


Ready to ship
Further links
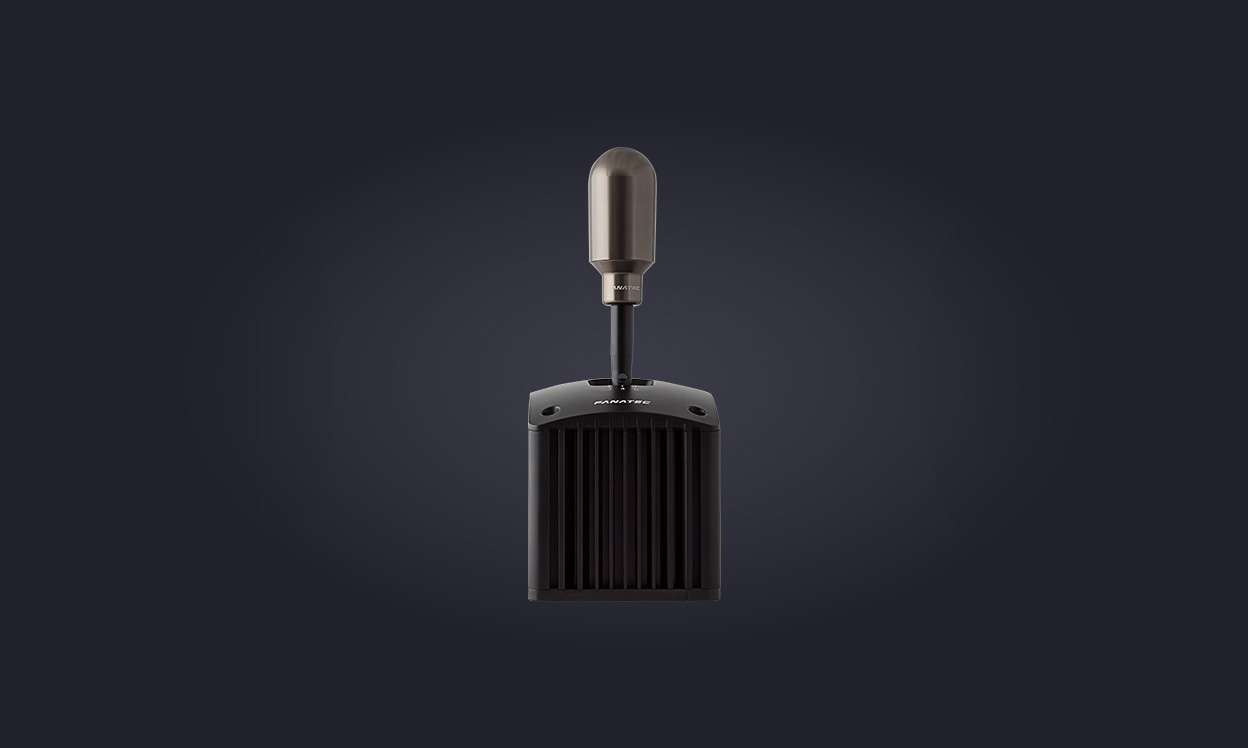
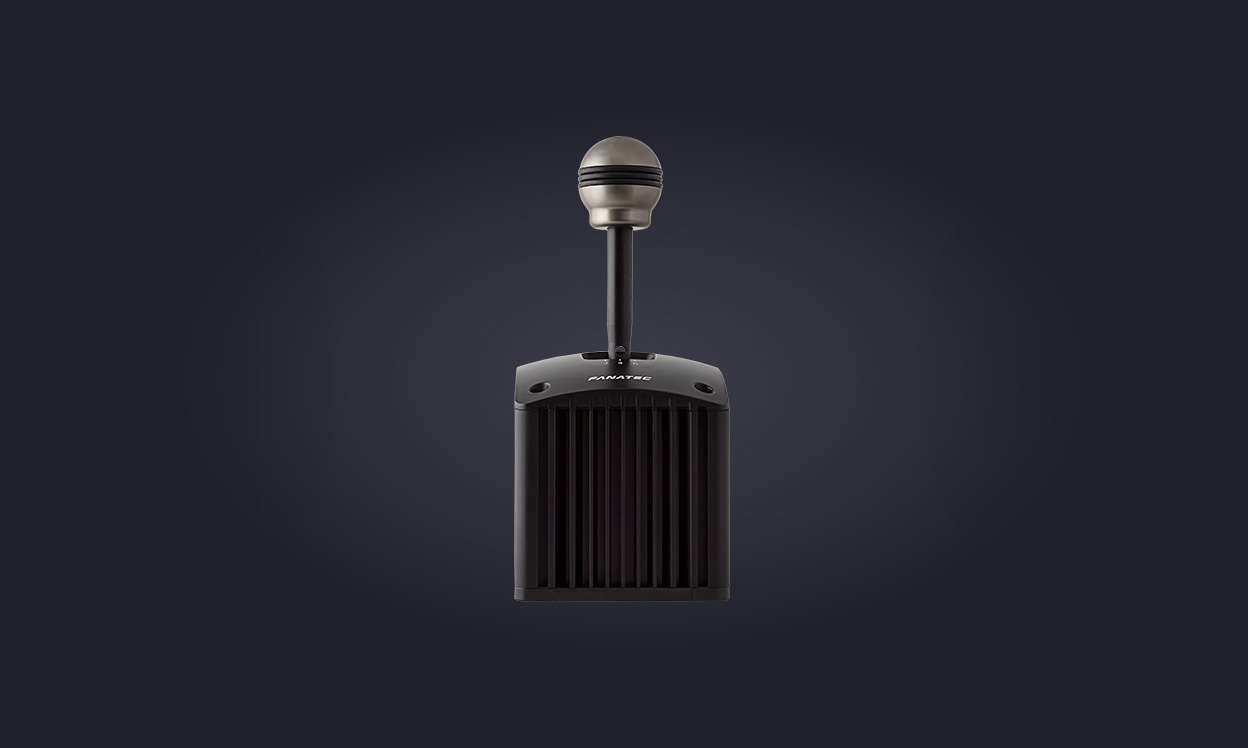
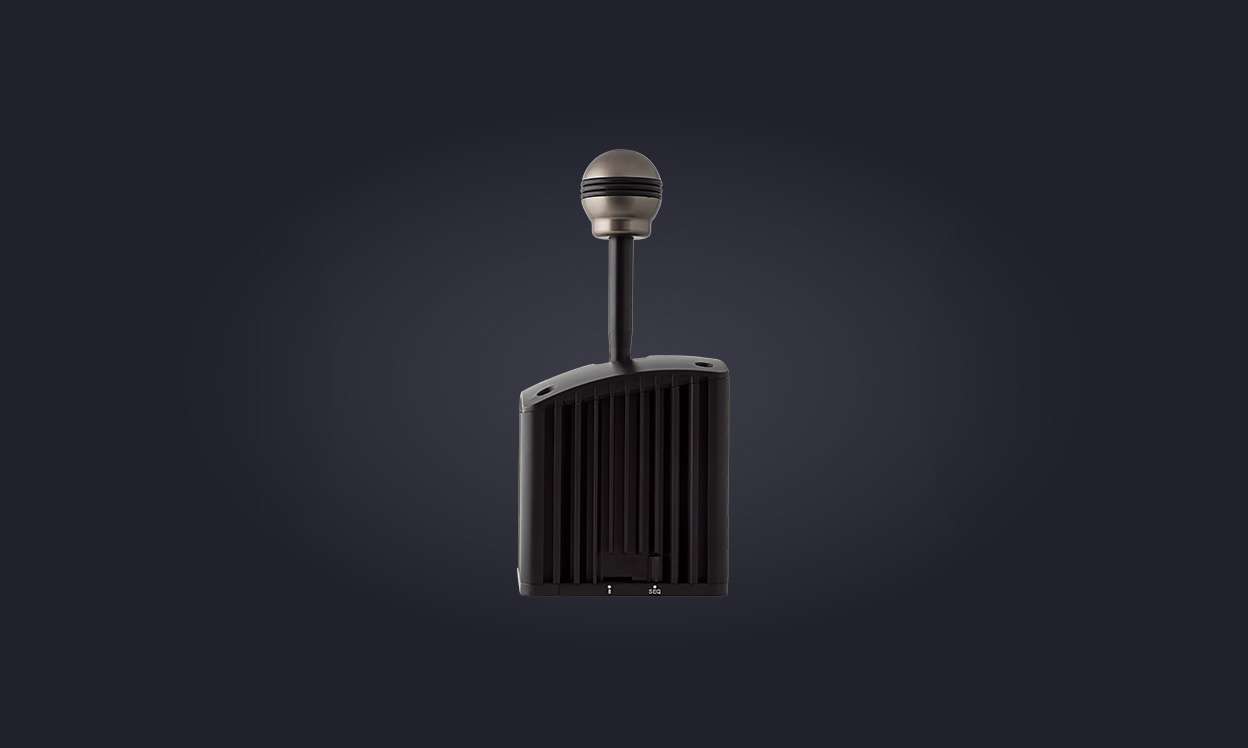
Features
- Full metal construction
- Ultra realistic shifting experience
- 7 gear H-Pattern mode
- Reverse gear with inhibitor to prevent accidental shifts and makes handling it, more realistic
- Very realistic sequential mode with strong haptic feedback
- Easy to switch between sequential and H-Pattern mode
- Shifter knob made of solid polished aluminum
- Exchangeable gear knob, compatible to popular automotive standards
- Adjustable shift feeling and resistance
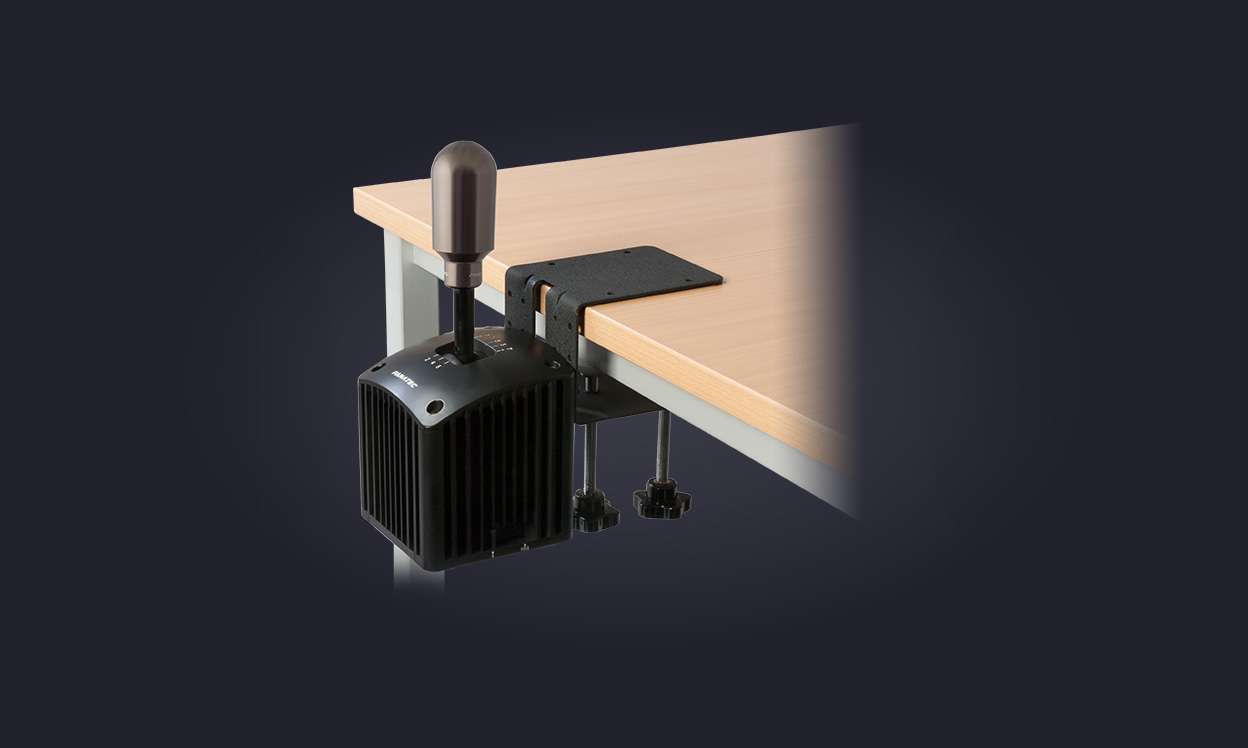
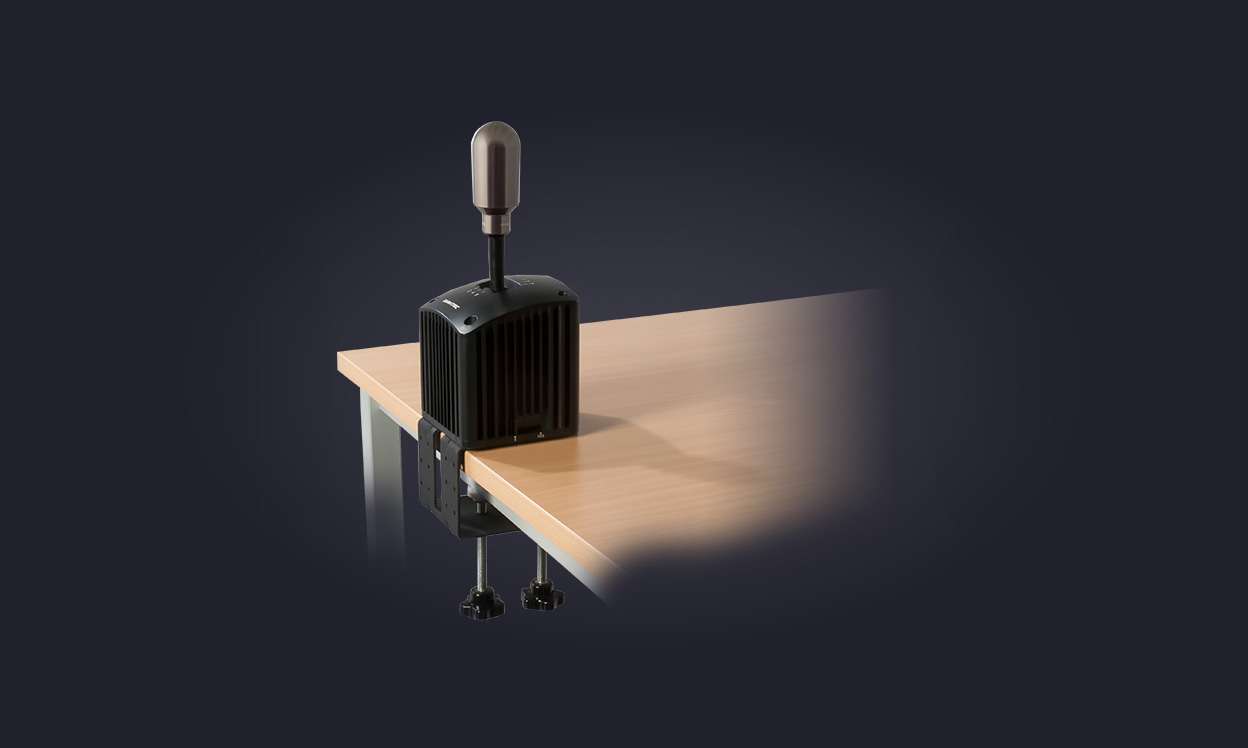
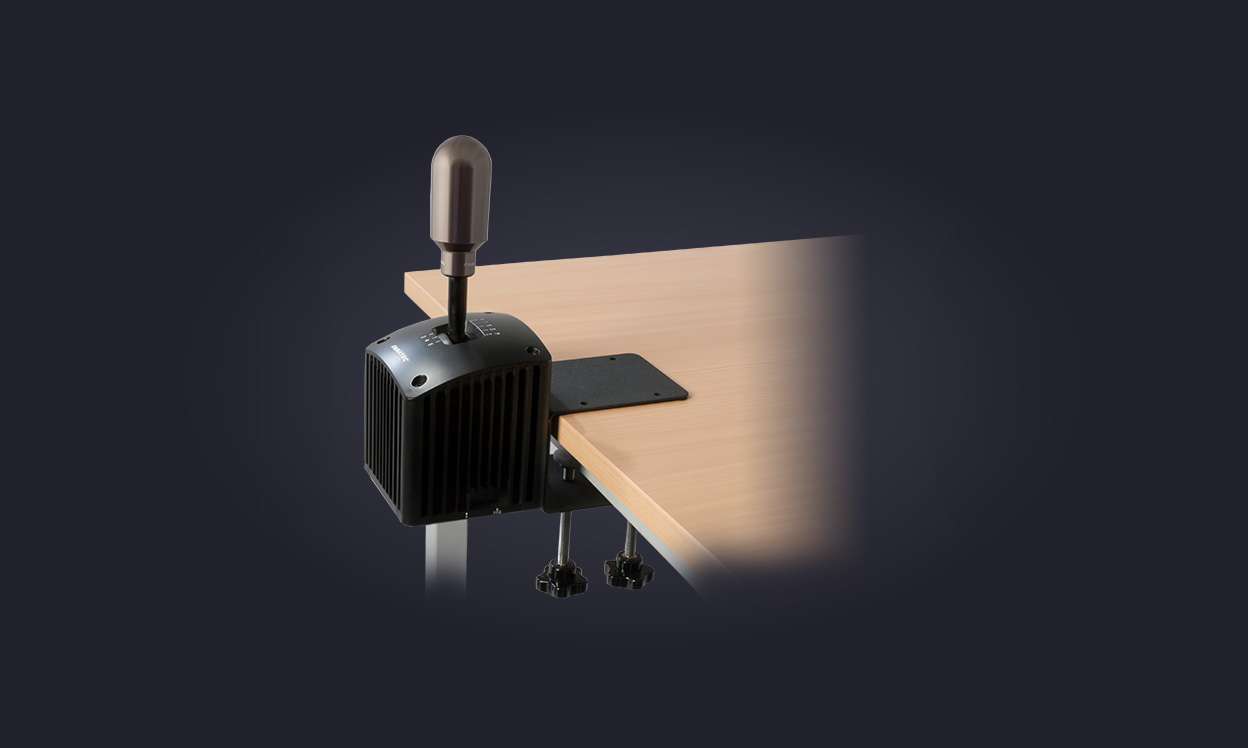
- Multiple mounting options on all 4 sides and bottom
Compatibility
Platforms
- PC: The ClubSport Shifter SQ will work in most games, if connected to a Fanatec product with shifter port. Please check the compatibility details on the product page of the connected product.
- Consoles: The ClubSport Shifter SQ can be used on gaming consoles in games that support shifters, if connected through a Fanatec Wheel Base / Racing Wheel. Please check the information on the product page of the Fanatec product through which it will be connected to the console. It will not work on consoles using the ClubSport USB Adapter.
Peripherals
IMPORTANT: To operate the ClubSport Shifter SQ you must connect it with either one of the following products:
- Compatible to all Fanatec Wheel Bases / Racing Wheels
- ClubSport USB Adapter (optional!): with the adapter you can use it on PC with any racing wheel of any brand (e.g. Logitech G29 / G920, Thrustmaster TX), in many games. For more details, see the product page of the ClubSport USB Adapter
Special Notes
- IMPORTANT: This product can be operated when connected to a Fanatec Wheel Base or as a standalone device on PC using the ClubSport USB adapter.
- 7th gear only detected if the shifter is connected to a ClubSport / CSL Elite Wheel Base or with the ClubSport USB Adapter
Packaging Details
- Dimensions (L x W x H) 38cm x 23cm x 18cm
- Weight 3.28kg
- Volume weight 3.15kg
What's included
- ClubSport Shifter SQ
- H-knob
- Sequential knob
- 2 x connector cables
- PS/2 - RJ12 40cm (15.75 Inch)
- RJ12 - RJ12 115cm (45.25 Inch)
- RJ12 - RJ12 40cm (15.75 Inch)
Technical Specifications
- Platform PC, PS4 Ready, XBox One Ready
- USB Connectivity With optional adapter
- Knobs H-knob, Sequential knob
- Shifter mode 7-speed H-pattern + reverse, Sequential
- Adjustability Resistance, Shift feeling
- Hardmount On all sides
Driver (for PC)
You will have to plug the shifter into a compatible Fanatec product with dedicated shifter port by RJ12 cable connection. Following this, there are no individual drivers for this shifter and the driver of the Fanatec product it are connected to will also support it. Please check and download the concerned driver, e.g. for your Fanatec wheel.
Drilling template - additional information:
1. When printing the Drilling Template at home, please make sure that the print size is 100% (file size = print size). Therefore deactivate "automatic page scaling" in the print dialog for example.
2. Before drilling the holes, please check if the hole marks on your printed Drilling Template fit to the screw holes of your pedals.
Before first use the H-gated shifter must be calibrated to work properly. The calibration has to be done only once and will be saved in the firmware but it will be deleted after a firmware update. Please do it again after the wheel is updated/flashed.
1. Connect the H-gated shifter to "shifter port 1" of your wheel
2. Power the wheel on
3. Wait until auto-calibration and boot sequence are finished
4. Press "Tuning Button" + "Start Button" simulanously (the position of these buttons may vary depending on the CSW rim you are using!)
Display will show G_n
5. Move the shifter into neutral position and press "Start Button"
Display will show G_r
6. Move the shifter into reverse gear position (push stick to the very left position and up) and press "Start Button"
Display will show G_1
7. Move the shifter into first gear position and press "Start Button"
Display will show G_2
8. Move the shifter into second gear position and press "Start Button"
Display will show G_3
9. Move the shifter into third gear position and press "Start Button"
Display will show G_4
10. Move the shifter into fourth gear position and press "Start Button"
Display will show G_5
11. Move the shifter into fith gear position and press "Start Button"
Display will show G_6
12. Move the shifter into sixth gear position and press "Start Button"
Display will show G_7
13.1 Move the shifter into seventh gear position and press "Start Button"
13.2 If your Shifter does not have a 7th gear keep the shifter in 6th position and press "Start Button"
Display will turn off again -> Calibration done!
The best way to check the calibration is to open the driver menu on PC to check if the right gears are engaged. If the game on PC still does not shift into the right gears please check the ingame button mapping! You can also see the process in our Video Manual:
Avant la première utilisation, le levier de vitesses en H (7GS) doit être calibré pour fonctionner correctement. L'étalonnage ne doit être effectué qu'une seule fois et sera sauvegardé dans le firmware. Cependant, il sera supprimé après toute mise à jour du firmware. Veuillez l'effectuer de nouveau après la mise à jour du volant.
Bevor die H-Schaltung verwendet werden kann, muss diese auf ihrem Lenkrad kalibriert werden. Die Kalibrierung muss nur ein mal durchgeführt werden und wird dann in der Firmware gespeichert. Nach einem Update der Firmware muss der Prozess nochmal durchgeführt werden. Vor der ersten Verwendung bzw. nach einem Firmware Update, führen sie bitte folgende Schritte durch:
1. Verbinden sie den H-Shifter mit dem "Shifter Port 1" ihres Lenkrades.
2. Schalten sie das Lenkrad ein
3. Warten sie bis die Boot- und Auto-Kalibrierungssequenz abgeschlossen ist.
4. Drücken sie "Tuning Button" + "Start Button" gleichzeitig. (Die Position dieser Tasten varriiert je nach Wheel Rim)
Das Display zeigt G_n
5. Bewegen sie den Shifter in die neutrale Position und drücken sie den "Start Button"
Das Display zeigt G_r
6. Bewegen sie den Shifter in die Position des Rückwärtsgangs (drücken sie die H-Schaltung ganz nach links und hoch) und drücken sie den "Start Button"
Das Display zeigt G_1
7. Bewegen sie den Shifter in den ersten Gang und drücken sie den "Start Button"
Das Display zeigt G_2
8. Bewegen sie den Shifter in den zweiten Gang und drücken sie den "Start Button"
Das Display zeigt G_3
9. Bewegen sie den Shifter in den dritten Gang und drücken sie den "Start Button"
Das Display zeigt G_4
10. Bewegen sie den Shifter in den vierten Gang und drücken sie den "Start Button"
Das Display zeigt G_5
11. Bewegen sie den Shifter in den fünften Gang und drücken sie den "Start Button"
Das Display zeigt G_6
12. Bewegen sie den Shifter in den sechsten Gang und drücken sie den "Start Button"
Das Display zeigt G_7
13.1 Bewegen sie den Shifter in den siebten Gang und drücken sie den "Start Button"
13.2 Wenn ihr Shifter keinen siebten Gang hat, belassen sie den Schalthebel in der Position des sechsten Gangs und drücken sie den "Start Button"
Das Display schaltet in das Tuning Menu -> Die Kalibrierung ist abgeschlossen!
Sie können auch im Video Manual sehen wie sich dieser Vorgang ausführen lässt:
最初に H-ゲート shifterを使用する前にはかならずきゃりぶレーションが必要となります。. キャリブレーションは一回のみ行う必要がありますが、情報がfirmwareに保存されるため、firmwareを更新 / フラッシュした場合には削除されます。 その場合再度The calibrationを行ってください。
1. H-gated shifter を をあなたのステアリングコントローラ"shifter port 1"に接続
2. ステアリングコントローラ電源オン
3. 自動キャリブレーションと自動シーケンスが完了まで待つ
4. "Tuning Button" + "Start Button"を同時に押す。(お使いのCSW rim によってこれらのボタンの位置は異なります。)
Display表示は G_n
5. シフターを へ移動して "Start Button"を押す
Display表示は G_r
6. シフターをリバース位置へ移動して(シフタースティックを押して左に合わせて上へ移動) の上 "Start Button"を押す
Display表示はG_1
7. シフターを first gear position へ移動して"Start Button"を押す。
Display表示はG_2
8. Mシフターを second gear position へ移動して"Start Button"を押す。
Display表示は G_3
9. シフターを Third gear position へ移動して"Start Button"を押す。
Display表示は G_4
10. シフターを fourth gear position へ移動して"Start Button"を押す。
Display表示は G_5
11. シフターを fith gear position へ移動して"Start Button"を押す。
Display表示はG_6
12. シフターを sixth gear position and press "Start Button"
Display表示はG_7
13.1 シフターを seventh gear position へ移動して"Start Button"を押す。
13.2 もしシフターに 7th gearがない場合 6th positionに入れたままで "Start Button"を押す
Display表示が消える -> キャリブレーション 完了!
もっともよいキャリブレーションのチェックの方はPCのドライバーメニューを開いて正しいギアが選択されているか確認すること。もしまだPCゲームでギア選択がうまくいかない場合 ゲームの中のマッピングボタンを確認してください。このプロセスはビデオマニュアルでも確認できます。
Which dimension does the shifter knob mounting thread of the ClubSport Shifter (SQ) have? The dimensions of the thread are M12x1.5 20mm with a 1.5mm thread pitch.
NOTE: Some aftermarket shifter knobs may have a thread pitch of 1.75 mm. Please be sure that the shifter knob you wish to use has a thread pitch of 1.5 mm.
Il s'agit d'un filetage de vis M12x1,5 de 20 mm pour monter diverses poignées de changement de vitesse. Ici, 1,5 mm est le pas de filetage.
REMARQUE : Certaines poignées de changement de vitesse après-vente peuvent avoir un pas de filetage de 1,75 mm. Par conséquent, il est important de s'assurer du pas de filetage qui doit être de 1,5 mm.
¿Qué dimensión tiene la rosca de montaje de la perilla de cambio de la palanca de cambios ClubSport Shifter (SQ)?
Es una rosca de tornillo M12x1.5 de 20 mm para montar varias perillas de cambio. Aquí, el paso del hilo es de 1,5 mm.
NOTA: Algunas perillas de cambio del mercado de postventa pueden tener un paso de rosca de 1,75 mm. Por lo tanto, es importante estar seguro de que el paso de la rosca que debe ser de 1,5 mm.
Der CSS (SQ) verfügt über M12x1,5 20 mm Gewinde, um die Montage verschiedener Knäufe zu ermöglichen. Der Wert 1,5 gibt die Gewindesteigung an.
CSS(SQ)ノブのねじ寸法
ClubSport Shifter(SQ)のシフターノブ取り付けネジはどの寸法ですか?
各種シフターノブを取り付けるためのM12x1.520mmネジ山です。ここで、1.5mmはねじピッチです。
注:一部のアフターマーケットシフターノブのネジピッチは1.75mmです。したがって、ねじピッチは1.5mmでなければならないことを確認することが重要です。
The ClubSport Shifter (CSS) and the ClubSport Shifter V1.5 (7GS) require calibration prior to first use in order to ensure proper shifter detection of each of the gears.
The calibration will be automatically prompted by the wheelbase if it is already powered on when the shifter is connected via the RJ12 cable. You can identify this by the shifter calibration message which will appear on the steering wheel screen.
If you are not prompted to perform the calibration, or if you want to start it manually, please press the shifter calibration button combination on the steering wheel you currently have. The button combination for each wheel and the procedure itself can be found in the shifter’s manual or can be seen in this video:
→ https://www.youtube.com/watch?v=N80GNV3VpO4
The calibration will be prompted by the wheel base after every firmware update. Please note that the 7th (locked) gear of the ClubSport Shifter is not supported by Porsche and CSR Wheels!
Le ClubSport Shifter (CSS) et le ClubSport Shifter V1.5 (7GS) nécessitent un calibrage avant la première utilisation afin de garantir une détection correcte du levier de vitesses de chacune des vitesses.
Le calibrage sera automatiquement demandé par la roue si elle est déjà sous tension lorsque le levier de vitesses est connecté via le câble RJ12. Vous pouvez l'identifier par le message de calibration du levier de vitesses qui apparaîtra sur l'écran du volant.
Si vous n'êtes pas invité à effectuer le calibrage, ou si vous souhaitez le démarrer manuellement, veuillez appuyer sur la combinaison de boutons de calibrage du levier de vitesses sur le volant que vous possédez actuellement. La combinaison de boutons pour chaque roue et la procédure elle-même se trouvent dans le manuel du levier de vitesses ou peuvent être vues dans cette vidéo:
→ https://www.youtube.com/watch?v=N80GNV3VpO4
Le calibrage sera demandé par la roue après chaque mise à jour du firmware. Veuillez noter que la 7e vitesse (verrouillée) du ClubSport Shifter n'est pas prise en charge par Porsche et roues CSR !
Las palancas de velocidades ClubSport Shifter (CSS) y ClubSport Shifter V1.5 (7GS) requieren ser calibradas antes de ser utilizadas por primera vez para asegurar que las velocidades son detectadas correctamente.
La calibración será sugerida automáticamente por la base de volante si ya está encendida cuando la palanca de cambios sea conectada a través del cable RJ12. Puede identificar esto por el mensaje de calibración de la palanca de cambios que aparecerá en la pantalla del volante.
Si no le pide que realice la calibración, o si desea iniciarla manualmente, presione la combinación de botones de calibración de la palanca de cambios en el volante que este usando. La combinación de botones para cuada volante y el procedimiento en sí, se puede encontrar en el manual de la palanca de cambios o también lo puede ver en este video:
→ https://www.youtube.com/watch?v=N80GNV3VpO4
La calibración será asugerida por la base de volante después de cada actualización de firmware. Tenga en cuenta que la séptima velocidad (bloqueada) de la palanca de cambios ClubSport, no es compatible con bases Porsche y CSR wheels.
Il ClubSport Shifter (CSS) e il ClubSport Shifter V1.5 (7GS) richiedono la calibrazione prima dell’utilizzo per garantire il corretto rilevamento del cambio di ciascuna delle marce.
La calibrazione verrà richiesta automaticamente dalla base del volante se è già accesa quando il cambio è collegato tramite il cavo RJ12. Questo si puo’ identificare dal messaggio di calibrazione del cambio che apparirà sullo schermo del volante.
Se non viene richiesto di eseguire la calibrazione o se si desidera avviarla manualmente, premere la combinazione di pulsanti di calibrazione del cambio sul volante che si possiede attualmente. La combinazione di pulsanti per ciascuna ruota e la procedura stessa possono essere trovati nel manuale del cambio o possono essere visti in questo video:
→ https://www.youtube.com/watch?v=N80GNV3VpO4
La calibrazione verrà richiesta dalla base del volante dopo ogni aggiornamento del firmware. Si prega di notare che la 7a marcia (bloccata) del cambio ClubSport non è supportata da Porsche e CSR Wheels!
Der ClubSport Shifter (CSS) und der ClubSport Shifter V1.5 (7GS) müssen vor der ersten Verwendung kalibriert werden, um eine korrekte Erkennung der einzelnen Gänge durch den Shifter zu gewährleisten.
Die Kalibrierung wird automatisch von der Wheel Base veranlasst, wenn diese bereits eingeschaltet ist, wenn der Shifter über das RJ12-Kabel angeschlossen wird. Sie erkennen dies an der Meldung "Shifter-Kalibrierung", die auf dem Bildschirm des Lenkrads angezeigt wird.
Wenn Sie nicht aufgefordert werden, die Kalibrierung durchzuführen, oder wenn Sie sie manuell starten möchten, drücken Sie bitte die Tastenkombination für die Shifter-Kalibrierung an dem Lenkrad, das Sie gerade nutzen. Die Tastenkombination für jedes Rad und die Prozedur selbst finden Sie in der Anleitung des Shifters oder können Sie in diesem Video sehen:
→ https://www.youtube.com/watch?v=N80GNV3VpO4
Die Kalibrierung wird nach jedem Firmware-Update von der Wheel Base abgefragt. Bitte beachten Sie, dass der 7. (gesperrte) Gang des ClubSport Shifters von Porsche und CSR Wheels nicht unterstützt wird!
You can use the Clubsport USB Adapter in Shifter, Handbrake, or Pedal mode. The video tutorial below shows you how to flash the right firmware, and illustrates how to calibrate the shifter afterwards:
→ https://www.youtube.com/watch?v=Ds5BlhljDKQ
The ClubSport Shifter needs to be calibrated before its first use, regardless of connection (USB Adapter, Wheel Base). The calibration will be stored inside the connection device, and not inside of the shifter. After the firmware of a wheel base or of the ClubSport USB Adapter is updated, the calibration will have to be done once again.
Vous pouvez utiliser l'adaptateur USB Clubsport en mode levier de vitesses, Frein à main ou Pédale. Cette vidéo tutorial vous montre comment flasher le bon firmware et explique comment calibrer le levier de vitesses par la suite :
https://www.youtube.com/watch?v=X-7oax-pNPk
Le ClubSport Shifter doit être calibré avant la première utilisation, quel que soit l'appareil auquel vous le connectez (adaptateur USB, Roue). Le calibrage sera stocké à l'intérieur de cet appareil et non à l'intérieur du levier de vitesses. Après la mise à jour du micrologiciel d'une roue ou du ClubSport Shifter, le calibrage devrait être refait.
Usted puede utilizar el adaptador Clubsport USB Adapter con la modalidad de palanca de cambios, freno de mano o pedales. En el siguiente video tutorial se muestra cómo flashear el firmware correctamente y cómo calibrar la palanca de cambios después:
https://www.youtube.com/watch?v=X-7oax-pNPk
La palanca de cambios ClubSport Shifter necesita ser calibrada antes de ser utilizada por primera vez, sin importar a que dispositivo lo esté conectado (adaptador USB o base de volante). La calibración se almacenará dentro de este dispositivo y no dentro de la palanca de cambios. Después de actualizar el firmware de una base de volante, es necesario realizar una vez más la calibración.
Der ClubSport USB Adapter verfügt über einen Shifter-, Handbrems- und auch einen Pedal-Modus. Die unten verlinkte Videoanleitung zeigt, wie der richtige Modus ausgewählt wird und wie im Anschluss der ClubSport Shifter kalibriert werden soll:
→ https://www.youtube.com/watch?v=_aU9-bTzGU8
Vor Inbetriebnahme muss der ClubSport Shifter einmalig kalibriert werden. Die Kalibrierung wird jeweils im USB Adapter oder in der Wheel Base abgespeichert.
Eine erneute Kalibration vom Shifter muss durchgeführt werden, sobald die Firmware für die Wheel Base oder dem USB Adapter aktualisiert wurde.
All Porsche and CSR Wheels do not support the 7th (locked) gear of the ClubSport Shifter shifter. Only the ClubSport Wheel and later products will support all gears of the ClubSport Shifter. Sadly this cannot be solved by a new firmware. The gears R-6 can be used perfectly normal on all Fanatec CSR and Porsche Wheels on any platform.
On the Playstation 3 the 7th gear is not supported in general.
Alle Porsche und CSR Wheels unterstützen den (verriegelten) 7. Gang des CSS (SQ) leider nicht. Nur das ClubSport Wheel und spätere Produkte unterstützen alle Gänge des ClubSport Shifters. Leider kann dies nicht durch ein Firmware Update gelöst werden. Die Gänge R-6 können auf allen Porsche und CSR Wheels auf allen Plattformen normal verwendet werden.
Auf der Playstation 3 wird der 7. Gang generell nicht unterstützt.
全てのPorsche 及び CSR ステアリングコントローラー では ClubSport Shifterの7th (ロックド) ギア をサポートしません。. ClubSports とそれ以降の 商品がwillClubSport Shifterのすべてのギアをサポートします。この問題は残念ながらfirmware更新では解決できません。 R-6ギア に関してはすべての プラットフォーム上のFanatec CSR、Porsche ステアリングコントローラー.で問題なく使用可能となっております。
Playstation 3 では7thギアは一般的にサポートされません。
8. February 2014:
The reverse gear does not get properly detected in games after the CSS (SQ) was properly calibrated in the driver window. We need to update the firmware to resolve the problem. Right now we prepare a new driver, a new firmware and an updater-tool to flash the ClubSport USB adapter as easily as possible. We hope that the software can be released within the next two weeks.
This FAQ article will be updated and the files will be uploaded to the download section of the ClubSport USB adapter.
Update - 13. February 2014:
A new beta driver has been released which contains a firmware updater to solve the issue. Please check this FAQ article to get the file:
FAQ article - latest beta driver
8. Februar 2014:
Der Rückwärtsgang wird in Spielen nicht richtig erkannt nachdem der CSS (SQ) im Treiberfenster ordnungsgemäß kalibriert wurde. Um das Problem zu beheben wird eine neue Firmware nötig sein. Aktuell wird ein neuer Treiber, die neue Firmware und ein Updater-Tool vorbereitet, damit der ClubSport USB Adapter einfach aktualisiert werden kann. Wir hoffen diese Software innerhalb der nächsten zwei Wochen bereitstellen zu können.
Dieser FAQ Artikel wird aktualisiert werden und die Dateien werden in den Downloadbereich des ClubSport USB Adapters hochgeladen.
13. Februar 2014:
Ein neuer Beta-Treiber wurde veröffentlicht welcher ein Firmware Update für den USB Adapter enthält und das Problem löst. Bitte folgen sie diesem Link um die Software zu erhalten:
FAQ Artikel - aktuellster Beta Treiber
Before first use the H-gated shifter (CSS & 7GS) must be calibrated to work properly. The calibration has to be done only once and will be saved in the firmware but it will be deleted after a firmware update. Please do it again after the wheel is updated/flashed.
This procedure is also explained (incl. pictures) in the full downloadable manual of the product!
1. Connect the shifter to the shifter port of your wheel
2. Power the wheel on
3. Set the wheel into PC mode (press "Back" Button)
USB cable must be connected to engage the PC mode. For calibration you can connect the USB cable also to the Xbox 360 but the cable will NOT be needed later on for playing.
4. Press "Tuning Button" + "Start Button" simulanously
Display will show G_n
5. Move 7GS (shifter) into neutral position and press "Start Button"
Display will show G_r
6. Move 7GS into reverse gear position (push stick to the very left position and up) and press "Start Button"
Display will show G_1
7. Move 7GS into first gear position and press "Start Button"
Display will show G_2
8. Move 7GS into second gear position and press "Start Button"
Display will show G_3
9. Move 7GS into third gear position and press "Start Button"
Display will show G_4
10. Move 7GS into fourth gear position and press "Start Button"
Display will show G_5
11. Move 7GS into fith gear position and press "Start Button"
Display will show G_6
12. Move 7GS into sixth gear position and press "Start Button"
Display will turn off again -> Calibration done!
The best way to check the function of the 7GS is the driver Window on PC. Just open the Fanatec Wheel propeties page and check if the right gears are shown in sofware when you shift through the gears. In PC games you will have to map the gears to the proper controls in the game menu.
Avant la première utilisation, le levier de vitesses en H (7GS) doit être calibré pour fonctionner correctement. L'étalonnage ne doit être effectué qu'une seule fois et sera sauvegardé dans le firmware. Cependant, il sera supprimé après toute mise à jour du firmware. Veuillez le faire de nouveau après mise à jour du volant.
Bevor sie die H-Schaltung das Erste mal verwenden können, muss diese Kalibriert werden. Dieser Vorgang muss nur ein mal gemacht werden und die Einstellung wird dann in der Firmware gespeichert. Nach einem Firmware Update muss dies, sowie die "Wheel Center Kalibrierung", nochmals durchgeführt werden.
0. Bitte stecken sie den ClubSport oder 7GS Shifter an den Shifter Port ihres Lenkrades.
1. Bitte verbinden sie das Lenkrad mit dem Stromanschluss und schalten sie es ein.
2. Wenn "- - -" angezeigt wird, setzen sie das Lenkrad in den PC Modus. (Dazu muss ein USB Kabel angeschlossen sein. Falls sie keinen PC haben, können sie das Lenkrad auch an die Xbox 360 anschließen. Zum Spielen wird dieses Kabel dann nicht gebraucht und kann nach der Kalibrierung wieder abgesteckt werden.)
3. Befolgen sie bitte folgende Schritte:

Before first use the H-gated shifter (7GS or CSS) must be calibrated to work properly. The calibration has to be done only once and will be saved in the firmware but it will be deleted after a firmware update. Please do it again after the wheel is updated/flashed.
1. Connect the shifter to the shifter port of your wheel
2. Power the wheel on
3. Set the wheel into PC mode (press "Back" Button)
USB cable must be connected to engage the PC mode. For calibration you can connect the USB cable also to the Xbox 360 but the cable will NOT be needed later on for playing.
4. Press "Tuning Button" + "Start Button" simulanously
Display will show G_n
5. Move 7GS (shifter) into neutral position and press "Start Button"
Display will show G_r
6. Move 7GS into reverse gear position (push stick to the very left position and up) and press "Start Button"
Display will show G_1
7. Move 7GS into first gear position and press "Start Button"
Display will show G_2
8. Move 7GS into second gear position and press "Start Button"
Display will show G_3
9. Move 7GS into third gear position and press "Start Button"
Display will show G_4
10. Move 7GS into fourth gear position and press "Start Button"
Display will show G_5
11. Move 7GS into fith gear position and press "Start Button"
Display will show G_6
12. Move 7GS into sixth gear position and press "Start Button"
Display will turn off again -> Calibration done!
You can also see the process in our Video Manual. The process works identically on CSR and CSR Elite Wheels.
Avant la première utilisation, le levier de vitesses en H (7GS) doit être calibré pour fonctionner correctement. L'étalonnage ne doit être effectué qu'une seule fois et sera sauvegardé dans le firmware. Cependant, il sera supprimé après toute mise à jour du firmware. Veuillez le faire de nouveau après mise à jour du volant.
Vous pouvez également visionner le processus dans notre manuel vidéo. Le processus fonctionne de manière identique sur les volants CSR et CSR Elite.
Bevor die H-Schaltung (7GS oder CSS) verwendet werden kann, muss diese auf ihrem Lenkrad kalibriert werden. Die Kalibrierung muss nur ein mal durchgeführt werden und wird dann in der Firmware gespeichert. Nach einem Update der Firmware muss der Prozess nochmal durchgeführt werden. Vor der ersten Verwendung bzw. nach einem Firmware Update, führen sie bitte folgende Schritte durch:
1. Verbinden sie den Shifter mit dem Shifter-Port ihres Lenkrades.
2. Schalten sie das Lenkrad ein
3. Setzen sie das Lenkrad in dem PC Modus ("Back" Button muss ca. eine Sekunde gedrückt werden )
Ein USB Kabel muss mit dem Lenkrad verbunden sein um den PC Modus zu aktivieren. Dafür kann das Lenkrad auch per USB an die Xbox 360 angeschlossen werden. Diese Kabel ist zum Spielen an der Konsole später nicht notwendig.
4. Drücken sie "Tuning Button" + "Start Button" gleichzeitig
Das Display zeigt G_n
5. Bewegen sie den 7GS in die neutrale Position und drücken sie den "Start Button"
Das Display zeigt G_r
6. Bewegen sie den 7GS in die Position des Rückwärtsgangs (drücken sie die H-Schaltung ganz nach links und hoch) und drücken sie den "Start Button"
Das Display zeigt G_1
7. Bewegen sie den 7GS in den ersten Gang und drücken sie den "Start Button"
Das Display zeigt G_2
8. Bewegen sie den 7GS in den zweiten Gang und drücken sie den "Start Button"
Das Display zeigt G_3
9. Bewegen sie den 7GS in den dritten Gang und drücken sie den "Start Button"
Das Display zeigt G_4
10. Bewegen sie den 7GS in den vierten Gang und drücken sie den "Start Button"
Das Display zeigt G_5
11. Bewegen sie den 7GS in den fünften Gang und drücken sie den "Start Button"
Das Display zeigt G_6
12. Bewegen sie den 7GS in den sechsten Gang und drücken sie den "Start Button"
Das Display schaltet sich ab -> Die Kalibrierung ist abgeschlossen!
Sie können auch im Video Manual sehen wie sich dieser Vorgang ausführen lässt. Dies funktioniert gleichermaßen auf CSR und CSR Elite Lenkrädern:
Before first use the H-gated shifter (7GS & CSS) must be calibrated to work properly. The calibration has to be done only once and will be saved in the firmware but it will be deleted after a firmware update. Please do it again after the wheel is updated/flashed.
1. Connect the shifter to the shifter port of your wheel
2. Connect the Wheel-USB cable to your PC/PS3
3. Power the wheel on
4. Press "Tuning Button" + "Start Button" simulanously
Display will show G_n
5. Move 7GS (shifter) into neutral position and press "Start Button"
Display will show G_r
6. Move 7GS into reverse gear position (push stick to the very left position and up) and press "Start Button"
Display will show G_1
7. Move 7GS into first gear position and press "Start Button"
Display will show G_2
8. Move 7GS into second gear position and press "Start Button"
Display will show G_3
9. Move 7GS into third gear position and press "Start Button"
Display will show G_4
10. Move 7GS into fourth gear position and press "Start Button"
Display will show G_5
11. Move 7GS into fith gear position and press "Start Button"
Display will show G_6
12. Move 7GS into sixth gear position and press "Start Button"
Display will turn off again -> Calibration done!
The best way to check the function of the 7GS is the driver Window on PC. Just open the Fanatec Wheel propeties page and check if the right gears are shown in sofware when you shift through the gears. In PC games you will have to map the gears to the proper controls in the game menu.
Avant la première utilisation, le levier de vitesses en H (7GS) doit être calibré pour fonctionner correctement. L'étalonnage ne doit être effectué qu'une seule fois et sera sauvegardé dans le firmware. Cependant, il sera supprimé après toute mise à jour du firmware. Veuillez le faire de nouveau après mise à jour du volant.
Bevor sie die H-Schaltung (7GS oder CSS) das Erste mal verwenden können, muss diese Kalibriert werden. Dieser Vorgang muss nur ein mal gemacht werden und die Einstellung wird dann in der Firmware gespeichert. Nach einem Firmware Update muss dies, sowie die "Wheel Center Kalibrierung", nochmals durchgeführt werden.
0. Bitte stecken sie den 7GS oder CSS an den Shifter Port ihres Lenkrades.
1. Bitte verbinden sie das Lenkrad mit ihrem PC (USB) oder der PS3. Schalten sie ihr GT3V2 nun ein.
2. Im PC Modus. Befolgen sie bitte folgende Schritte:
Sie können die Korrekte Kalibrierung nun im PC Treiber überprüfen.


