MANUAL | QUICK START GUIDE
ClubSport Pedals V3

The Difference
Between Ordinary and Extra Ordinary
Is That Little ‘Extra’
Manual
To get the most out of your ClubSport Pedals V3, please read this manual before first use. It contains important health and safety information and should be retained for future reference.
Index
- General
2. Introduction
3. Compatibility
4. Preparation
4.1 Package contents
4.2 Tools
4.3 Part list ClubSport Pedals V3
5. Assembly
5.1 Plan your configuration
5.2 Mounting the ClubSport Pedals V3
5.3 Connections
5.4 Exchanging the pedal plates
5.5 Assembly of pedal extensions
5.6 Stronger springs at throttle and clutch
6. ClubSport Pedals V3 Damper Kit
6.1 Package Content ClubSport Pedals V3 Damper Kit
6.2 Tools
6.3 ClubSport Pedals V3 Damper Kit assembly
7. ClubSport Pedals V3 Brake Performance Kit
7.1 Package Content ClubSport Brake Performance Kit
7.2 ClubSport Brake Performance Kit assembly
7.3 Hardness comparison
8. Drilling template
9. Function & features
9.1 Firmware and driver update
9.2 Start up procedure
9.3 Pedal auto calibration mode
9.4 Pedal manual calibration
10. Electrical operation
10.1 Hotkeys
11. Cleaning
12. Maintenance
13. Troubleshooting
14. Serial number
15. Trademarks
16. Ecology advice
17. FCC compliance
18. CE compliance
19. Warranty
WARNING!
Photosensitive Seizures
A small percentage of people may experience a seizure when exposed to certain visual images, including flashing lights or patterns that may appear in video games. Even people who have no history of seizures or epilepsy may have an undiagnosed condition that can cause these “photosensitive epileptic seizures” while watching video games. These seizures may have a variety of symptoms, including light-headedness, altered vision, eye or face twitching, jerking or shaking of arms or legs, disorientation, confusion, or momentary loss of awareness. Seizures may also cause loss of consciousness or convulsions that can lead to injury from falling down or striking nearby objects. Immediately stop playing and consult a doctor if you experience any of these symptoms. Parents should watch for or ask their children about the above symptoms – children and teenagers are more likely than adults to experience these seizures. The risk of photosensitive epileptic seizures may be reduced by taking the following precautions:
• Sit farther from the TV screen.
• Use a smaller TV screen.
• Play in a well-lit room.
• Do not play when you are drowsy or fatigued.
If you or any of your relatives have a history of seizures or epilepsy, consult a doctor before playing.
WARNING!
Musculoskeletal disorders
Use of game controllers, keyboards, mice, or other electronic input devices may be linked to serious injuries or disorders. When playing video games, as with many activities, you may experience occasional discomfort in your hands, arms, shoulders, neck, or other parts of your body. However, if you experience symptoms such as persistent or recurring discomfort, pain, throbbing, aching, tingling, numbness, burning sensation, or stiffness, DO NOT IGNORE THESE WARNING SIGNS. PROMPTLY SEE A QUALIFIED HEALTH PROFESSIONAL, even if symptoms occur when you are not playing a video game. Symptoms such as these can be associated with painful and sometimes permanently disabling injuries or disorders of the nerves, muscles, tendons, blood vessels, and other parts of the body. These musculoskeletal disorders (MSDs) include carpal tunnel syndrome, tendonitis, tenosynovitis, vibration syndromes, and other conditions.
While researchers are not yet able to answer many questions about MSDs, there is general agreement that many factors may be linked to their occurrence, including medical and physical conditions, stress and how one copes with it, overall health, and how a person positions and uses their body during work and other activities (including playing a video game). Some studies suggest that the amount of time a person performs an activity may also be a factor. If you have questions about how your own lifestyle, activities, or medical or physical condition may be related to MSDs, see a qualified health professional.
1. GENERAL
ATTENTION!
- The device must not be exposed to rain or humidity in order to avoid risk of fire and / or electric shock.
- Operating room temperature: 15°C - 35°C
- Excessive use may cause health risks. We recommend taking a 5 minute break after every 20 minutes of use, and to not drive for more than 2 hours per day.
- We strongly advise you to not drive a vehicle immediately after using a video game.
- Utilization of the vibration and Force Feedback function may cause damage to your health.
- In case of In interference with other wireless 2.4 GHz devices, the interfering devices must be removed or switched off.
- Not intended for children under the age of 6 years old. Contains small pieces. Danger of swallowing!
- Do not open the casing of the device.
- This device contains components that cannot be repaired by the user, opening will void the warranty
WARNING! Electrical Safety:
The CS Pedals V3 must be connected to the appropriate power source:
- For the used ClubSport Pedals V3 use only the cords that came with your ClubSport Pedals V3 or that you received from an authorized repair center.
- For the used ClubSport Pedals V3 do not use non-standard power sources, such as generators or inverters, even if the voltage and frequency appear acceptable. Only use power provided by PC USB port or wheel base port ‘Pedals’.
- To avoid damaging the ClubSport Pedals V3: Do not expose your ClubSport Pedals V3 to sources of heat.
- Do not try to use the ClubSport Pedals V3 with cords different from the cords packaged with the ClubSport Pedals V3 or received from authorized repair center.
- Unplug the power cord of your wheel base or disconnect the supply cord from ClubSport Pedals V3 to PC USB port during storms or when unused for long periods of time to protect also your ClubSport Pedals V3.
- If the ClubSport Pedals V3 becomes damaged in any way, stop using it immediately and contact Fanatec Customer Support.
GENERAL NOTES
- Additional peripheral devices like the Fanatec wheel bases, the ClubSport Handbrake and others which might be mentioned in this manual are not included within the ClubSport Pedals V3 package and sold separately.
- This manual explains a lot about assembly, connections and functions related to Fanatec wheel bases, other additional peripheral devices and also about PC or console functionalities but this manual is not a replacement for the manuals corresponding to the products! Read the quick guides or user manuals for the other products as well!
- All specifications in this document are subject to change. Especially the ClubSport Pedals V3 firmware, the wheel base firmware or the PC driver might be changed or updated to implement new features or for general improvements.
- The warranty does not include defects that are due to commercial use of the product. See chapter “Warranty” at the end of this user manual as well as the terms & conditions on www.fanatec.com for more details.
- Technical copying partially or full product and reverse engineering is explicitly prohibited! Violation might have legal consequences
2. INTRODUCTION
You have purchased an innovative product which enables you to make proper adjustments according to your personal driving style and behaviour for your advanced simracing experience. The ClubSport Pedals V3 provide high steering accuracy by DirectSensorTM (HALL) at throttle and clutch pedal as well as a 90kg Loadcell at the brake pedal, an adjustable brake pedal preload by screw built into a high quality metal construction.
Select the pedal extensions for longer pedal levers which can be used with the metal pedal plates as well as with the D-shape pedal plates for further personalization of the ClubSport Pedals V3 – all materials needed therefore are included in the ClubSport Pedals V3 package.
And if this is not yet enough: You can add also the ClubSport Pedals V3 Damper Kit to brake pedal and / or to throttle pedal. ClubSport Pedals V3 Damper Kit is not included in ClubSport Pedals V3 package and sold separately.
3. COMPATIBILITY
The ClubSport Pedals V3 (CSP V3) can be used with the ClubSport Wheel Base, the ClubSport Wheel Base V2, ClubSport Handbrake and other peripheral devices from the Fanatec ClubSport and CSL platform!
The ClubSport Pedals V3 can be used on PC by direct connection to USB port or by wheel base connection (wheel base to be connected to PC USB port) and consoles (only by connection to wheel base).
IMPORTANT: Before first use the ClubSport Pedals V3 must be updated
to the latest firmware version which is available on our website www.
fanatec.com/support. See chapter ‘Firmware and driver update’ for more
details! Also the firmware of your Fanatec wheel base and the PC driver
must be updated to the latest versions available on our website www.
fanatec.com/support.
4. PREPARATION
4.1 Package contents

1x CS Pedals V3


3x Pedal extension
3x D-shaped pedal plates


1x USB connection cable
1x RJ12 connection cable 1,5 m


1x strong spring throttle (long)
1x strong spring clutch (short)


4x spring guide
Mounting screws S1,
nuts N1 and washers W1
plus Lithium Grease and Quick Guide
4.2 Tools
The tools listed below are required:
- For assembly / exchange of pedal plates: Allen Key 4 mm
- For assembly of pedal extensions: Allen Key 4 mm, Wrench width 10 m
- For exchanging the throttle pedal spring: Allen Key 3 mm
- For assembly of ClubSport Pedals V3 Damper Kit (sold separately): Allen Key 1.5 mm, Allen Key 2.5 mm, Allen Key 4 mm
NOTE: Required tools are not included in ClubSport Pedals V3 package!
NOTE: Red screws of the ClubSport Pedals V3 must not be loosened.
4.3 Parts list ClubSport Pedals V3
| Part Number | Part Name | Number | Image | Description |
| S1 |
Screw M6 x 12 mm |
24 |  |
Screws for mounthing the pedal extensions and the D-shape pedal plates onto th epedal extensions |
| S2 |
Screw M6 x 16 mm |
6 |  |
Screws for mounting the metal pedal plates onto the pedal extensions |
| N1 |
Hexagon Nut M6 |
24 |  |
Nuts for mounting the pedal extensions and the pedal plates onto the pedal extensions |
| W1 |
Washer ID = 6 mm |
24 |  |
Washers for mounting the pedal extensions and the pedal plates onto the pedal extensions |
5. ASSEMBLY
5.1 Plan your configuration
Option 1: Connect your ClubSport Pedals V3 to the PC USB port. USB connection cable is included in ClubSport Pedals V3 package. This option is applicable only for use with PC, not applicable for use with consoles.
Option 2: Connect your ClubSport Pedals V3 to the ‘Pedals’ port of your Fanatec wheel base (e.g. ClubSport Wheel Base V2). RJ12 connection cable is included in ClubSport Pedals V3 package. This option is applicable for use with PC or consoles.
IMPORTANT: Use only the USB cable or the RJ12 cable which is packaged with your ClubSport Pedals V3 to avoid damages on the ClubSport Pedals V3 electronics!
Please check chapter ‘Connections’ to see which kind of peripheral devices have to be connected to which socket at the ClubSport Pedals V3.
Additional peripheral devices are not strictly required but will give the user a more similar feeling like driving a race car. We recommend using the ClubSport Handbrake and also the ClubSport Pedals V3 Damper Kit from the Fanatec ClubSport platform. Visit our Webshop at www.fanatec.com for more compatible products.
5.2 Mounting the ClubSport Pedals V3
To mount the ClubSport Pedals V3 to a rig by screws please find a drilling template fitting to the ClubSport Pedals V3 footprint as printable version in the download area of our website www.fanatec.com.
The drilling template also shows more detailed informations about the outline dimensions of ClubSport Pedals V3 with attached ClubSport Pedals V3 Damper Kit.
To assemble the ClubSport Pedals V3 to your rig insert the screw from bottom side through the feet and tighten with a nut from top side. This procedure requires to use a opensided wrench to hold the nuts while turning the screws with Allen Key or wrench, depending on used screw type.
NOTE: Required tools are not included in ClubSport Pedals V3 package!
5.3 Connections
To connect your ClubSport Pedals V3 to PC or wheel base or connect additional peripheral devices like the ClubSport Handbrake to the ClubSport Pedals V3 there are some connector sockets at the bottom side of the ClubSport Pedals V3:

1 - Wheel direct; 2 - USB; 3 - Gas; 4 - Brake; 5 - Clutch; 6 - Handbrake
IMPORTANT: Connect the ClubSport Pedals either by USB cable OR by RJ12 cable to a wheel (base). Never connect both ways in parallel to avoid hardware damages!
5.3.1 Wheel direct
Use the RJ12 connection cable on this port and connect the other plug of the RJ12 cable to the wheel base port ‘Pedals’. This option is applicable for use of ClubSport Pedals V3 with PC or consoles.
IMPORTANT: Use only the RJ12 cable which is packaged with your ClubSport Pedals V3 to avoid damages on the ClubSport Pedals V3 electronics!
5.3.2 USB
Use the USB connection cable on this port and connect the other plug of the USB cable to the USB port of your PC. This option is only applicable for use of ClubSport Pedals V3 with PC, not applicable for use of ClubSport Pedals V3 with consoles.
IMPORTANT: Use only the USB cable which is packaged with your ClubSport Pedals V3 to avoid damages on the ClubSport Pedals V3 electronics!
5.3.3 Gas
This port is used for the connection to the DirectSensorTM (HALL) at the gas / throttle pedal of ClubSport Pedals V3.
IMPORTANT: Do not try to use this port to connect any other device!
5.3.4 Brake
This port is used for the connection to 90kg Loadcell at the brake pedal of ClubSport Pedals V3.
IMPORTANT: Do not try to use this port to connect any other device!
5.3.5 Clutch
This port is used for the connection to the DirectSensorTM (HALL) at the clutch pedal of ClubSport Pedals V3.
IMPORTANT: Do not try to use this port to connect any other device!
5.3.6 Handbrake
This port is used for connection of the ClubSport Handbrake. Cable needed to connect ClubSport Pedals V3 with ClubSport Handbrake is not included in the ClubSport Pedals V3 package but is included in the ClubSport Handbrake package.
IMPORTANT: Use only the connection cables which are packaged with the ClubSport Pedals V3, with the wheel base and with the ClubSport Handbrake! Wheel base and ClubSport Handbrake are not included and sold separately!
5.4 Exchanging the pedal plates
The ClubSport Pedals V3 comes with attached metal pedal plates. The package also contains additional D-shaped pedal plates. If you want to use the D-shaped pedal plates instead of single or all metal pedal plates you can exchange them as follows:
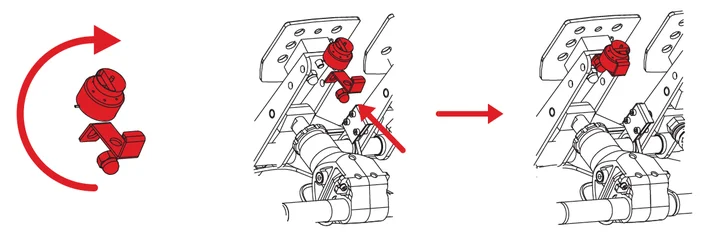
Loosen and take out the screws marked on the picture below (identical for every pedal lever):
Take off the assembled metal pedal plates and attach the D-shaped pedal plates instead. Use screws S1 and tighten them to fix the D-shaped pedal plates on the pedal levers.

You can adjust the positions of the plates to your favour by selecting different plate holes for the mounting screws. Please see some examples below:

5.5 Assembly of pedal extensions
The ClubSport Pedals V3 comes with attached metal ped- al plates. The package also contains additional D-shape pedal plates. If you want to use the D-shape pedal plates instead of single or all metal pedal plates you can exchange them as follows:
Loosen and take out the screws marked on the picture below (identical for every pedal lever):

Take off the assembled metal pedal plate and check for the marked holes on throttle pedal arm sides.

Bring the pedal extension into position and decide for your target pedal plate height and pedal plate angle in this step:

Put the screws S1 into the holes, add a washer W1 and a nut N1on the back end of the screw S1:

You can select to go ahead with the metal pedal plates or the D-shape pedal plates.
- If you decide to use the metal pedal plates use also the screws
- If you decide to use the D-shape pedal plates use the screws S1.

5.6 Stronger springs at throttle and clutch
The ClubSport Pedals V3 come with four different springs for the throttle and clutch pedals, the assembled regular spring and the stronger ones in the accessories. These springs are identified easy:
- Red short spring assembled is regular one for clutch pedal
- Black short spring in accessories is strong one for clutch pedal
- Red long spring assembled is the regular one for throttle pedal
- Black long spring in accessories is strong one for throttle pedal
IMPORTANT: Make sure to use the correct spring guides to avoid
damages, bad feeling and noise: The assembled spring guides must be
used with the regular springs only, the spring guides in the accessories
must be used for the stronger springs only! The spring guides match with
the springs inner diameter when put together.
5.6.1 Exchanging the throttle spring
Loosen the two screws on backside of the throttle pedal box with Allen Key 3 mm and remove the back plate.

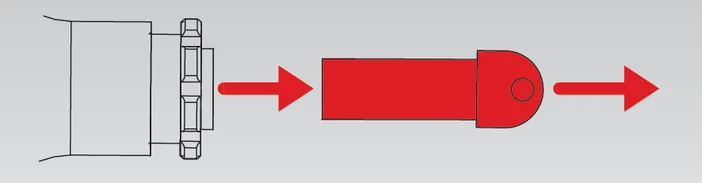
Push the Pedalbox towards the pedal lever and away from lower stroke.

Lift the pedalbox upwards and then pull it from the pedal rod.

5.6.2 Exchanging the clutch spring
Loosen the two upper screws on clutch curve disc upper sides as shown in picture on the right hand side:

Lift away the upper clutch rod. Then loosen flip over the clutch curve disc until the lower clutch pedal rod is released from the pedal box:

Remove the spring including the spring guides from clutch pedal rod:

Put the wanted spring onto the clutch pedal rod:

Flip back the clutch curve disc while aiming the clutch pedal rod into the pedal box:

Hang in the upper clutch rod to the clutch curve disc and fix it by tightening the two screws on the upper sides of the clutch curve disc:

6. DAMPER KIT
The ClubSport Pedals V3 can be modified for even more fine tuning options by using the ClubSport Pedals V3 Damper Kit at the brake pedal or at the throttle pedal or at both of them.
IMPORTANT: One ClubSport Pedals V3 Damper Kit includes only one damper and needed mounting material for one damper. ClubSport Pedals V3 Damper Kit is not included in ClubSport Pedals V3 package and sold separately!
6.1 Package content ClubSport Pedals V3 Damper Kit

|
1x (A) Damper |
1x (B) Damper Nut (pre-assembled) |
|
1x (C) Pedal Arm Link (pre-assembled) |
1x (D) Mounting Bracket |
|
1x (E) Rumble motor bracket |
2x (F) Screw S1DK |
|
4x (G) Screw S2DK |
2x (J) Screw S3DK |
|
4x (I) Washer W1DK |
2x (K) Bushing W2DK |
|
1x (L) Allen Key |
| Part Number | Part Name | Usage | Picture | Description |
| S1 |
Screw M6 x 12 mm |
24 |  |
Screws for mounthing the pedal extensions and the D-shape pedal plates onto the pedal extensions |
| S2 |
Screw M6 x 16 mm |
6 |
 |
Screws for mounting the metal pedal plates onto the pedal extensions |
| N1 |
Hexagon Nut M6 |
24 |  |
Nuts for mounting the pedal extensions and the pedal plates onto the pedal extensions |
| W1 |
Washer ID = 6 mm |
24 |  |
Washers for mounting the pedal extensions and the pedal plates onto the pedal extensions |
6.2 Tools
For assembly of ClubSport Pedals V3 Damper Kit you need these tools:
- Allen Key 1.5 mm (included in Damper Kit package)
- Allen Key 2.5 mm
- Allen Key 4 mm
NOTE: Required tools Allen Key 2.5 mm and 4 mm are not included in ClubSport Pedals V3 Damper Kit package!
6.3 ClubSport Pedals V3 Damper Kit assembly
IMPORTANT: Please check the drilling template for ClubSport Pedals V3 to see the outline dimensions with attached ClubSport Pedals V3 Damper Kit! The damper(s) could collide with parts of your rig!
Disassemble the rumble motor, pull out the motor from the bracket and put motor into the new bracket (brake pedal can use existing rumble motor bracket):

Attach the rumble motor upside down with the new rumble motor bracket:
Use the Allen Key 4 mm and screws S2DK with washers W1DK to mount the damper bottom link onto the pedal box (3 screws on brake pedal box, 4 screws on throttle pedal box):

Hang in the damper to the pedal lever at the marked holes and fix it by tightening the two screws S1DK by using Allen Key 4 mm. At brake use the upper holes at pedal arm, at throttle use the lower holes at pedal arm:

Turn the damper nut onto the damper towards the pedal lever. Stop when the damper bottom link side holes correspond with the damper nut side holes. Fix the damper nut onto the damper bottom link by tightening the two screws S3DK with Allen Key 2,5 mm.

Adjust and lock damper position: Turn the damper backwards until pedal moves a bit (a), then turn damper 180° towards the pedals again (b). Tighten the two screws by hand so that the damper cannot be turned anymore (c). Tighten the two screws on top side of the damper nut with Allen Key 2.5 mm:

Now you can check the damper effect by pressing the pedal with attached and fixed ClubSport Pedals V3 Damper Kit. During that you can change the damper adjustment by turning the knurled plate at the back end of the damper, see picture below:
The damper adjustment can be done in a range from ‚0‘ to ‚8‘:
- ‘0’ is almost no damper effect (weak)
- ‘8’ is highest damper effect (strong)
- Spot / Point on outer edge shows set position

When you have found your favourite adjustment we recommend to fix the knurled plate at damper back end by using the Allen Key 1.5 mm (included in ClubSport Pedals V3 Damper Kit package) to avoid maladjustment due to vibrations while driving:


IMPORTANT: Before using we recommend to check the calibrated minimum and maximum positions of the pedals after assembly and/or disassembly of ClubSport Pedals V3 Damper Kit and recalibrate them if necessary.
7. BRAKE PERFORMANCE KIT
Become a racing professional: The feeling of your ClubSport Pedals V3 brake pedal can be modified even more by using the ClubSport Pedals V3 Brake Performance Kit in order to achieve the best possible performance for your brake.
IMPORTANT: The ClubSport Pedals V3 Brake Performance Kit is not included in ClubSport Pedals V3 package and sold separately!
7.1 Package content ClubSport Brake Performance Kit

2x Elastomer spring red Ø13 x 20 mm (A)
1x Elastomer spring red Ø12 x 20 mm (B)
2x Elastomer spring green Ø13 x 20 mm (C)
1x Elastomer spring green Ø12 x 20 mm (D)
1x Polyurethane spring (PU foam) Ø13,5 x 15 mm (E)
1x Lithium grease (F)
NOTE: Required tools are not included in package content.
7.2 ClubSport Brake Performance Kit assembly
IMPORTANT: Please follow these steps carefully to avoid damages due to assembly mistakes which cannot be covered by warranty.
Turn the brake preload screw to backside end position (lowest preload):

Losen the small screw (a) with Allen Key 2,5 mm, then remove the thin bolt (b) from the brake pedal lever:

Disconnect the loadcell cable from ‘Brake’ port at the mainboard and take it out of the cable clips. Then turn the brake assembly downwards out from the brake pedal lever:

Remove the brake pedal bolt:
Remove the original Polyurethane springs and store them safely and light-protectedfor later use:

Insert the small Polyurethane spring (E) from Brake Performance Kit package content into the preload screw:

Select two pieces of the Elastomer springs (A) – (D) from Brake Performance Kit package content according to your preferences (refer to chapter ‘hardness comparison’ of this manual) and apply Lithium grease (F) to their surface:

Insert the selected two pieces of the Elastomer springs (A) – (D) into the preload screw:

Insert the brake pedal bolt into the preload screw:

Turn back the brake assembly into the brake pedal lever, then reconnect the loadcell cable to ‘Brake’ port:

IMPORTANT: Take care of the cables to avoid damages!
Insert the thin bolt (a) into the brake pedal lever through the black block at the brake bolt, then tighten the small screw (b) with Allen Key 2,5 mm with moderate force again:

Adjust the preload screw so that the scale is within the correct use range and there is no mechanical play in brake pedal. Note: Preload screw cannot be used in the full range as before, it’s use is limited only to eliminate the mechanical play:


Minimum preload setting for brake pedal
Left: Correct, right: wrong!
Maximum preload setting for brake pedal
Left: Correct; Right: wrong!
IMPORTANT: After insertion of the Brake Performance Kit the manually calibrated pedal positions of the ClubSport Pedals V3 have to be manually calibrated again. Otherwise the ClubSport Pedals V3 uses the automatically calibrated positions after pressing down each pedal to 100% of mechanical travel. See chapter ‘Pedal manual calibration’ of this manual for more details.
7.3 Hardness comparison
| Ø 13 green | Ø 12 green | Ø 13 red | Ø 12 red | |
| Ø 13 green | Very hard | Hard | Medium | Soft |
| Ø 12 green | Hard | Medium | Soft | |
| Ø 13 red | Medium | Soft | ||
| Ø 12 red | Soft |
8. DRILLING TEMPLATE

Image shows damper kit attached to brake pedal. Note: Damper is sold separately / not included in ClubSport Pedals V3 package content.

9. FUNCTIONS & FEATURES
The ClubSport Pedals V3 have an own firmware handling the device communication to PC or wheel base as well as to connected ClubSport Handbrake. And the firmware provides different functions for the user.
9.1 Firmware and driver update
The firmware and the PC driver can be updated to newer versions by Fanatec in order to introduce new features and compatibilities or other improvements.
Before first use the ClubSport Pedals V3 must be updated to the latest firmware version which is available on our website www.fanatec.com/support.
You also have to use the latest driver version in order to use the ClubSport Pedals V3 on a PC.
Run the downloaded file(s) and follow the instructions shown on the screen. See more detailed description later in this user manual chapter.
IMPORTANT: The ClubSport Pedals V3 is secured by firmware and by driver so that usually it is not possible to install wrong firmware files on the ClubSport Pedals V3! Do not try to force installation of any wrong firmware to the ClubSport Pedals V3 to avoid damages.
IMPORTANT: After firmware update the manually calibrated pedal positions of the ClubSport Pedals V3 have to be manually calibrated again. Otherwise the ClubSport Pedals V3 uses the automatically calibrated positions after pressing down each pedal to 100% of mechanical travel.
See chapter ‘Pedal manual calibration’ of this manual for more details.
9.1.1 PC driver – page ‘Function Test’
The PC driver is a very helpful tool as it can assist the user to do functional tests,
adjustments and update procedure on the ClubSport Pedals V3.
When you start the driver this window as shown on the right hand side will appear and show all connected USB devices:
Double-click the ClubSport Pedals V3 to go ahead and see the complete menu.

The next appearing page is called ‘Function Test’, see pictures below:

This window shows you a lot of different information and gives possibilities to test the currently used hardware and settings but also can be used for manual calibration:
On the upper left side there are two buttons named ‘Test rumble motor brake’ and
‘Test rumble motor throttle’.
When pressing one of these buttons the corresponding rumble motor will start operation:
- Test rumble brake: Activates the motor at the brake pedal
- Test rumble throttle: Activates the motor at the gas / throttle pedal

ATTENTION: The two motors are mounted at the backside of brake pedal lever and gas / throttle pedal lever. When ClubSport Pedals V3 are powered please make sure that the weights at this motors can turn free and do not touch them to avoid damages or even injuries!
Below these two buttons there is a checkbox named.
‘Enable auto calibration mode’ as shown on the right hand side (Note: This checkbox is shown on driver page ‘settings’ if ClubSPort Pedals V3 are connected to wheel base).

This checkbox is deactivated per default when auto calibration mode is active or after updating the ClubSport Pedals V3 firmware. Activate this checkbox manually to enable the manual calibration mode (indicated in driver window: The buttons right above and below each pedal indicator bar are displayed only when manual calibration mode is active after a moment). See chapter ‘Pedal manual calibration’ of this manual for more details about the calibration process itself.
On the lower left side you can see the indicator bars for each single pedal and for the ClubSport Handbrake, see picture on right hand side:
When pressing a pedal of the ClubSport Pedals V3 the corresponding bar shows the signal level as a blue indicator, depending on the mechanical travel and on the manually calibrated minimum and maximum positions. Same with the ClubSport Handbrake if connected to the ClubSport Pedals V3.

Above every single indicator bar there are buttons ‘set max’, below every single indicator bar there are buttons ‘set min’. These buttons are only available when checkbox ‘Enable auto calibration mode’ was activated by user before to enter manual calibration mode
- When pressing a ‘set max’ button the current mechanical position of the corresponding pedal or the handbrake will be stored as the maximum position for this pedal or handbrake axis.
- When pressing a ‘set min’ button the current mechanical position of the corresponding pedal or the handbrake will be stored as the minimum position for this pedal or handbrake axis.
- See more detailed description in chapter ‘Pedal manual calibration’ of this manual.
Beside the indicator bar for the brake pedal there is another setting bar with an arrow, scaled into eleven stages (‘0’ on top end, ‘100’ on bottom end), see picture on right hand side. This bar is only displayed and active when the Pedals are connected to PC by USB directly. By moving the arrow from stage ‘0’ to stage ‘100’ the signal resistance of the brake pedal can be adjusted (some users may know this feature realized by potentiometer next to the brake pedal of ClubSport Pedals V1, ClubSport Pedals V2 or CSR Elite Pedals).

9.1.2 PC driver – page ‘Update’
On the upper side of the PC driver you can switch from window ‘Function Test’ to window ‘Update’, see picture below:

This page gives you detailed informations about the currently installed PC driver version and the currently installed ClubSport Pedals V3 firmware version. There is also the button ‘Update CSP V3 Firmware’, see chapter ‘Firmware update procedure’ of this manual for more detailed information about the firmware update process itself.
9.1.3 Firmware update procedure
To initiate the firmware update the ClubSport Pedals V3 must be connected to the PC by USB cable first. Then switch to Bootloader mode by starting the PC driver, go to page ‘Update’ (see chapter ‘PC driver – page Update’ of this manual) and press button ‘Update CSP V3 Firmware’ as shown below:

Right at start of the Firmware Updater the instructions ‘Set CSP V3 into bootloader mode’ is executed, the latest firmware file per driver default is selected (see line ‘Firmware File’ on top side of the Firmware Updater window) and set – both indicator checkboxes are marked active.

Now the user has the opportunity to select a different ClubSport Pedals V3 firmware file than the default selected file by pressing the button with the three dots if necessary. Usually the latest PC driver version already includes the latest ClubSport Pedals V3 firmware so this step is not necessary for the user.

By pressing the button ‘Start’ the firmware update proceeds within a few seconds and the Firmware Updater indicates progress until the ClubSport Pedals V3 firmware update has been finished completely, see picture below:

When the firmware update has been finished the ClubSPort Pedals V3 will reboot automatically. As described on the Firmware Updater window please close the Firmware Updater application. Open the driver window again and check the ClubSport Pedals V3 before next use.

IMPORTANT: The ClubSport Pedals V3 is secured by firmware and by driver so that usually it is not possible to install wrong firmware files on the ClubSport Pedals V3! Do not try to force installation of any wrong firmware to the ClubSport Pedals V3 to avoid damages.
IMPORTANT: After firmware update the manually calibrated pedal positions of the ClubSport Pedals V3 have to be manually calibrated again. Otherwise the ClubSport Pedals V3 uses the automatically calibrated positions after pressing down each pedal to 100% of mechanical travel. See chapter ‘Pedal manual calibration’ of this manual for more details.
9.2 Start-Up procedure
Connect the ClubSport Pedals V3 to the PC or wheel base, when the device is switched ON the ClubSport Pedals V3 are ON, too. The ClubSport Pedals V3 does not have an ON/OFF switch.
9.3 Pedal auto calibration mode
First connect your ClubSport Handbrake to the ‘Handbrake’ port of your Club- Sport Pedals V3. If you do not use a handbrake skip this step.
Then connect the ClubSport Pedals V3 to your PC or wheel base and switch ON the connected device.
When the ClubSport Pedals V3 were powered without having done a manual calibration yet or after a firmware update the ClubSport Pedals V3 operates in auto calibration mode, the user can verify in PC driver, page ‘Function Test’, see picture below.
(Note: This checkbox is shown on driver page ‘settings’ if ClubSport Pedals V3 are connected to wheel base):

To calibrate each pedal press every pedal lever from initial mechanical position down to 100% of pedal travel to maximum mechanical position and then back to initial mechanical position one time. Now the pressed pedal is calibrated automatically. The procedure for the handbrake (if connected) is the same.
9.4 Pedal manual calibration
If you want to make a more precise calibration of each pedal or even want to reduce the signal array within the mechanical travel you can do so by manual calibration.
There are two different ways to do manual calibration:
Manual calibration of minimum and maximum positions by PC driver
- Start PC driver application and monitor the single pedal signal indicator bars. Press the pedal to the wanted mechanical minimum position, then press the button ‘set min’ below the corresponding pedal indicator bar in PC driver. Now the new minimum position value is stored. Note: Minimum position must be lower than maximum position, to be achieved by shorter physical travel of pedal lever during manual calibration.
- Start PC driver application and monitor the single pedal indicator bars. Press the pedal to the wanted mechanical maximum position, then press the button ‘set max’ above the corresponding pedal indicator bar in PC driver. Now the new maximum position value is stored. Note: Maximum position must be higher than minimum position, to beachieved by longer physical travel of pedal lever during manual calibration.
Manual calibration of brake force by PC driver:
Beside the signal indicator bar for the brake pedal there is another setting bar with an arrow, scaled into eleven stages (‘0’ on top end, ‘100’ on bottom end), see picture on right hand side. This bar is only active when checkbox ‘Auto calibration mode’ is active, and the pedals are connected to PC by USB directly. By moving the arrow from stage ‘0’ to stage ‘100’ the signal resistance of the brake pedal can be adjusted.

Manual calibration of throttle and clutch by wheel base:
- Press the clutch pedal and the throttle pedal to your wanted physical minimum position. Enter the Tuning Menu and press the button combination as follows on your attached steering wheel: Left Shifter Paddle + Right Shifter Paddle + Down on D-Pad Now the new minimum position values for both pedals are stored. After successfully calibrating the new minimum positions the display of the attached steering wheel shows ‘PNP’. Note: Minimum position must be lower than maximum position, to be achieved by shorter physical travel of pedal levers during manual calibration.
- Press the clutch pedal and the throttle pedal to your wanted physical maximum position. Enter the Tuning Menu and press the button combination as follows on your attached steering wheel: Left Shifter Paddle + Right Shifter Paddle + Up on D-Pad Now the new maximum position values for both pedals are stored. After successfully calibrating the new minimum positions the display of the attached steering wheel shows ‘PUP’. Note: Maximum position must be higher than minimum position, to be achieved by longer physical travel of pedal levers during manual calibration.
Brake force signal adjustment by wheel base:
Enter the Tuning Menu and navigate to parameter ‘BRF’ (brake force; is only shown if ClubSport Pedals V3 are connected to the wheel base) with default value 050. Change the value for ‘BRF’ according to your favourite setting within the range OFF to 100:
- Value OFF is hardest setting, no scaling of brake signal resistance
- Value 100 is scaling the brake signal resistance by factor 3
ATTENTION: Manual calibration by driver is applicable when ClubSport Pedals V3 is connected to PC USB port or to wheel base. Manual calibration by wheel base is only applicable if ClubSport Pedals V3 is connected to the wheel base.
IMPORTANT: After firmware update the manually calibrated pedal positions of the ClubSport Pedals V3 have to be manually calibrated again. Otherwise the ClubSport Pedals V3 uses the automatically calibrated positions after pressing down each pedal to 100% of mechanical travel. See chapter ‘Pedal manual calibration’ of this manual for more details.
IMPORTANT: To switch back to auto calibration mode connect the ClubSport Pedals V3 to PC directly or to wheel base port ‘PEDAL’ and wheel base to PC. Then open the PC driver and activate the checkbox for ‘Auto calibration mode, see picture below:
For further information check the FAQ section on our website
9.5 Preload screw at brake pedal

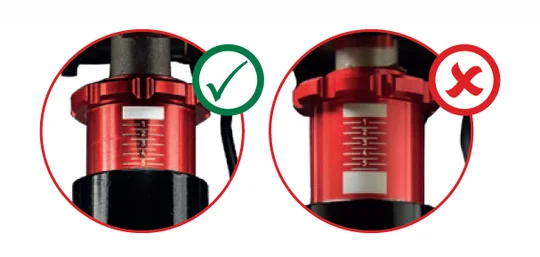
Minimum setting
Left: Correct, right: wrong!
Maximum setting
Left: Correct, right: wrong!
At the brake pedal you can see a red screw with a printed scale. With this screw you can adjust the brake pedal preload (stiffness). Use a setting within the lasered scale on this screw!
IMPORTANT: Refer to chapter ‘Brake Brake Performance Kit’ of this user manual, the preload adjustment does not work anymore when the ClubSport Pedals V3 Brake Performance Kit is used on your pedals set, then it is used only to eliminate the mechanical play on the brake pedal!
10. ELECTRICAL OPERATION
10.1 Hotkeys
This is a summary of all hotkeys related to the ClubSport Pedals V3. Note: Hotkeys are a functionality of the used Fanatec wheel base firmware. Wheel base firmware is subject to change.
10.1.1 Tuning menu (wheel base / steering wheel)
To enter the tuning menu use tuning menu button (usually the small black button
close to the LED display of the used Fanatec Steering Wheel; see corresponding quick guide of your Fanatec Steering Wheel). The picture just shows the tuning menu button on top of the ClubSport Universal Hub as an example:

10.1.2 Pedals manual calibration (throttle and clutch)
First enter the Tuning menu by tuning menu button, then use these hotkeys to calibrate the minimum and maximum positions of the throttle and clutch pedals at the same time:
- Manual calibration of throttle and clutch pedals minimum position: Left Shifter Paddle + Right Shifter Paddle + Down on D-Pad
- Manual calibration of throttle and clutch pedals maximum position: Left Shifter Paddle + Right Shifter Paddle + Up on D-Pad
- Switch to auto calibration mode: Left Shifter Paddle + Right Shifter Paddle + Left on D-Pad.
See chapter ‘Pedal manual calibration’ of this manual for more detailed information about the manual calibration process and auto calibration process.
11. CLEANING
Clean only with a dry or slightly damp microfibre cloth. Using cleaning solutions may damage your CS Pedals V3 and/or your ClubSport Pedals V3 Damper Kit.
12. MAINTENANCE
Please add some lithium grease to the parts where marked in the photos below
when you can feel or even hear the parts grinding:

Please add some technical vaseline to the PU foam inside brake pedal if it develops a stuttering feeling. Do not use the lithium grease from ClubSport Pedals V3 box content as this might affect the life time of the PU foam.
13. TROUBLESHOOTING
The ClubSport Pedals V3 must not be modified differently than described in this manual. Endor® AG expressly prohibits analysis and utilization of the electronics, hardware, software and firmware contained in the controller. In case difficulties occur in connection with utilization of the ClubSport Pedals V3, please use the following guide for elimination of errors. On the website
https://help.fanatec.com/hc/de you will find further details and contact data.
If the ClubSport Pedals V3 is not working properly:
| Problem Description | Solution |
|
After firmware update of the ClubSport Pedals V3my manually calibrated positions are lost.
|
After doing a firmware update on the Club- Sport Pedals V3 the manually calibrated pedal positions must be manually calibrated again. See chapter ‘Pedals manual calibration’ and also chapter ‘Firmware update procedure’ of this manual for more details. |
|
When pushing a pedal lever of the ClubSport Pedals V3 a grinding noise is appearing from mechanic parts.
|
Due to use and mechanical movement of the pedal levers we recommend to use some grease at some parts of the ClubSport Pedals V3. See chapter ‘Maintenance’ of this manual. |
|
The PC driver or the wheel base does not recognize the ClubSport Pedals V3.
|
Make sure that you have updated your Fanatec wheel base to the latest firmware version which can be downloaded from www.fanatec.com/ support. |
| Make sure that you have updated your ClubSport Pedals V3 to the latest firmware version which can be downloaded from www.fanatec.com/ support. | |
| Ensure that the RJ12 cables are plugged in the correct ports of the CSL Elite Pedals V2 and the correct port of the wheel base. See section 4.6 ‘Connections’ |
|
|
Make sure that you have updated your PC driverto the latest version which can be downloaded from www.fanatec.com/ support. |
|
|
Make sure that the used cable (USB or RJ12) is plugged to the correct ports at ClubSport Pedals V3 bottom side and at PC or wheel base. |
|
|
Brake pedal lever feels too soft or too strong. |
Try to improve the feeling by adjusting the preload of the brake pedal lever with the preload screw. See chapter ‘Mechanical adjustments’ of this manual. |
|
Pedal signal behaviour in game feels strange. |
Connect the ClubSport Pedals V3 to PC direct or through the wheel base. Start the PC driver and check the indicator bars of each pedal during pressing the corresponding pedal. You may need to do manual calibration of minimum and / or maximum positions or reactivate the ‘Auto calibration mode’ to adjust the pedal signal behaviour according to your favour. |
|
After startup the pedal signals are not correctly indicated, can be verified at PC driver. |
When powering ON the ClubSport Pedals V3 in ‘Auto calibration mode’ every pedal lever must be pushed first to the maximum position and then back to the minimum position. When pressing the corresponding pedal lever then again the signal from the corresponding pedal should be fine. See chapter ‘Pedal auto calibration mode’ of this manual for more details. |
|
After playing a while the brake pedal seems to become weaker.
|
Inside the brake pedal lever there is a PU foam stick. If the preload screw is not correctly adjusted within the scale this could lead to damages at this PU foam stick. Check your preload screw adjustment. |
|
Inside the brake pedal lever there is a PU foam stick. After a while of use and with preload screw adjusted within scale this stick may become weaker. Contact the Fanatec support. |
|
|
My PC does not boot when ClubSport Pedals V3 are connected to USB before Windows is booted. |
This phenomenon is related to some main board manufacturers’ BIOS. In this case the it is required to boot the PC first and then plug the ClubSport Pedals V3 to the USB port. |
14. VIDEO GUIDE