マニュアル |クイックスタートガイド
ポディウム レーシングホイール F1®
目次

- PS4™対応 ポディウム ホイールベース (A)
- ClubSport ステアリングホイール F1® with APM (B)
- 電源ユニット (C)
- 電源コード(地域別)(D)
- USB接続ケーブル (E)
- シリンダーヘッド用ネジ ISO 4762 M6x20 (簡易クイックリリース専用) (F)
- シリンダーヘッド用ネジ ISO 4762 M6x20 (ClubSport クイックリリース (G) 専用)
- ペダル用RJ12接続ケーブル(H)
- トルクレンチ (I)
- レーシングスタイルボタンキャップ (J)
ポディウム・ホイールベースの取り付け
ドリル用テンプレートはこちらからダウンロードしてください:

サイドマウント
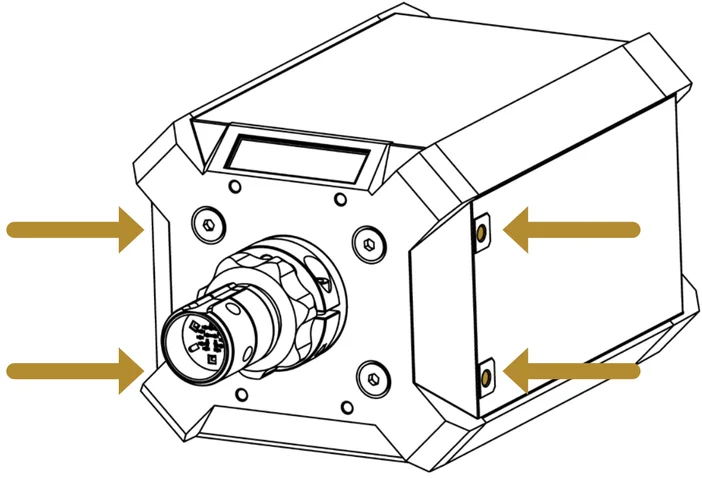
車軸の両側には、M8ネジ穴が2つずつある
ボトムマウント
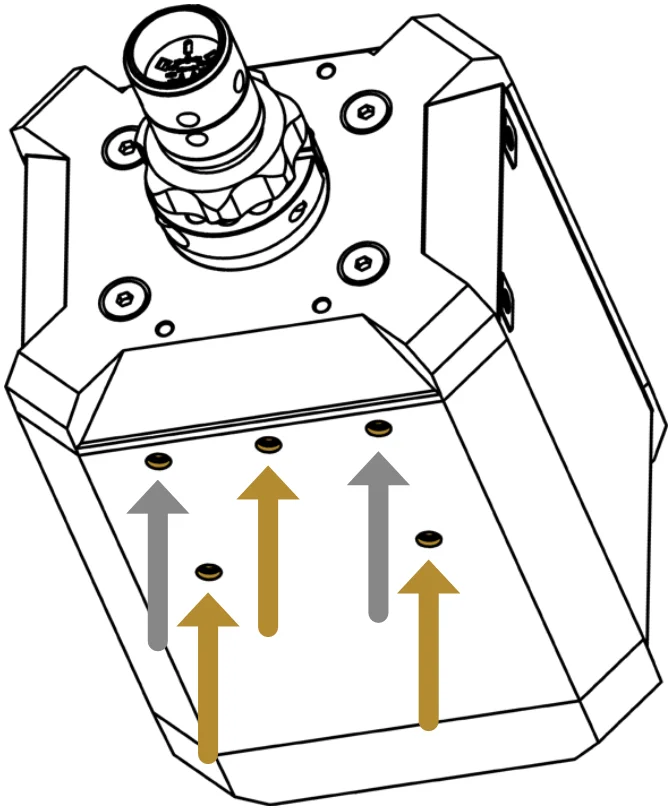
ホイールベースの底面には、Fanatecの三角形マウントおよび正方形マウント(78.4mm x 66mm)用のM6ネジ穴パターンが5箇所設けられています。
前面中央の穴と後方の2つの穴(Fanatec三角マウント - 金色の矢印で表示)を使用すれば、十分な固定が可能です。
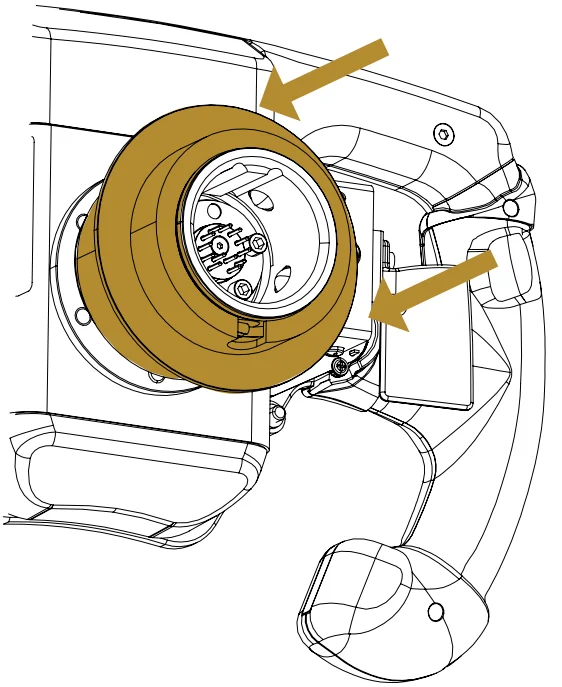
ステアリングホイールの取り付け
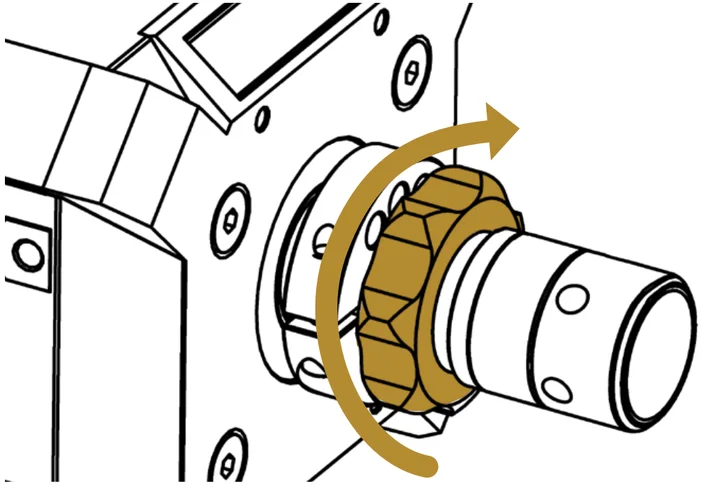
1:ロックリングを時計回りにシャフトの背面に向けて回してください。ゴムリングが圧縮されていないことを確認してください。
2:溝が上を向くようにシャフトを回転させる。
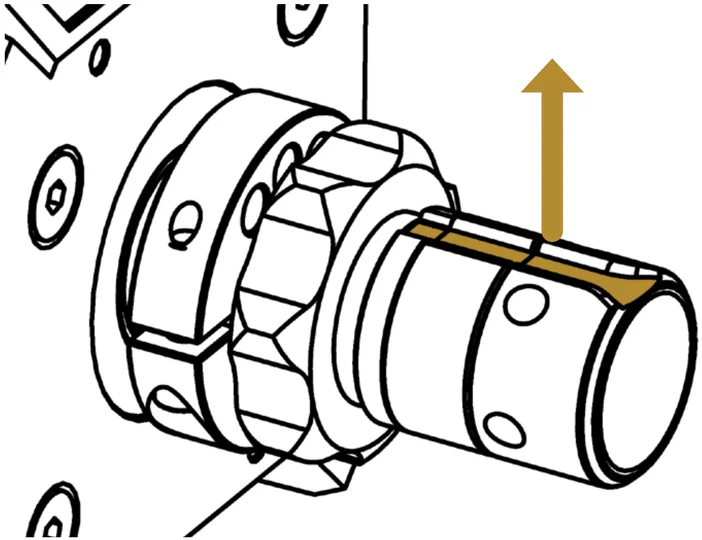
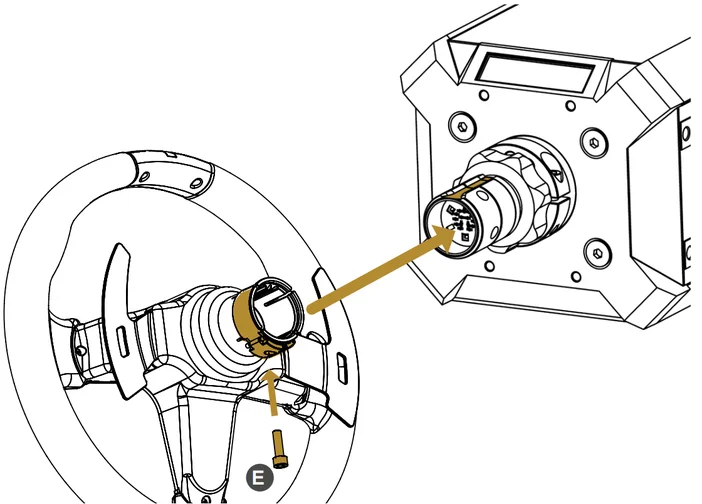
3a:ファナテック クラブスポーツ クイックリリース:
クイックリリーススリーブを引きながら押し続け、ステアリングホイールをシャフトに慎重に押し込みます。スリーブを離します。
Fanatec ClubSport Quick ReleaseをPodium DD Baseで使用する場合、ネジは不要です。
3b:簡易クイックリリース:
ステアリングホイールをシャフトに慎重に押し込みます。クランプリングの締め付けには、ポディウム・ホイールベース付属品のM6x20ネジを使用してください。
ステアリングホイールに付属のM6x16ネジは使用しないでください!代わりに、ポディウム・ホイールベースパッケージ内容物に含まれるシリンダーヘッドネジ(F)と交換してください!
注記:簡易クイックリリースを使用する場合、ホイールベースが自動的にトルクを制限し損傷を防止します。クラブスポーツクイックリリースはフルトルクの使用が許可されています。
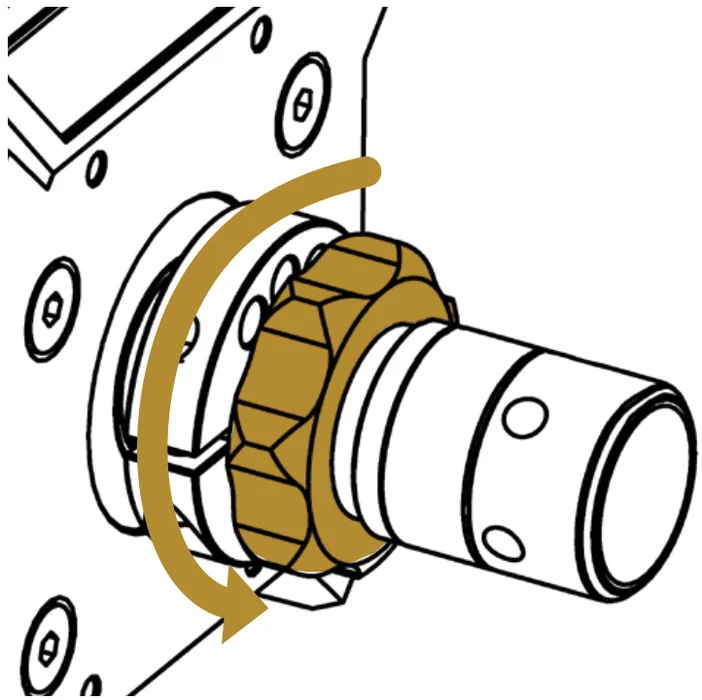
4:ロックリングを反時計回りに回して、しっかりと固定してください。
ベースから取り外す際は、逆の手順で行ってください。
オン・アンド・オフ
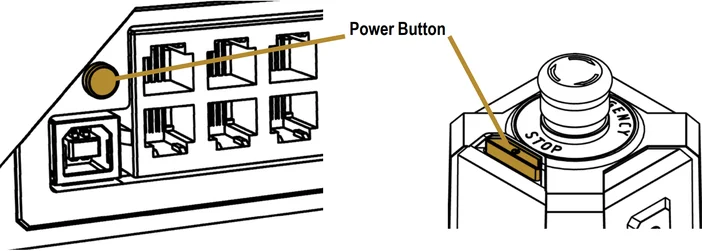
ポディウム・ホイールベースの電源を入れるには、電源に接続し、背面にある電源ボタンを約1秒間押してください。また(オプションの)ポディウム・キルスイッチにも、ホイールベースの電源を入れるための電源ボタンが備わっています。
電源を切るには、電源ボタンを5秒間押し続けてから離してください。
注:本製品に付属の電源アダプター(C)および電源コード(D)のみを使用してください。
トルクレンチ
トルクキー(H)はポディウム・ホイールベースの最大トルクを解放します。使用前に安全警告が表示されます。安全上の理由から、このトルクキーは工場出荷時には挿入されていません。トルクキーを挿入する前に、すべての安全警告をよくお読みください。経験の浅いユーザーやお子様の怪我を防ぐため、ホイールベースを使用しない時や無人状態の時は、常にトルクキーを取り外すことを推奨します。
トルクキーは必ず「トルクキー」ポートにのみ挿入し、ホイールベースの他のポートや、ポディウム ホイールベース以外のデバイスには挿入しないようご注意ください。
つながり
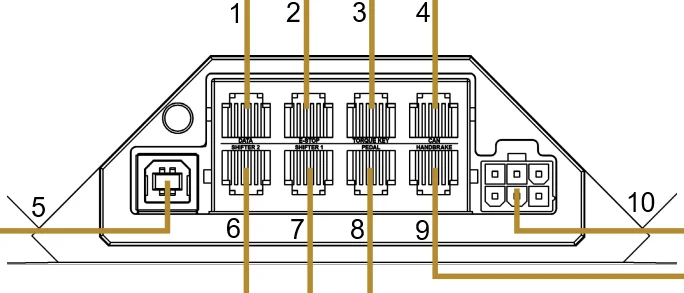
| # | イラストレーション | 説明 |
|---|---|---|
| 1 | 追加アクセサリー* | |
| 2 |  |
ポディウム キルスイッチ* |
| 3 |
重要! トルクキーは必ず「トルクキー」ポートに挿入し、ホイールベースの他のポートには挿入しないようご注意ください。 |
トルクレンチ (フルトルクを有効にします。ご使用前にすべての安全上の注意をよくお読みください。) |
| 4 | CANバスへの接続 | |
| 5 |
USBからPCへ USBからコンソールへ (重要!USBポートの損傷を防ぐため、本製品に同梱されているストレートUSBプラグのみをご使用ください。) |
|
| 6 |
|
シークエンシャル・シフター* スタティック・シフター* |
| 7 |  HパターンモードまたはSQモードで! HパターンモードまたはSQモードで! |
Hパターン・シフター* |
| 8 |  |
ペダル* |
| 9 |  |
ハンドブレーキ* |
| 10 |
クランプフックを上向きにして差し込んでください。 クランプフックを押さえながらプラグを抜いてください。 |
電源プラグ |


センターキャリブレーション
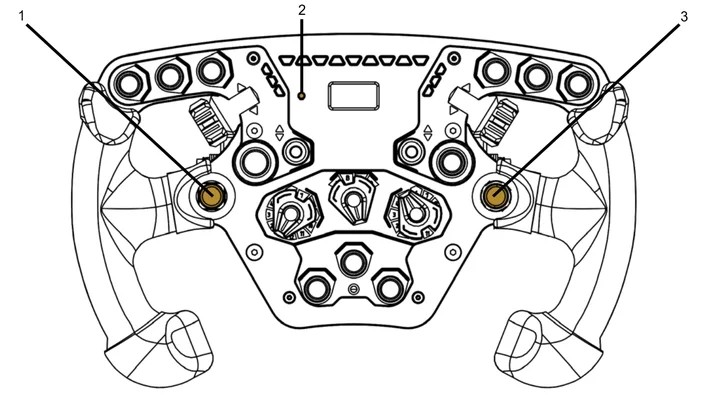
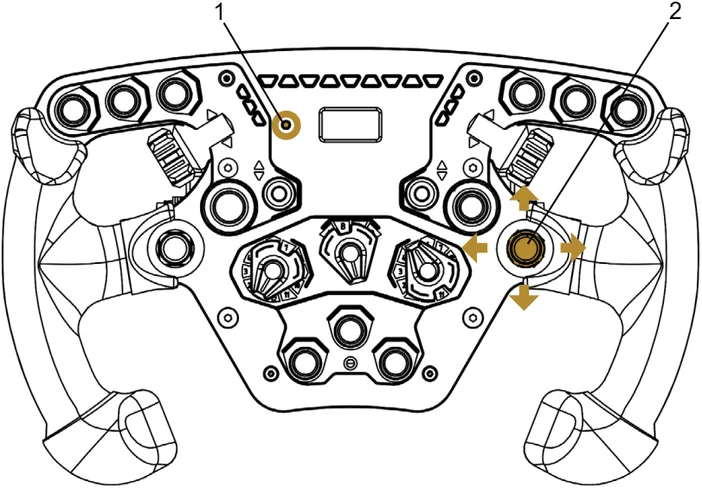
センターキャリブレーションが必要な場合(例:ホイールベースのファームウェア更新後)、ステアリングホイールを使用する際には、本ページ下部の図で強調表示されているチューニングボタン(2)を押してチューニングメニューに入ってください。
調整メニューがアクティブな状態で、アナログスティック(1)とファンキースイッチ™(3)を同時に押すと、ホイール中心のキャリブレーションが行われます。
シフターキャリブレーション
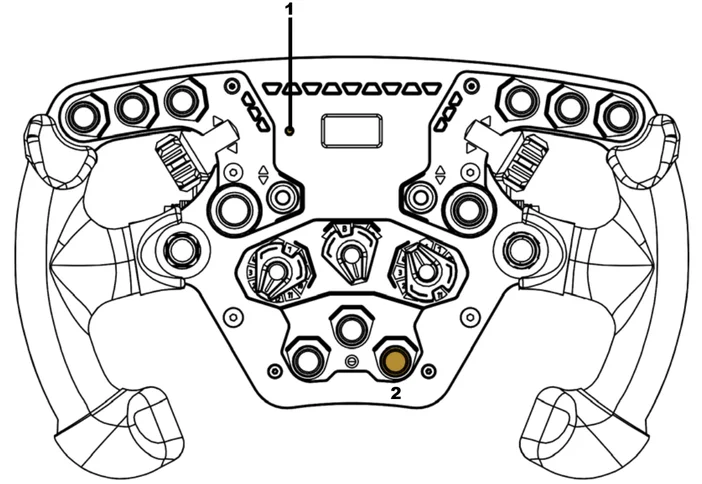
シフターキャリブレーションモードに入るには、チューニングボタン(1)と下記で強調表示されたボタン(2)を同時に押してください。
より詳細な説明は、シフターのクイックガイドでご覧いただけます。
モード
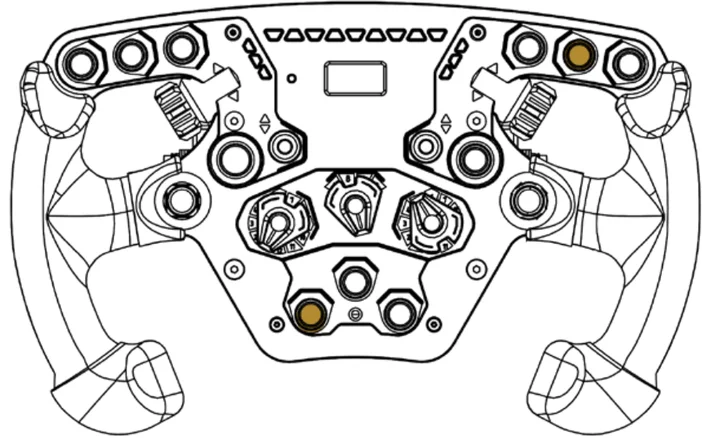
モードを変更するには、上記のハイライトされた2つのボタンを同時に押してください。
注:モード変更に必要なボタン操作の組み合わせは、ステアリングホイールごとに異なります。必要なボタン操作の組み合わせについては、お使いのホイールのクイックガイドをご確認ください。
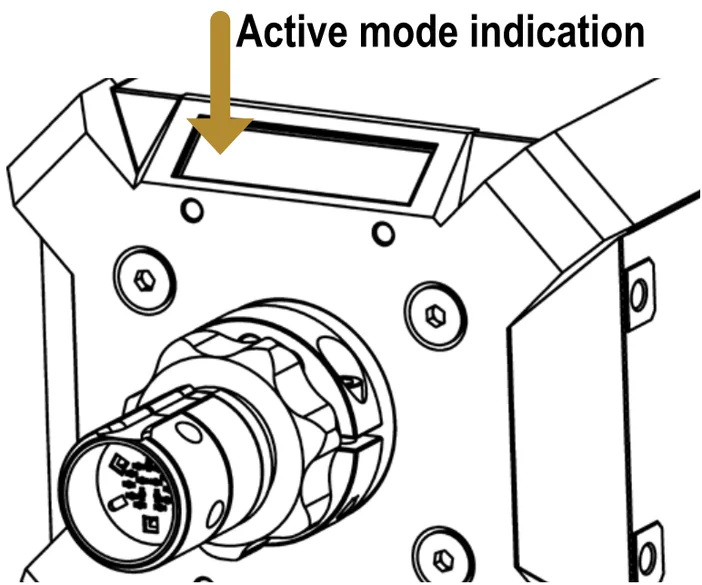
ホイールベースのOLEDディスプレイ左上隅に、現在のアクティブな動作モードが表示されます:
- PS4™: PlayStation®4および任意のFanatecステアリングホイール(オプション品であり、本製品パッケージには含まれません)との連動動作に対応
- PC(ソニー・インタラクティブエンタテインメント株式会社による互換性テストおよび推奨は行っておりません):Windows PCおよび任意のFanatecステアリングホイール(オプション品であり、本製品パッケージには含まれません)との連動を目的としています
- Comp V2.5: 当社のポディウム・ホイールベースDD1に対応していないWindows PCで旧式ゲームを動作させる場合、このモードを使用してください。これにより、任意のFanatecステアリングホイール(オプション品であり、本製品パッケージには含まれません)でCSW V2.5をエミュレートします。
- Comp PS4™: 当社のPodium Wheel Base DD1に対応していないPlayStation®4で旧作ゲームを動作させる場合、このモードを使用してください。これにより、任意のFanatecステアリングホイール(オプション品、本製品パッケージには含まれません)と組み合わせてCSL Elite Wheel Base+をエミュレートします。
ベース表示画面

ポディウム・ホイールベースのOLEDディスプレイには、デフォルトでFanatecロゴ、検出された周辺機器、USB接続状態、および動作モードが表示されます。
さらに、ディスプレイには異なるデータを表示する代替画面も表示可能です。例えば、インストール済みファームウェアのバージョン、トルク曲線、またはデバイスの温度などが挙げられます。
画面を切り替えるには、付属ステアリングホイールのチューニングメニューボタン(1)を長押しし、FunkySwitch™(2)の方向キーで画面を操作します。画面の詳細については取扱説明書、チューニングメニューボタンおよびFunkySwitch™については各ステアリングホイールのクイックガイドを参照してください。
| ファンキースイッチ™ | 表示 | メニュータイトル |
|---|---|---|
 |
デフォルト画面 | |
| ⬌ |  |
力覚フィードバック解析 |
| ⬌ |  |
モーターデータ解析 |
| ⬌ |  |
温度分析 |
| ⬍ |  |
システム情報 |
チューニングオプション
チューニングメニューに入るには、チューニングメニューボタン(1)を1回押してください。
チューニングメニューに入るには、チューニングメニューボタン(2)を押します。上下に押すと5つの設定にアクセスできます。FunkySwitch™を右または左に押してオプションを移動し、FunkySwitch™を回してオプションの値を変更します。