


Discontinued
This product is discontinued! There are no units left and there will be no pre-order for this product!
Weiterführende Links
Features
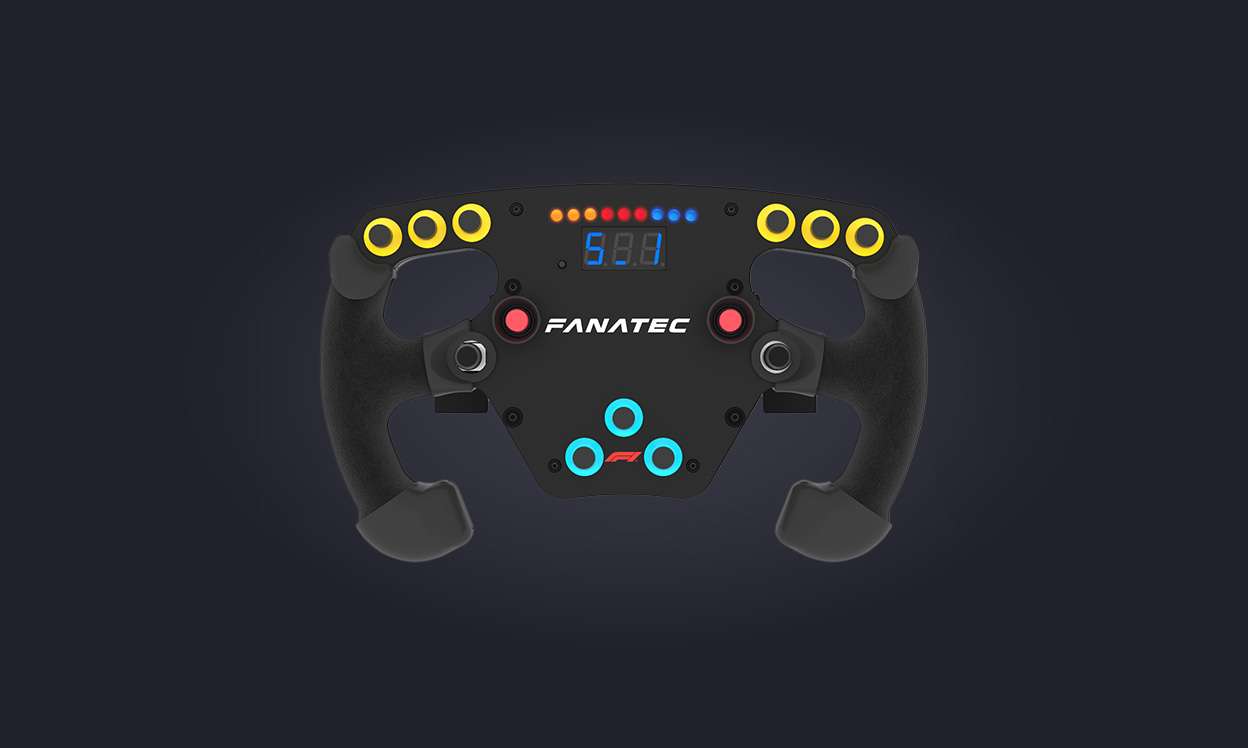
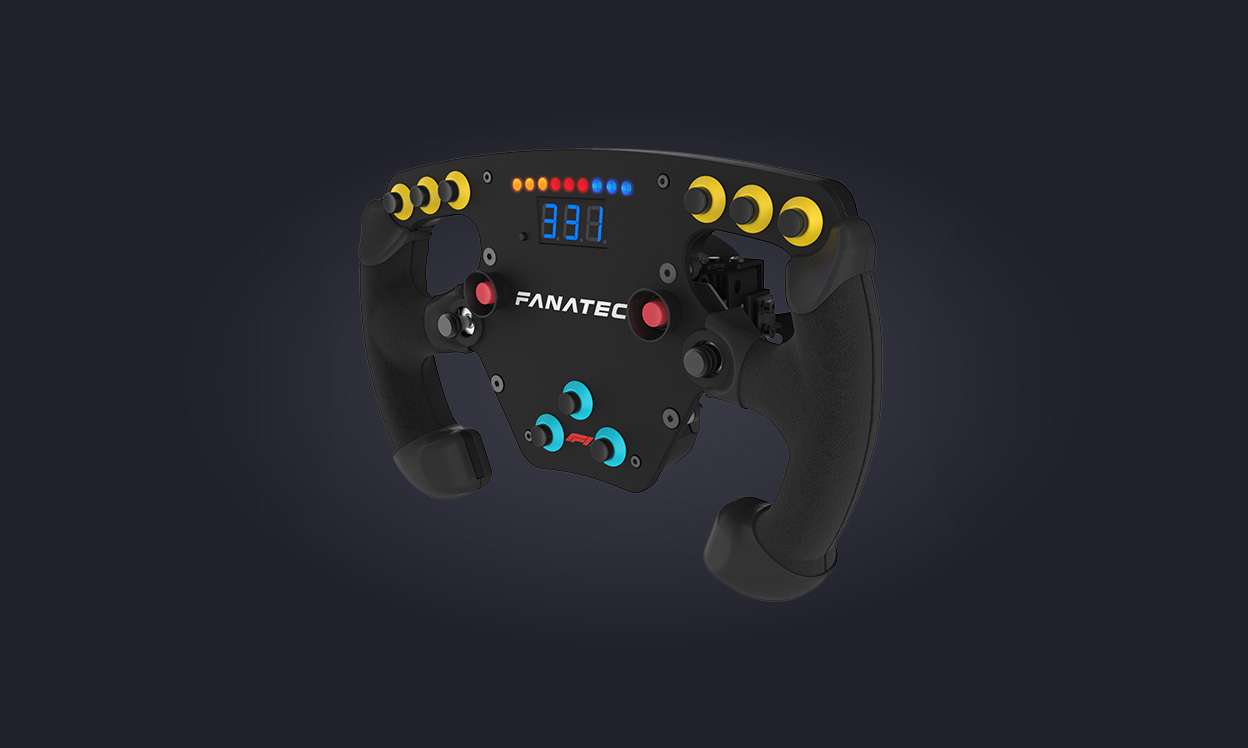
- Nachbildung eines Lenkrads, wie es in Formel-Autos verwendet wird. Der kompakte Durchmesser von 27 cm ermöglicht schnelle Bewegungen und Reaktionen
- Offiziell lizensiert von Formula 1™
- Langlebige Konstruktion aus Metall gefertigt
- Handflächen aus echtem italienischem Alcantara, welches einfach zu reinigen ist und ein sensationelles Fahrgefühl vermittelt
- Lenkradgewicht: ca. 1200g (produktionsbedingte Änderungen vorbehalten)
- 11 Buttons + 2 Schaltwippen mit realistischen und zuverlässigen Schaltern
- Joystick für die Kontrolle im Cockpit oder zum Verwenden anderer Achsen
- 7-way FunkySwitch™ um die Einstellungen zu ändern: Nach links drehen, nach rechts drehen. Bewege den FunkySwitsch rechts, links, hoch und runter und/oder drücke (aktiv im Tuning Menü und kompatibel mit jeglichen PC Spielen).
- Zwei Vibrationsmotoren sind in den Handflächen integriert. Sie können über das Tuningmenü kontrolliert warden (SHO) oder über das Spiel mit dem Fanatec SDK
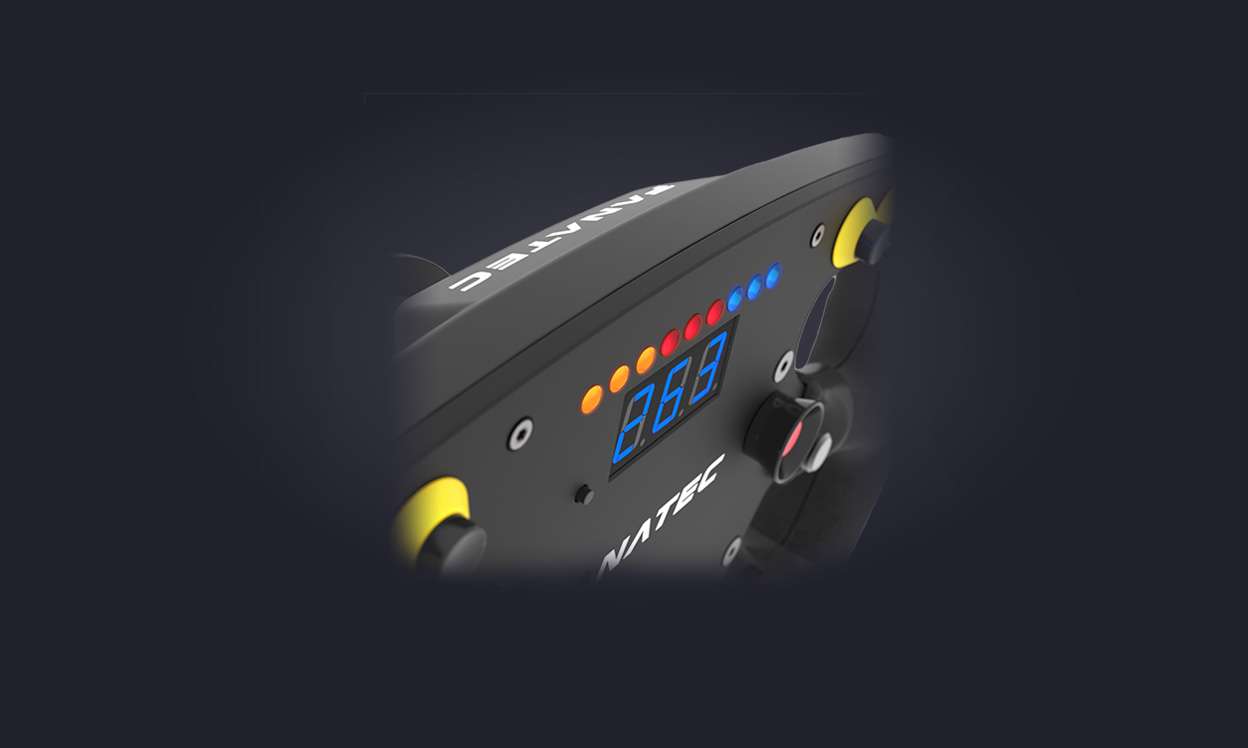
- Revolutionäre LED Anzeige mit 9 LED’s (3 x gelb, 3 x rot, 3 x blau) um die Motordrehzahl zu suggerieren und somit den optimalen Schaltmoment anzuzeigen (Rev Meter).
- LED Display zur Anzeige von Telemetriedaten..
- Tuning-Funktionen mit LED-Anzeige zum Anpassen der Einstellungen unabhängig vom Spiel und während des Spiels (Details siehe kompatible Wheel Bases/ Racing Wheels)
- Verstellbare und abnehmbare Schalthebel komplett aus Metall. Stellen Sie den Winkel, den Abstand zum Lenkrad und den Weg der Paddel ein.
- Racing-Style Button Caps inklusive
Kompatibilität
NULL
- ClubSport Wheel Base V1
- ClubSport Wheel Base V2
- ClubSport Wheel Base V2.5
- CSL Elite Wheel Base
- CSL Elite Wheel Base V1.1
- CSL Elite Wheel Base + - offiziell lizensiert für PS4™
- CSL Elite Racing Wheel - offiziell lizensiert für PS4™
- PODIUM Wheel Base DD1
- PODIUM Wheel Base DD2
- PODIUM Racing Wheel F1 - offiziell lizensiert für PS4™
NULL
- Xbox One®: Dieses Lenkrad ist nicht kompatibel zur Xbox One.
- PC und andere Plattformen: Hier gelten die Spezifikationen der kompatiblen Wheel Bases.
Hinweise
Zur Inbetriebnahme des Produkts ist eine kompatible Fanatec Wheel Base (nicht enthalten) zwingend erforderlich!
F1 2018 Game - an official product of the FIA FORMULA ONE WORLD CHAMPIONSHIP. © 2018 The Codemasters Software Company Limited ("Codemasters"). All rights reserved. "Codemasters”®, “EGO”® and the Codemasters logo are registered trade marks owned by Codemasters.
The F1 FORMULA 1 logo, F1 logo, FORMULA 1, FORMULA ONE, F1, FIA FORMULA ONE WORLD CHAMPIONSHIP, GRAND PRIX and related marks are trade marks of Formula One Licensing BV, a Formula 1 company. © 2018 Cover images Formula One World Championship Limited, a Formula 1 company. Licensed by Formula One World Championship Limited. The FIA and FIA AfRS logos are trade marks of Federation Internationale de l’Automobile. All rights reserved.
All other copyrights or trade marks are the property of their respective owners and are being used under license. Developed and published by Codemasters.
Da dieses Produkt nicht mehr hergestellt wird und dieser Jubiläumsverkauf die letzten Einheiten darstellt, die jemals zum Kauf angeboten werden, können wir eventuell nicht unseren normalen RMA-Service anbieten. Sollte ein Garantieanspruch erforderlich sein, werden wir versuchen, das Produkt zu reparieren, aber in dem Fall, dass dies nicht möglich ist, wird Ihnen selbstverständlich eine angemessene Alternative angeboten.
Verpackungsinformationen
- Abmessungen (L x W x H) 31cm x 55cm x 21cm
- Gewicht 1.8kg
- Volumengewicht 2.86kg
Inhalt
- ClubSport Lenkrad Formula 1 Esports
- Racing-Style Button Caps
- Quick Guide, Schnellanleitung
- Sicherheitsnadel für Langzeitlagerung
- Sicherheitsschraube für Langzeitmontage an der Wheel Base
Technische Spezifikationen
- Plattform PC, PS4 Ready
- Abnehmbare Button Caps Included
- Druckknopf mit hohem Rand Ja (2)
- Diameter 270mm
- Vibrationsmotoren Ja (2)
- Analoger Joystick Ja
- Einstellbare Schaltwippen Distanz zum Lenkrad, Weg
- Quick release ClubSport
- Display 3-stellige LED
- Rev lights Ja
- Funky Switch 7-Wege
- Buttons 11
- Griffmaterial Alcantara®
- Gewicht (ungefähr) 1200g
- Material Metall
Any RJ12-RJ12 (6p6c straight) and USB (type A -- type B; USB 1/2.0; USB Type C) cable which has the right connectors on both ends can be used. If you use high quality cables of similar length to the originals, there should be no issues. Please keep in mind that FANATEC cannot guarantee perfect functionality of our products if third-party products are used, even if the combination should work!
Important notes regarding (replacement) cables:
- Cables which are significantly longer than the original cables can cause connection issues
- Extension cables are often the source of connection issues. Longer high-quality cables are the better option
- If your product came with a high-quality ferrite core cable, a replacement cable should be of similar quality
- For USB Type C cables, please make sure that you are using USB Type C Data and not a Charging cable
Q: Can I purchase replacement "RJ12--RJ12" / "USB A -- USB B / USB Type C (for the CSL DD)" cables from FANATEC?
A: We should be able to offer replacement cables for all recent products. If they are not offered in the webshop, please ask our support team. Alternatively, it is also possible to use similar standard USB/RJ12 high quality cables, which are inexpensive and can be found at most electrical retailers.
Grundsätzlich sollten alle standard RJ12--RJ12 (6p6c - straight) und USB (Type A auf Type B; USB 1/2.0) Kabel passen und einwandfrei funktionieren, welche die richtigen Stecker bieten. Sofern hochqualitative Kabel mit ähnlicher Länge verwendet werden, sollte dies kein Problem darstellen. Bitte beachten Sie, dass Fanatec keine uneingeschränkte Garantie auf Funktionalität geben kann, sofern Teile/Produkte von Drittherstellern verwendet werden bzw. involviert sind.
Wichtige Anmerkungen zu Ersatzkabeln:
- Kabel welche (deutlich) länger als die Originalkabel sind, können zu Verbindungsproblemen führen
- Verlängerungskabel (und Adapterstecker) sind oft die Ursache von mangelhafter Übertragungsqualität der Signale. Längere Kabel wären hier die bessere Option.
- Wenn ihr Produkt mit einem hochwertigen Kabel inkl. Ferrit-Kern geliefert wurde, sollten sie als Ersatz ein ähnlich hochwertiges Kabel verwenden.
Frage: Kann ich ein (RJ12--RJ12 oder USB A -- USB B) Ersatzkabel von Fanatec kaufen?
Antwort: Wir sollten in der Lage sein für aktuelle Produkte Ersatzkabel zu Verfügung zu stellen. Falls diese im Webshop nicht gelistet sind, fragen sie bitte unser Supportteam danach. Es ist allerdings auch möglich ähnliche Standardkabel in hoher Qualität von anderen Händlern zu erschwinglichen Preisen zu kaufen und zu verwenden.
Every car in every game can have a different steering angle. In order to match your steering angle with the one of the car, you will need to have the ‘Sensitivity’ setting (in the tuning menu) set to ‘Auto’. Once this is done, you will have to re-calibrate the controller in the game.
As every game is different, some will require you to set the steering angle in the options menu. For example, in Assetto Corsa or Assetto Corsa Competizione, you will need to set the degrees in game and then apply the same setting in the tuning menu.
For Dirt Rally and Dirt Rally 2.0 for example, you will need to perform the calibration in game, then set the saturation to 63 and set the sensitivity in the tuning menu to 900 degrees in order to get the exact steering lock of the car in-game.
In case the steering angles are still not matching, please try check the following:
- Turn your steering wheel at 90 degrees.
- Open the tuning menu and go to the ‘Sensitivity’ setting
- Start reducing the sensitivity setting until the in-game steering wheel starts to match that of your steering wheel. Turn the wheel left and right, and check that it is now matching with the in-game steering wheel.
Some games may not have a realistic steering wheel animation, and will therefore be impossible to match with your steering wheel.
Chaque voiture dans chaque jeu peut avoir un angle de braquage différent. Afin de faire correspondre votre angle de braquage avec celui de la voiture, vous devrez régler le paramètre Sensibilité (dans le menu de réglage) sur Auto. Ensuite, vous devrez terminer le calibrage du contrôleur dans le jeu.
Si vous obtenez toujours un angle de braquage différent sur votre volant et dans la voiture dans le jeu, vous devrez alors vérifier les points suivants :
Comme chaque jeu est différent, certains jeux nécessitent de régler l'angle de braquage dans les paramètres. Par exemple, dans Assetto Corsa et Assetto Corsa Competizione, vous devrez définir les degrés en jeu, puis appliquer le même paramètre dans le menu de réglage. Ensuite, toutes les voitures seront assorties.
Pour Dirt Rally et Dirt Rally 2.0 par exemple, vous devrez effectuer le calibrage dans le jeu, puis régler la saturation sur 63 et régler la sensibilité dans le menu de réglage sur 900 degrés afin d'obtenir le verrouillage de direction exact de la voiture en Jeu.
Si le volant ne correspond toujours pas, procédez comme suit :
- Tournez votre volant à 90 degrés.
- Ouvrez le menu de réglage et allez dans le réglage ''Sensibilité''
- Commencez à réduire la sensibilité jusqu'à un point où vous voyez le volant sur l'écran correspondant à la position de votre propre volant. Tournez à gauche et à droite jusqu'au bout, jusqu'à ce que vous sentiez le soft lock (limite de rotation du volant) et vérifiez si la position du volant sur l'écran correspond à la vôtre.
Sachez que certains jeux n'ont pas d'animation réaliste de rotation du volant, il ne sera donc pas possible de faire correspondre le volant à l'écran avec le vôtre.
Cada coche en cada juego puede tener un ángulo de dirección diferente. Con el fin de hacer coincidir su ángulo de dirección con el del coche, usted tendrá que tener el ajuste de sensibilidad (en el menú de ajuste) establecido en automático. A continuación, tendrá que completar la calibración del controlador en el juego.
En caso de que usted todavía está recibiendo un ángulo de dirección diferente en el volante y en el coche en el juego, entonces usted tendrá que comprobar lo siguiente:
Como cada juego es diferente, algunos juegos requieren para establecer el ángulo de dirección en los ajustes. Por ejemplo, en Assetto Corsa y Assetto Corsa Competizione, deberá establecer los grados en el juego y luego aplicar la misma configuración en el menú de ajuste. Entonces todos los coches estarán a la par.
Para Dirt Rally y Dirt Rally 2.0, por ejemplo, deberá realizar la calibración en el juego, luego establecer la saturación en 63 y establecer la sensibilidad en el menú de ajuste a 900 grados para obtener el bloqueo de dirección exacto del automóvil en el juego.
En caso de que el volante no coincida todavía, realice lo siguiente:
- Gire el volante a 90 grados.
- Abra el menú de ajuste y vaya a la configuración de ''Sensibilidad'' (Sensitivity).
- Comience a reducir la sensibilidad a un punto, donde se ve el volante en la pantalla que coincide con la posición de su propio volante. Gire a la izquierda y a la derecha y todo el camino hasta que sienta el bloqueo suave y compruebe si la posición del volante en la pantalla coincide con la suya.
Por favor, sepa, que algunos juegos no tienen una animación de giro del volante realista, por lo tanto, no será posible hacer coincidir el volante en la pantalla con el suyo.
Ogni auto in ogni gioco può avere un angolo di sterzata diverso. Per far corrispondere il tuo angolo di sterzata a quello dell'auto, dovrai impostare la sensibilità (nel menu di messa a punto) su Auto. Quindi dovrai completare la calibrazione del controller nel gioco.
Nel caso in cui ottieni ancora un angolo di sterzata diverso sul volante e nell'auto nel gioco, dovrai controllare quanto segue:
Poiché ogni gioco è diverso, alcuni giochi richiedono di impostare l'angolo di sterzata nelle impostazioni. Ad esempio, in Assetto Corsa e Assetto Corsa Competizione, dovrai impostare i gradi nel gioco e quindi applicare la stessa impostazione nel menu di ottimizzazione. Quindi tutte le auto saranno corrispondenti.
Per Dirt Rally e Dirt Rally 2.0, ad esempio, sarà necessario eseguire la calibrazione nel gioco, quindi impostare la saturazione su 63 e impostare la sensibilità nel menu di regolazione su 900 gradi per ottenere l'esatto bloccasterzo dell'auto in gioco.
Nel caso in cui il volante non corrisponda ancora, eseguire le seguenti operazioni:
- Ruota il volante di 90 gradi.
- Apri il menu di sintonizzazione e vai all'impostazione "Sensibilità"
- Inizia a ridurre la sensibilità fino a un punto in cui vedi il volante sullo schermo che corrisponde alla posizione del tuo volante. Gira a sinistra e a destra e fino in fondo finché non senti il blocco morbido e controlla se la posizione del volante sullo schermo corrisponde alla tua.
Tieni presente che alcuni giochi non hanno un'animazione realistica del volante, quindi non sarà possibile abbinare il volante sullo schermo con il tuo.
Jedes Fahrzeug in jedem Spiel/Simulation kann einen unterschiedlichen Lenkwinkel haben. Um den Lenkwinkel Ihrer Hardware mit dem des Fahrzeugs in der Simulation anzupassen, müssen Sie das Sensitivity Setting (Im Tuning Menü) auf ‚Auto‘ stellen. Anschließend müssen Sie die Controller Kalibrierung im Spiel abschließen.
Falls Sie dennoch einen anderen Lenkwinkel als im Spiel haben, beachten Sie bitte folgendes:
Da jedes Spiel anders ist, müssen Sie bei einigen Spielen den Lenkwinkel in den Einstellungen einstellen. In Assetto Corsa und Assetto Corza Competizione müssen Sie beispielsweise die Gradzahl im Spiel einstellen und dann die gleiche Einstellung im Tuning-Menü anwenden. Dann passen alle Lenkwinkel der Fahrzeuge.
Für Dirt Rally 1 und 2 zum Beispiel, muss die Kalibrierung im Spiel vorgenommen werden, dann die Sättigung (Saturation) auf 63 gestellt werden und das Lenkrad auf 900° gestellt werden um den exakt gleichen Lenkwinkel wie beim Fahrzeug im Spiel einzustellen.
Sollte das Lenkrad immer noch nicht mit dem im Spiel übereinstimmen, führen Sie die folgenden Schritte durch:
- Drehen Sie Ihr Lenkrad auf 90°
- Öffnen Sie das Tuning Menu und die „Sensitivity“ Einstellung
- Beginnen Sie die Sensitivität zu senken, bis zu einem Punkt, an dem das Lenkrad auf dem Bildschirm im Spiel mit dem Lenkrad an Ihrer Wheel Base übereinstimmt. Drehen Sie das Lenkrad dann anschließend bis zum Anschlag links und rechts und überprüfen Sie, ob das Lenkrad, mit dem im Spiel übereinstimmt.
Bitte bedenken Sie, dass nicht jedes Spiel eine realistische Anzeige des Lenkrads im Fahrzeug anzeigt, bei diesen Spielen ist es leider nicht möglich, das Lenkrad mit dem im Spiel über den Bildschirm zu synchronisieren.
All steering wheels are equipped with 13 golden contact pins. Depending on the steering wheel itself, one or two of the golden pins may be shorter than the rest.
The purpose of the shorter pin is to connect last or after all other pins are already connected. This is called a lagging electrical circuit. It means the steering wheel is only supplied with electricity after the circuit is closed.
Vous remarquerez peut-être qu'une broche est plus courte sur le connecteur du quickrelease .
Ceci est normal et n'affecte pas la connectivité du volant.
Le but de la broche la plus courte est de se connecter en dernier ou après que toutes les autres broches sont déjà connectées. C'est ce qu'on appelle un circuit électrique retardé. Cela signifie que le volant sera alimenté en électricité avant la fermeture du circuit.
Puede ser que haya nota que uno de los pines en el conector Quick Release es más corto.
Esto es normal, y no afecta la conectividad del volante.
El propósito del pin más corto, es que este se conecte hasta el final, o una vez que los otros pines ya estén conectados. A esto se le llama circuito eléctrico de rezago. Significa que la electricidad será suministrada al volante, antes de que el circuito este cerrado.
Potresti notare che un pin è più corto sul connettore a rilascio rapido. Ciò è normale e non influisce sulla connettività del volante. Lo scopo del pin più corto è collegare per ultimo o dopo che tutti gli altri pin sono già collegati. Questo è chiamato un circuito elettrico in ritardo. Significa che il volante verrà alimentato con l'elettricità prima che il circuito venga chiuso.
私のピンの1つが他のピンよりも短い
クイックリリースコネクタに短いピンがあることに気付くかもしれません。
これは正常です、ステアリングホイールの接続には影響しません。短いピンの目的は、最後に接続するか、他のすべてのピンがすでに接続された後に接続することです。これは遅れ電気回路と呼ばれます。回路が閉じる前にハンドルに電気が供給されることです。
There might be several reasons why your wheelbase is not detecting your steering wheel.
1) Software
Please always make sure you have the latest driver package and firmware installed for your wheelbase. You can find the driver package on the product page of the steering wheel you are trying to use. In order to find more info on how to perform the driver and firmware update, please refer to this manual https://fanatec.com/media/pdf/a6/ee/64/Driver-Firmware-Instructions-Manual-EN_Web_02_MO.pdf
2) Hardware
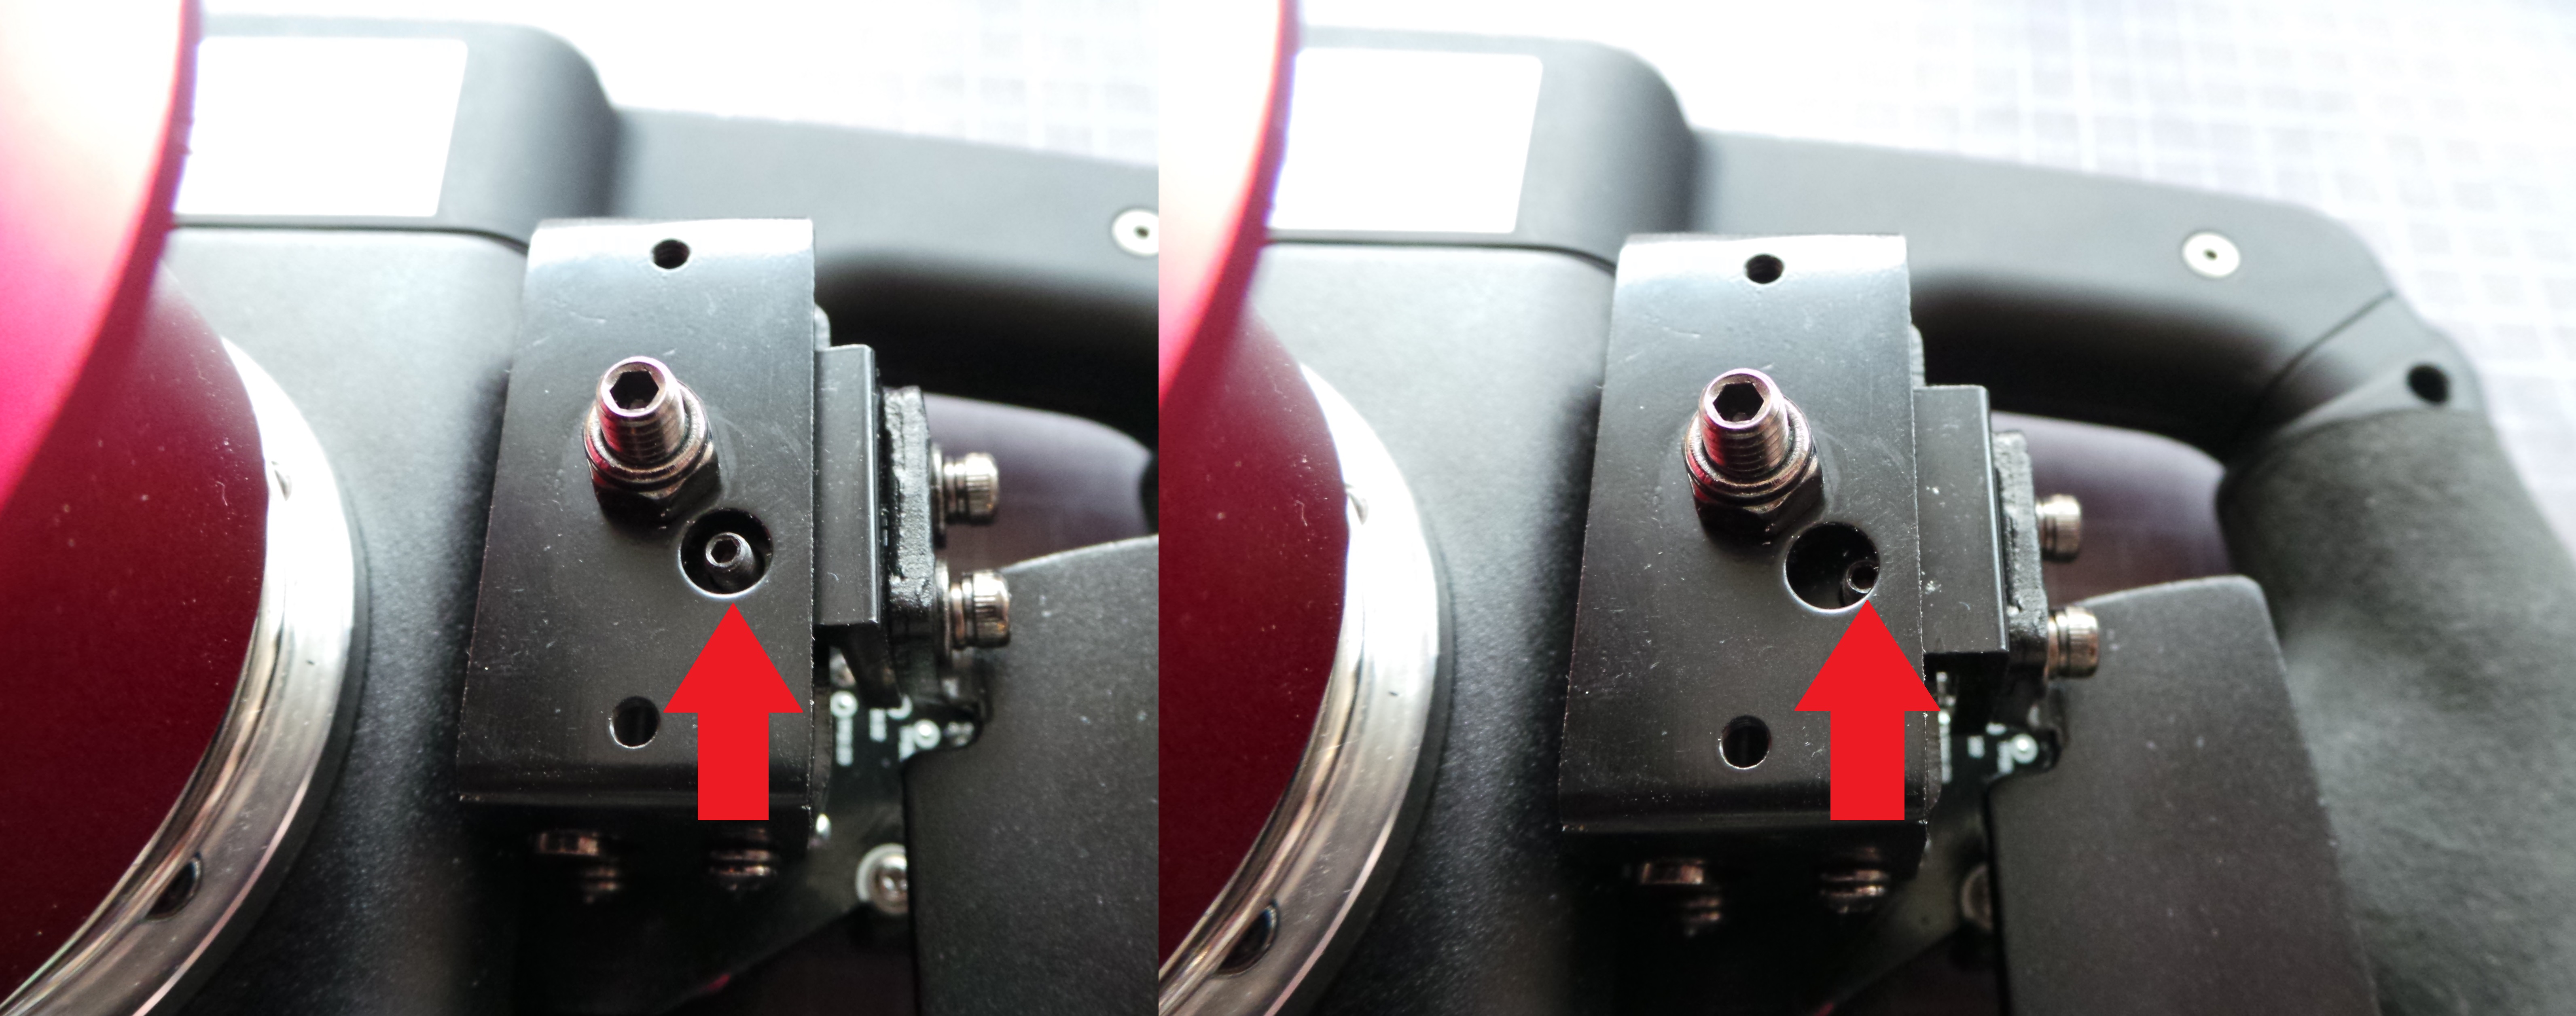
2.1 Inspect the QR Pins at the back of the wheel for any damage. (One of the pins is shorter and there is no need to worry. It is on purpose).
2.2 Inspect the hub of the wheelbase for any damage
2.3 If you have a second rim please check if the other rim shows the same symptoms.
2.4 Perform Screw re-tightening. Loosen the screws surrounding the pins (main cable) and re-tighten them again. Note: Be very careful with the small screw in the middle.

In case the issue still persists after the driver and firmware update and there is no visible damage on the pins and the hub, please reach out to the Fanatec Technical support.
1.- Comment démarrer
Avant de brancher le volant McLaren GT3 sur une base de volant (CSW V2.5, CSW V2, CSL E WB et CSL E WB PS4), téléchargez le dernier pilote Fanatec (v310 ou supérieur) et mettez à jour le micrologiciel de la base de volant. Seulement après avoir effectué ces deux étapes, le volant McLaren GT3 sera reconnu par la base de volant, sinon les deux produits ne vont pas fonctionner.
Pour plus d'informations sur l'installation du pilote Fanatec et la mise à jour du micrologiciel de la base de volant référez-vous à notre vidéo youtube turorial ci-dessous ou au manuel en ligne base de volant correspondant.
Veuillez noter: Le pilote et le manuel en ligne base de volant peuvent être trouvés sur notre site internet dans la section "Téléchargements" en choisissant la bonne base de volant dans le menu déroulant correspondant.
2.- Brancher le volant McLaren GT3
Maintenant que le pilote Fanatec et le micrologiciel de base de volant sont à jour, branchez le McLaren GT3 sur la base de volant comme indiqué dans le guide rapide (page 2) ou cet article FAQ en utilisant la vis de fixation fournie! Le volant McLaren GT3 sera désormais reconnu par la base de volant et le driver.
3.- Mise à jour du micrologiciel du volant McLaren GT3
Via le pilote Fanatec, sélectionnez l'onglet "Mise à jour" et mettez à jour le micrologiciel du volant McLaren GT3 en cliquant sur le bouton "Mise à jour micrologiciel du volant McLaren" dans le coin inférieur gauche de la fenêtre Fanatec Driver.
Pour plus d'informations sur la façon d'effectuer une mise à jour du micrologiciel du volant McLaren GT3, reportez-vous à notre vidéo youtube turorial.
1.- Comenzando
Antes de connectar el volante CSL Elite McLaren GT3 a una base de volante compatible (CSW v2.5, CSW v2, CSL E WB y CSL E WB PS4), descargue el último driver Fanatec (versión 310 o superior) y actualice el firmware de la base. Solo después de realizar estos pasos, el volante McLaren GT3 será reconocido por la base del volante, en caso contrario no funcionarán correctamente.
Para mas información sobre como instalar el Driver Fanatec y actualizar el firmware de la base, refiérase al videotutorial más abajo, o al manual online de la correspondiente base de volante.
Importante: Tenga en cuenta que el driver y el manual online de la base de volante se encuentran en la web bajo la sección "Downloads", elegiendo previamente la base volante correcta en el menú correspondiente.
2.- Conectando el volante McLaren GT3
Ahora que tanto el Driver Fanatec como la base del volante están actualizados, conecte el volante McLaren GT3 a la base del volante como se muestra en la guía rápida o en éste artículo del FAQ utilizando el tornillo incluido. El volante McLaren GT3 será ahora reconocido por la base de volante y el driver.
3.- Actualizar el firmware del volante McLaren GT3
En el Driver Fanatec, seleccione la pestaña "Update" y actualice el firmware del volante McLaren GT3 pulsando en el botón "Update Steering Wheel McLaren Firmware" en la esquina inferior izquierda de la ventana del Drive Fanatec.
Para más información sobre como actualizar el firmware del volante McLaren GT3, por favor refiérase al vídeo a continuación.
1. Erste Schritte
Bevor das McLaren GT3 Lenkrad auf einer der kompatiblen Wheel Bases (CSW V2.5, CSW V2, CSL Elite Wheel base, CSL Elite Racing Wheel für PS4) verwendet werden kann, muss der Fanatec Treiber (v310 oder höher) auf einem PC installiert werden und die Firmware für die Wheel Base auf den neusten Stand gebracht werden. Erst nachdem diese Schritte erfolgt sind, wird das Lenkrad an der Wheel Base erkannt, anderenfalls funktionieren die Produkte nicht miteinander.
Der genaue Vorgang hierfür wird ausführlich in der unten angezeigten Videoanleitung beschrieben.
Den benötigten Treiber und die Anleitung für die verwendete Wheel Base finden Sie auf unserer Webseite unter „Downloads“. Dort muss die verwendete Wheel Base aus dem Drop Down Menü ausgewählt werden.
2. Anschließen des McLaren GT3 Lenkrades
Nachdem der Fanatec Treiber und die Firmware der Wheel Base aktualisiert wurden, kann das McLaren GT3 Lenkrad auf der Wheel Base aufgesteckt werden wie im Quick-Guide des Lenkrades auf Seite 2 und in diesem FAQ Artikel über die mitgelieferte befestigungsschraube beschrieben wird. Das McLaren GT3 Lenkrad sollte nun von der Wheel Base erkannt und dementsprechend im Treiber angezeigt werden.
3. Aktualisieren der Firmware für das McLaren GT3 Lenkrad
Im Reiter „Update“ in den Eigenschaften der Wheel Base in der Fanatec Property Page kann das Firmware Update für das McLaren GT3 Lenkrad über die Schaltfläche „Update Steering Wheel McLaren Firmware“ aktualisiert werden.
Der genaue Vorgang hierfür wird ebenfalls in der Videoanleitung gezeigt.
Such unpleasant effect is often caused by not properly set tuning menu settings.
We do expect that players will want to get the most out of their wheel bases, but maxing out all available settings is not the right way to do it. Often this ends up in the car becoming undriveable or the force feedback feeling is not so pleasant.
To get a good starting point and settings that will make sure that the base will provide you with proper behaviour, you can check the Fanatec Recommended settings for the game you wish to play. You will find a list of games in our Forum (https://forum.fanatec.com/categories/Fanatec_Forum) under the Racing Games/Simulations. Select your game and you will see the Fanatec Recommended settings page showing on top. Please note that the settings are different for each platform so please take a moment to select the right platform (mentioned in the title).
Apply the Fanatec recommended settings, test and see if they suit you. You can then start fine-tuning and get the desired force feedback feeling that will match your driving style perfectly.
Un tel effet désagréable est souvent causé par des paramètres de menu de réglage mal réglés.
Nous nous attendons à ce que les joueurs veuillent tirer le meilleur parti de leurs roues, mais maximiser tous les paramètres disponibles n'est pas la bonne façon de le faire. Souvent, cela finit par rendre la voiture incontrôlable ou la sensation de retour de force n'est pas si agréable.
Pour obtenir un bon point de départ et des paramètres qui garantiront que la base vous fournira un comportement approprié, vous pouvez vérifier les paramètres recommandés par Fanatec pour le jeu auquel vous souhaitez jouer. Vous trouverez une liste de jeux dans notre Forum (https://forum.fanatec.com/categories/Fanatec_Forum) sous Racing Games/Simulations. Sélectionnez votre jeu et vous verrez la page des paramètres recommandés par Fanatec s'afficher en haut. Veuillez noter que les paramètres sont différents pour chaque plate-forme, veuillez donc prendre un moment pour sélectionner la bonne plate-forme (mentionnée dans le titre).
Appliquez les paramètres recommandés par Fanatec, testez et voyez s'ils vous conviennent. Vous pouvez ensuite commencer à régler avec précision et obtenir la sensation de retour de force souhaitée qui correspondra parfaitement à votre style de conduite.
Tal efecto desagradable es a menudo causado por no ajustar correctamente la configuración del menú.
Esperamos que los jugadores quieran sacar el máximo provecho de sus bases de ruedas, pero maximizar todos los ajustes disponibles no es la forma correcta de hacerlo. A menudo esto termina ocasionando que el coche que se vuela inconducible o que la sensación de retroalimentación de la fuerza (FFB) no sea tan agradable.
Para tener un buen punto de partida y ajustes que asegurarán que la base le proporcionará un comportamiento adecuado, puede consultar los ajustes recomendados de Fanatec para el juego que desee jugar. Encontrará una lista de juegos en nuestro Foro (https://forum.fanatec.com/categories/Fanatec_Forum) en la sección Juegos de carreras / Simulaciones (Racing Games/ Simulations) . Seleccione su juego y verá la página de configuración recomendada de Fanatec que se muestra en la parte superior. Por favor tenga en cuenta que las configuraciones son para plataforma, por lo que es recomendable tomarse un momento para seleccionar la plataforma correcta (mencionada en el título).
Aplique los ajustes recomendados de Fanatec, pruebe y compruebe si le convienen. Entonces, puede comenzar a afinar y obtener la sensación de retroalimentación de fuerza (FFB) deseada que coincida perfectamente con su estilo de conducción.
Tale effetto spiacevole è spesso causato da impostazioni del menu di sintonizzazione non impostate correttamente.
Ci aspettiamo che i giocatori vogliano ottenere il massimo dalle loro basi del volante, ma massimizzare tutte le impostazioni disponibili non è il modo giusto per farlo. Spesso questo finisce nel rendere l’auto inguidabile o causando la sensazione di force feedback non piacevole.
Per ottenere un buon punto di partenza e impostazioni che assicurino che la base ti fornisca un comportamento corretto, puoi controllare le impostazioni consigliate da Fanatec per il gioco a cui desideri giocare. Troverai un elenco di giochi nel nostro Forum (https://forum.fanatec.com/categories/Fanatec_Forum) sotto Giochi di corse/Simulazione. Seleziona il tuo gioco e vedrai la pagina delle impostazioni consigliate di Fanatec mostrata in alto. Tieni presente che le impostazioni sono diverse per ogni piattaforma, quindi prenditi un momento per selezionare la piattaforma giusta (menzionata nel titolo).
Applica le impostazioni consigliate da Fanatec, prova e vedi se ti si addicono. Puoi quindi iniziare la messa a punto e ottenere la sensazione di force feedback desiderata che si abbinerà perfettamente al tuo stile di guida.
Solch ein unerwünschter Effekt kann oft bei falschen Einstellungen im Tuning Menu entstehen.
Natürlich erwarten wir, dass Nutzer das Meiste aus Ihren Wheel Bases herausholen möchten, alle verfügbaren Einstellungen auf Maximum zu stellen ist allerdings nicht der richtige Weg. Oft führt dies dazu, dass das Fahrzeug nicht mehr fahrbar ist oder das Force Feedback Gefühl nicht so angenehm ist.
Ein guter Anhaltspunkt für die Einstellungen sind die Fanatec Recommended Settings um sicherzustellen, dass sich Ihre Wheel Base ordnungsgemäß und vernünftig verhält. Sie finden dazu eine Liste mit Spielen/Simulationen in unserem Forum (https://forum.fanatec.com/categories/Fanatec_Forum) unter Racing Games/Simulations.
Wählen Sie Ihr Spiel aus und Sie werden die Fanatec Recommended Settings Seite oben auftauchen sehen. Bitte beachten Sie, dass die Einstellungen für jede Plattform variieren, stellen Sie also bitte sicher, dass Sie auch die richtige Plattform gewählt haben (Plattform ist im Titel erwähnt).
Wenden Sie die Fanatec Recommended Settings an und testen Sie, ob Ihnen diese zusagen. Anschließend können Sie das Feintuning angehen um das gewünschte Force Feedback zu erhalten, welches perfekt zu Ihrem Fahrstil passt.
In case the Power LED starts pulsating as soon as you attach the steering wheel, please check the following:
1) We have to make sure that we have the latest driver package installed and that our firmware is up to date. Please know that our latest steering wheels require the latest driver package and firmware for your base in order to be recognized. To download the driver, please go to the following page: https://fanatec.com/eu-de/driver
Once downloaded, please install it and proceed with the firmware updates
2) Inspect the pins at the back of the steering wheel as well as the hub of the wheelbase for any damage. (You will probably notice that one of the pins is shorter than the others. This is nothing to worry about. The shorten pin is left like this on purpose). In case you spot any damage, please make sure to reach out to our technical support team.
3) Loosen and then moderately retighten the screws located at the back of the steering wheel, around the pins and also the one in the middle.
In case none of the steps above help and you still get the pulsating power LED, please reach out to our technical support team. They will be able to assist you further.
Si la LED d'alimentation commence à clignoter dès que vous attachez le volant, veuillez vérifier le suivant :
1) Nous devons nous assurer que nous avons le dernier pack de pilotes installé et que notre firmware est à jour
Sachez que nos derniers volants nécessitent le dernier pack de pilotes et le dernier firmware pour votre base afin d’être reconnu. Pour télécharger le pilote, veuillez-vous rendre sur la page suivante :
https://fanatec.com/eu-de/driver
Une fois téléchargé, veuillez l'installer et procéder aux mises à jour du firmware
2) Inspectez les pins à l'arrière du volant ainsi que le moyeu de la base pour tout dégât. (Vous remarquerez probablement que l'un des pins est plus court que les autres. Il n'y a pas de quoi s'inquiéter. Le pin raccourci est laissé comme ça exprès). Si vous constatez des dégâts, assurez-vous de contacter notre équipe d'assistance technique.
3) Desserrer puis resserrer modérément les vis situées à l'arrière du volant, autour des pins et aussi celle du milieu.
Si aucune des étapes ci-dessus ne vous aide et que vous obtenez toujours le voyant d'alimentation clignotant, veuillez contacter notre équipe d'assistance technique. Ils pourront vous aider davantage.
En caso de que la luz LED de encendido en la base comience apenas conecte el volante, por favor verifique lo siguiente:
1) Tenemos que asegurarnos de que tenemos el paquete de controladores (driver) actual instalado, y que nuestro firmware está actualizado. Tenga en cuenta que nuestros volantes más recientes requieren el último paquete de controladores y firmware para su base para poder ser reconocidos. Para descargar el controlador, vaya a la siguiente página: https://fanatec.com/eu-de/driver
Una vez descargado, instálelo y continúe con las actualizaciones de firmware sugeridas.
2) Inspeccione los pines conectores en la parte posterior del volante, así como el conector de su base para verificar que no haya algún daño. (Probablemente notará que uno de los pines es más corto que los otros. Esto no es nada de lo que preocuparse. El perno acortado es más corto a propósito). En caso de que detecte algún daño, asegúrese de comunicarse con nuestro equipo de soporte técnico.
3) Afloje y luego moderadamente reapriete los tornillos ubicados en la parte posterior del volante, alrededor de los pines y también el del centro.
En caso de que ninguno de los pasos anteriores ayude y la luz LED de encendido aún esté parpadeando, comuníquese con nuestro equipo de soporte técnico. Ellos serán capaces de ayudarle aún más.
Nel caso in cui il LED di alimentazione inizi a lampeggiare non appena si collega il volante, controllare quanto segue:
1) Assicurarsi di avere installato il pacchetto driver più recente e che il nostro firmware sia aggiornato. Tieni presente che i nostri ultimi volanti richiedono il pacchetto driver e il firmware più recenti per la tua base, per essere riconosciuti. Per scaricare il driver, vai alla seguente pagina: https://fanatec.com/eu-de/driver Una volta scaricato, installalo e procedi con gli aggiornamenti del firmware
2) Ispezionare i perni sul retro del volante e il mozzo del base per eventuali danni. (Probabilmente noterai che uno dei perni è più corto degli altri. Non c'è nulla di cui preoccuparsi. Il perno accorciato è lasciato apposta così). In caso di danni, assicurati di contattare il gruppo di Supporto Tecnico.
3) Allentare e poi riavvitare moderatamente le viti poste sul retro del volante, attorno ai perni e anche quella centrale.
Nel caso in cui nessuno dei passaggi precedenti sia d'aiuto e continui a visualizzare il LED di alimentazione pulsante, contatta il gruppo di Supporto Tecnico. Saranno in grado di aiutarti ulteriormente.
Sollte die Power LED pulsierend aufleuchten, wenn Sie ihr Lenkrad anschließen, prüfen Sie bitte folgendes:
1) Wir müssen sicherstellen, dass Sie das aktuellste Treiberpaket installiert haben und die Firmware auf allen Produkten aktualisiert haben. Bitte beachten Sie, dass unsere neuesten Lenkräder immer die aktuellste Firmware auf der Base installiert benötigen, da die Lenkräder sonst nicht erkannt werden können. Um den Treiber herunterzuladen, folgen Sie diesem Link:
https://fanatec.com/eu-de/driver
Sobald Sie die Datei heruntergeladen haben, installieren Sie diese und fahren mit den Firmware-Updates fort.
2) Prüfen Sie die Pins im Quick Release Connector des Lenkrads auf Beschädigungen. (Sie werden vermutlich bemerken, dass einer der Pins kürzer ist als die anderen. Dies ist vollkommen normal und der Pin ist absichtlich kürzer). Sollten Sie eine Beschädigung an den Pins erkennen können, kontaktieren Sie bitte unseren Technischen Support.
3) Lockern und ziehen Sie die Schrauben rund um die Pins im Connector (und die kleine Schraube mittig der Pins) anschließend wieder mäßig an.
Sollten die oben genannten Schritte keine Besserung bringen und Sie immer noch die pulsierende Power LED an der Base sehen, kontaktieren Sie bitte unseren Technischen Support.
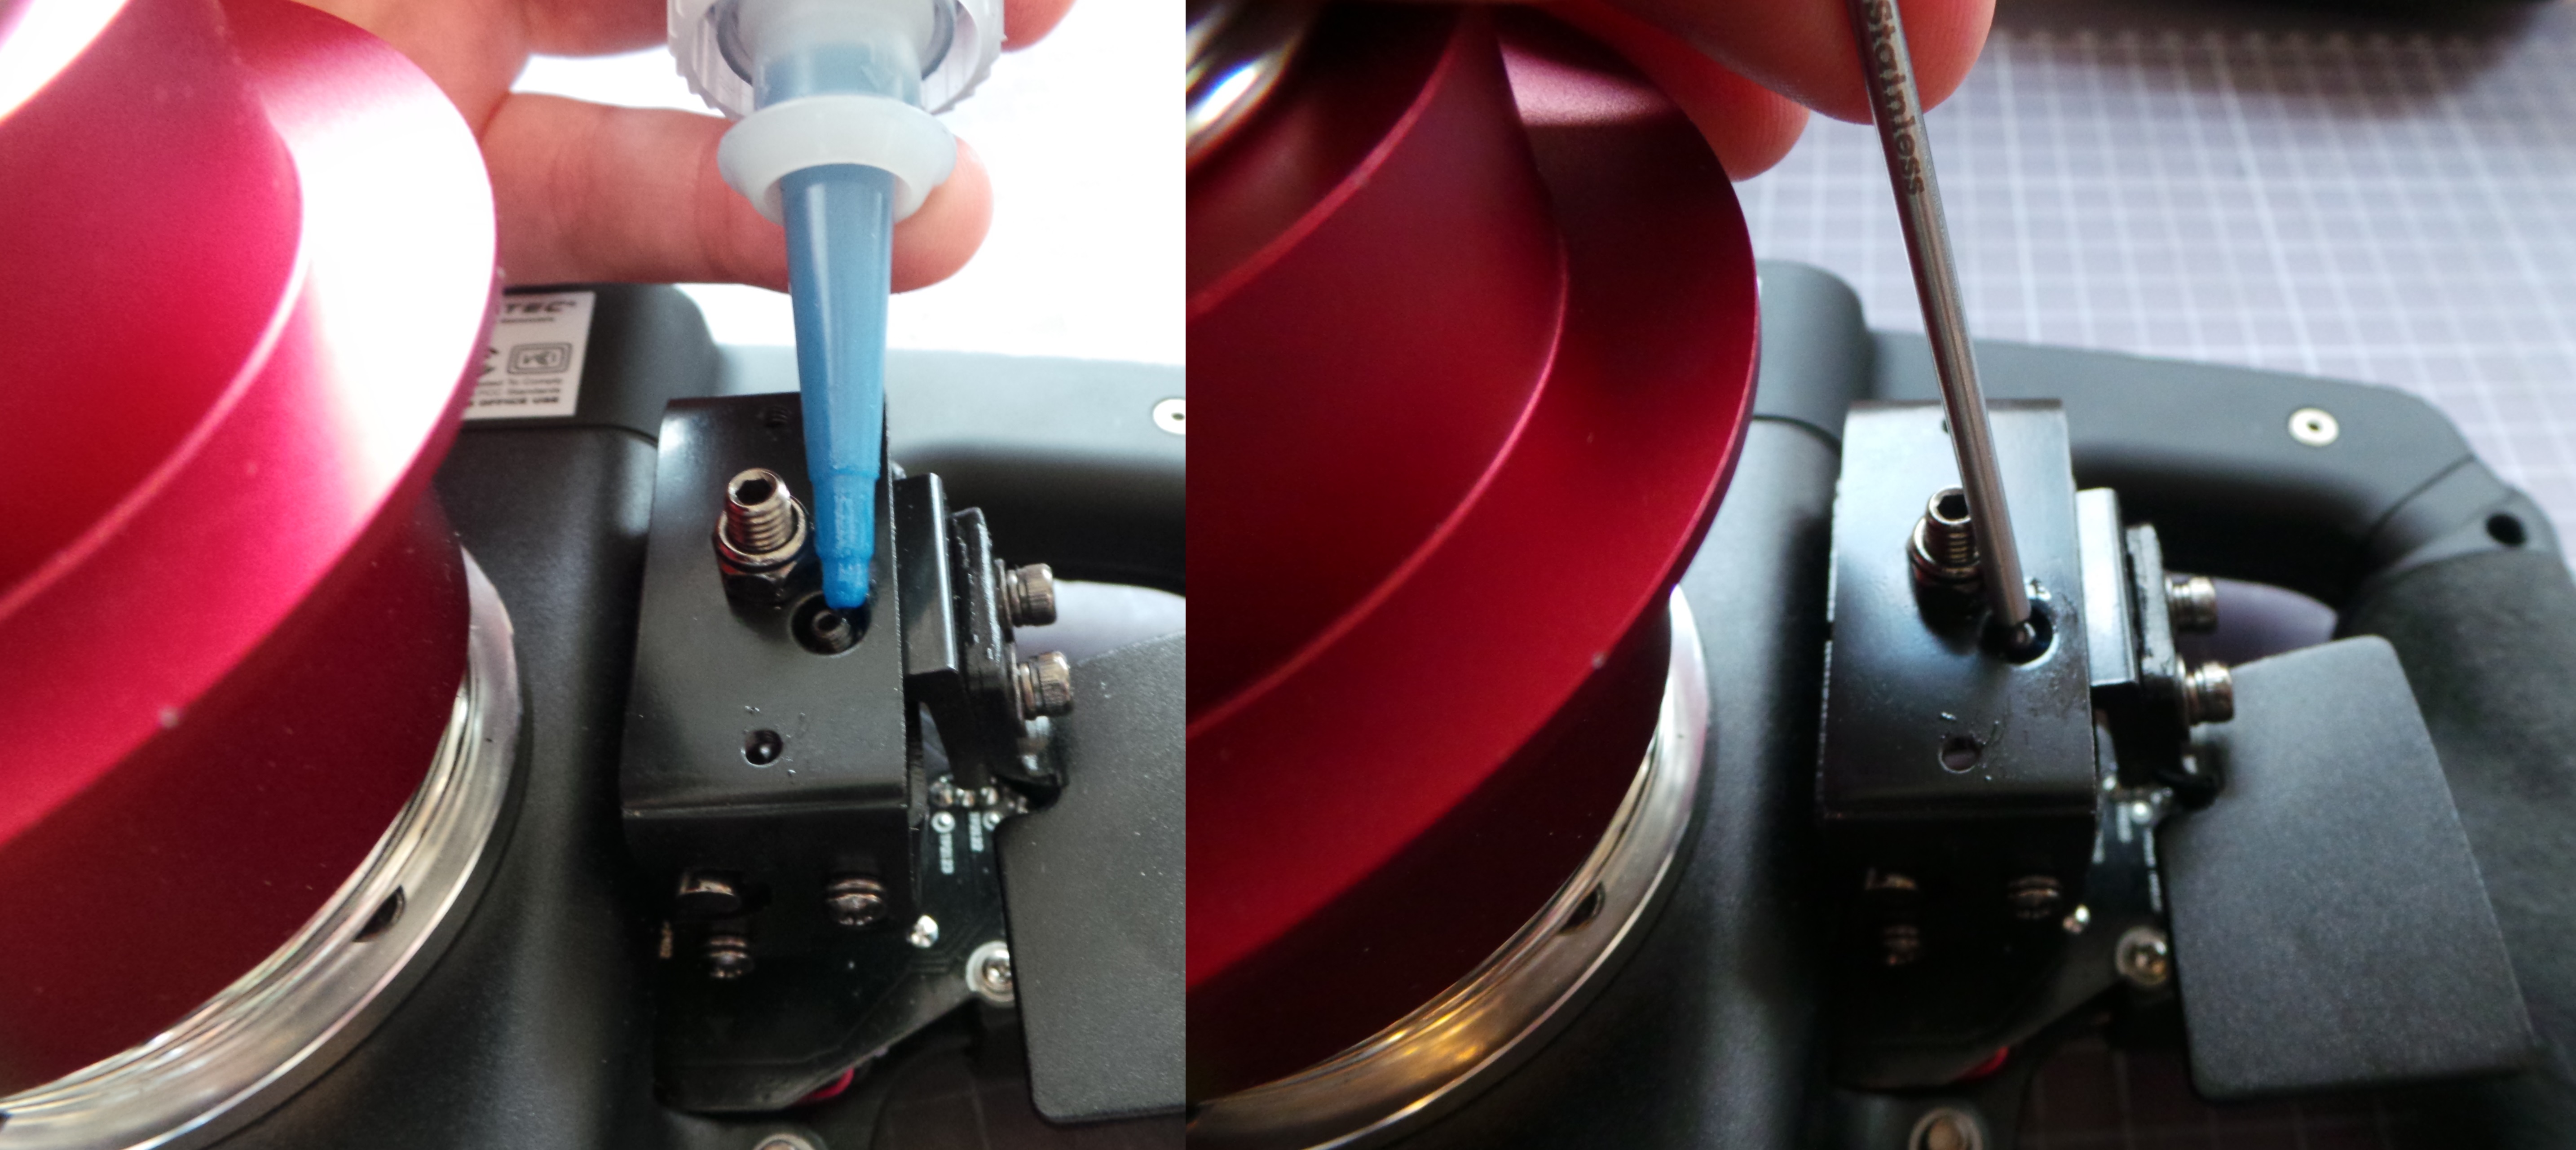
If the shifting paddle tends to stick while shifting, the most likely the reason is a loosened grub screw.
In order to resolve the issue, please use a 1.5mm Allen key to tighten the screw so it no longer touches the frame of the shifter paddle module. To ensure that the issue does not reoccur, you can apply a screw lock solution to the thread of the grub screw.
Si la palette du levier de vitesses se bloque lors du changement de vitesse, il est probable que la petite vis du module de changement séquentiel se soit dessérée et enclenché:
Pour résoudre le problème, resserrez la vis avec une clé Allen de 1,5 mm. Pour s'assurer que cela ne se reproduise plus, nous vous recommandons d'appliquer quelques gouttes de colle (comme Loctite 243 - force moyenne) sur le filetage de la vis:
Si al cambiar marcha la leva de cambio se atasca, es poque probablemente el tornillo pequeño en el módulo de cambio secuencial se ha suelto y enganchado:
Para resolver el problema, hay que volver a apretar el tornillo con una llave Allen de 1,5 mm. Para asegurarse que no vuelva a pasar, aconsejamos que se aplique algunas gotas de pegamento (como el Loctite 243 - medium strength) en la rosca del tornillo:
Wenn das Shifter Paddle beim Schalten klemmt, hat sich wahrscheinlich die kleine Madenschraube im Schaltmodul gelockert und verhakt sich:
Um das Problem zu beheben, muss die kleine Madenschraube mit einem 1,5 mm Inbusschlüssel so weit angezogen bzw. eingeschraubt werden, bis sie sich nicht mehr verklemmen kann. Um sicher zu gehen, dass die Schraube sich nicht von selbst lockert, kann man einen Schraubenkleber an der Madenschraube verwenden, bevor die Schraube angezogen wird:
新着:
シフト中にシフトパドルが動かなくなった場合は、グラブスクリューが緩んでいる可能性があります
この問題を解決するには、1.5mmアレンキーを使用してネジを締め直し、シフターパドルモジュールのフレームに触れないようにしてください。安全を確保し、今後問題が発生しないようにするために、グラブネジのネジ山にネジロックソリューションを適用できます
Oscillation can be felt when driving in reverse. We are aware of this effect, and are in contact with game developers in order to improve the feeling and remove the oscillations in question. This is not a hardware issue, and will not cause any damages to our respective products.
Une oscillation peut être ressentie lors de la conduite en marche arrière. Nous sommes conscients de cet effet et nous sommes en contact avec les développeurs de jeu afin d'améliorer le ressenti et supprimer les oscillations en question. Ce n'est pas un problème et cela ne causera aucun problème au produit.
Al conducir en reversa es posible sentir oscilación. Estamos conscientes de este efecto y estamos en contacto con los desarrolladores de juegos con el fin de mejorar la sensación y eliminar las oscilaciones en cuestión. Esto no es un problema y no causará ningún problema al producto.
L'oscillazione può essere avvertita durante la guida in retromarcia. Siamo consapevoli di questo effetto e siamo in contatto con gli sviluppatori del gioco per migliorare il feeling e rimuovere le oscillazioni in questione. Questo non è un problema e non causerà alcun difetto al prodotto.
Beim Rückwärtsfahren treten Oszillationen auf. Dieser Effekt ist uns bekannt und wir sind bereits mit den Spieleentwicklern in Kontakt, um das Fahrverhalten zu verbessern und das Oszillieren zu entfernen. Dies ist kein Produktfehler und verursacht keine Probleme mit dem Produkt.
