MANUAL | QUICK START GUIDE
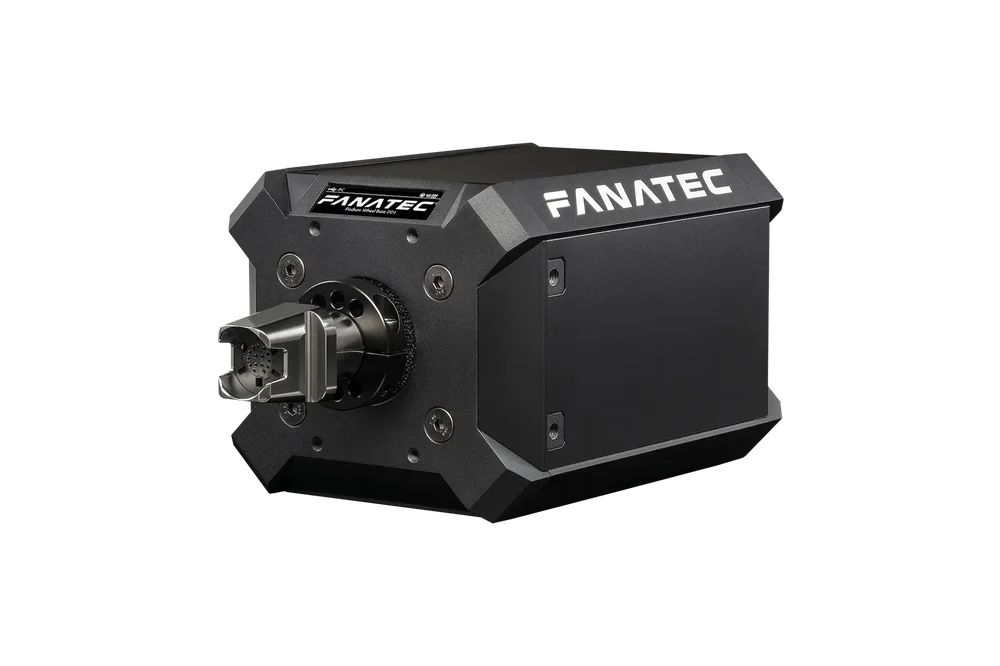
Podium Wheel Base DD1 QR2
A - PACKAGE CONTENT
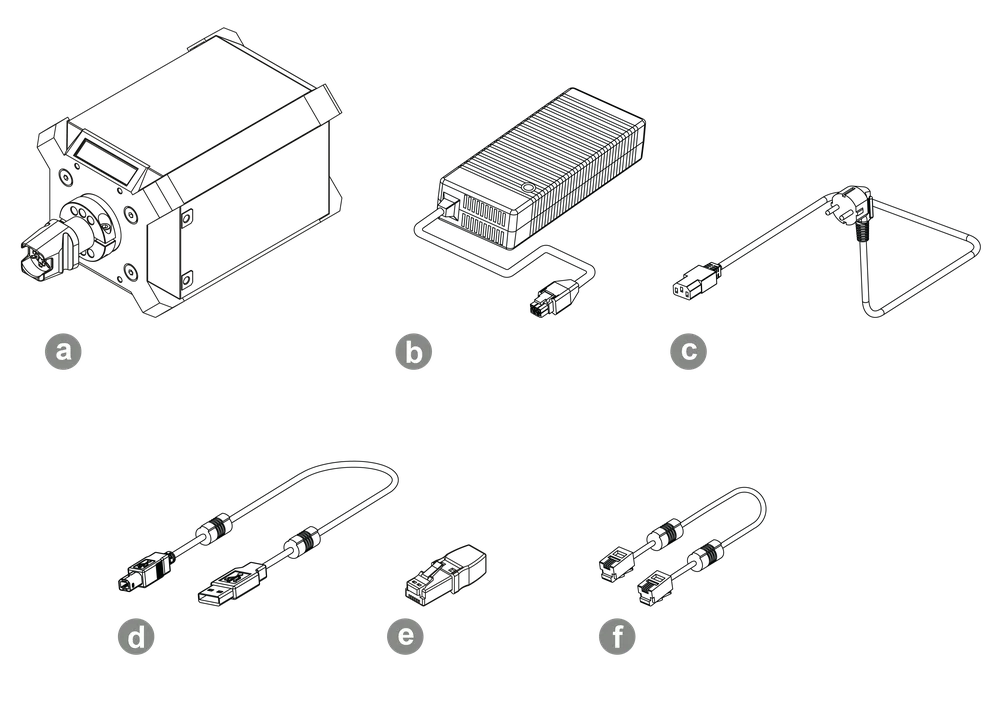
a - 1x Podium Wheel Base DD1
b - 1x Power Supply Unit (~ 150 cm)
c - 1x Power Cord (regional) (~ 150 cm)
d - 1x USB Cable (~ 250 cm)
e - 1x Torque Key
f - 1x RJ12 Cable (~ 200 cm)
B - PLAN YOUR SETUP
To get started with using the Podium Wheel Base DD1, decide on whether you will hard-mount the wheel base or use the ClubSport Table Clamp V2 (sold separately), connect your steering wheel via the Quick Release system, then connect the Podium Wheel Base DD1 to your Windows PC or Xbox console (steering wheel dependent) using the included USB cable. It is important to follow the chapter sequence of this manual for an effective assembly and setup procedure.
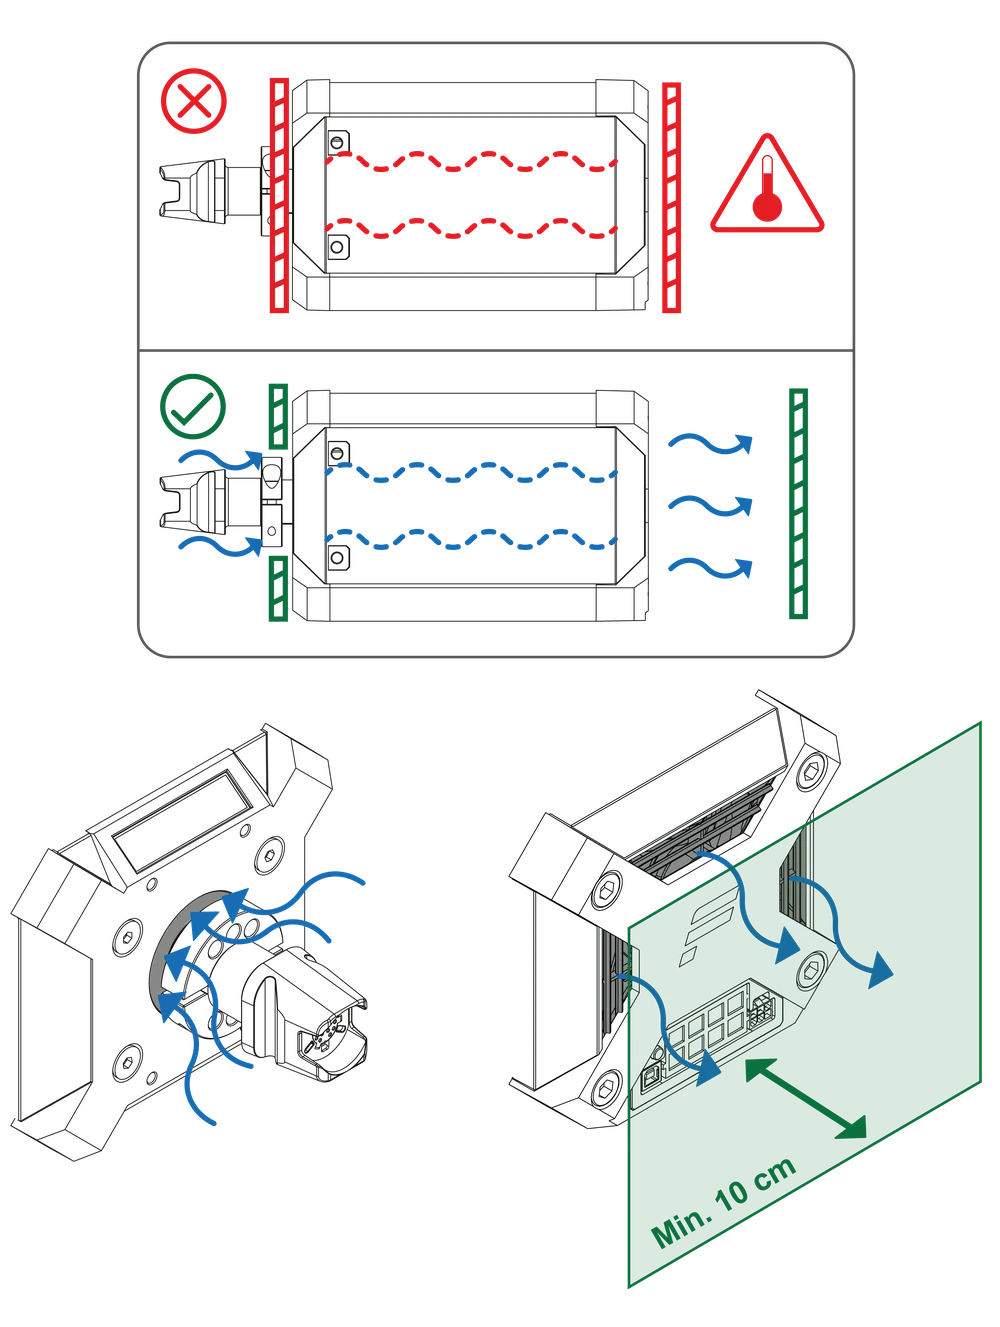
ATTENTION: See chapter E “Connections” for which type of peripheral devices must be connected to which port at the rear of the Podium Wheel Base DD1. All devices have to be connected to the Podium Wheel Base DD1 before powering ON to allow proper detection and operation. Only use the included USB cable from your Podium Wheel Base DD1 package contents to avoid damages! Ensure there is enough space around the wheel base to allow for air to circulate. The Podium Wheel Base DD1 uses an internal fan to expel hot air from the back of the device.
NOTE: Do not cover the air intake on the front side with accessories, and do not place any items in a 10cm range behind the wheel base to allow proper cooling airflow.
C - HARD-MOUNTING
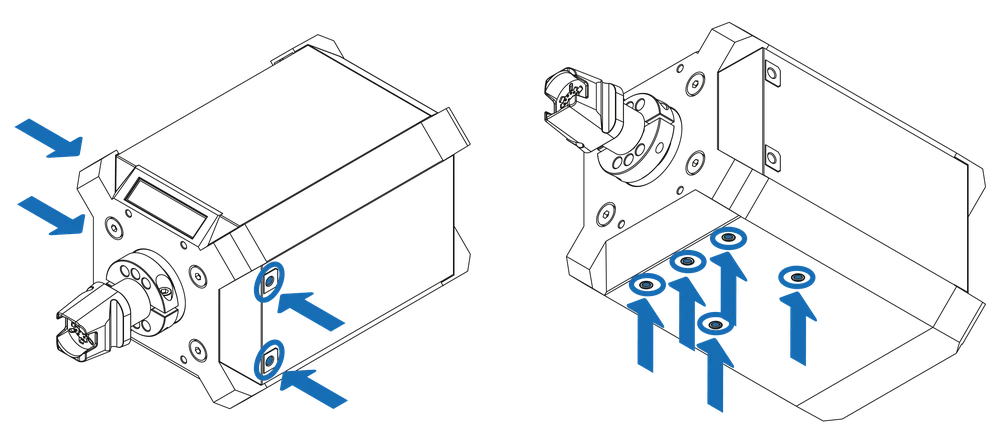
Hard-mounting from the side (left) or bottom (right) of the wheel base is possible.
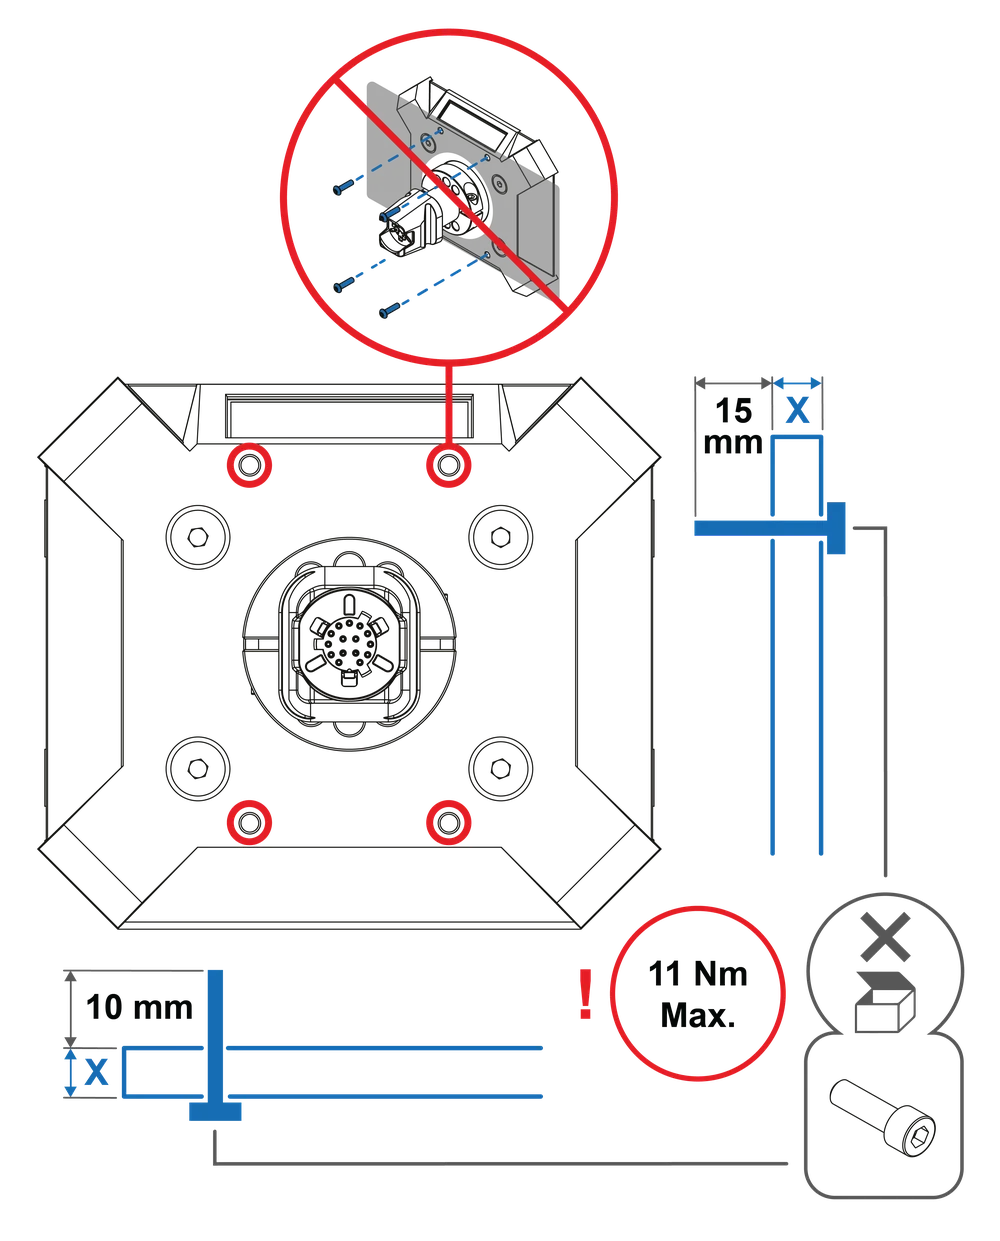
ATTENTION: Mounting holes at the front of the wheel base are NOT for hard-mounting! Only for peripheral mounting such as static shifter paddles or a dash display. Thread length: 10 mm
NOTE: Bolts not included. Use only good quality bolts when hard-mounting.
Bolt specifications:
M6x(10+X) mm for bottom mounting
M8x(15+X) mm for side mounting
D - STEERING WHEEL ATTACHMENT
NOTE: Images are only for the purpose of illustration. Steering wheel not included.
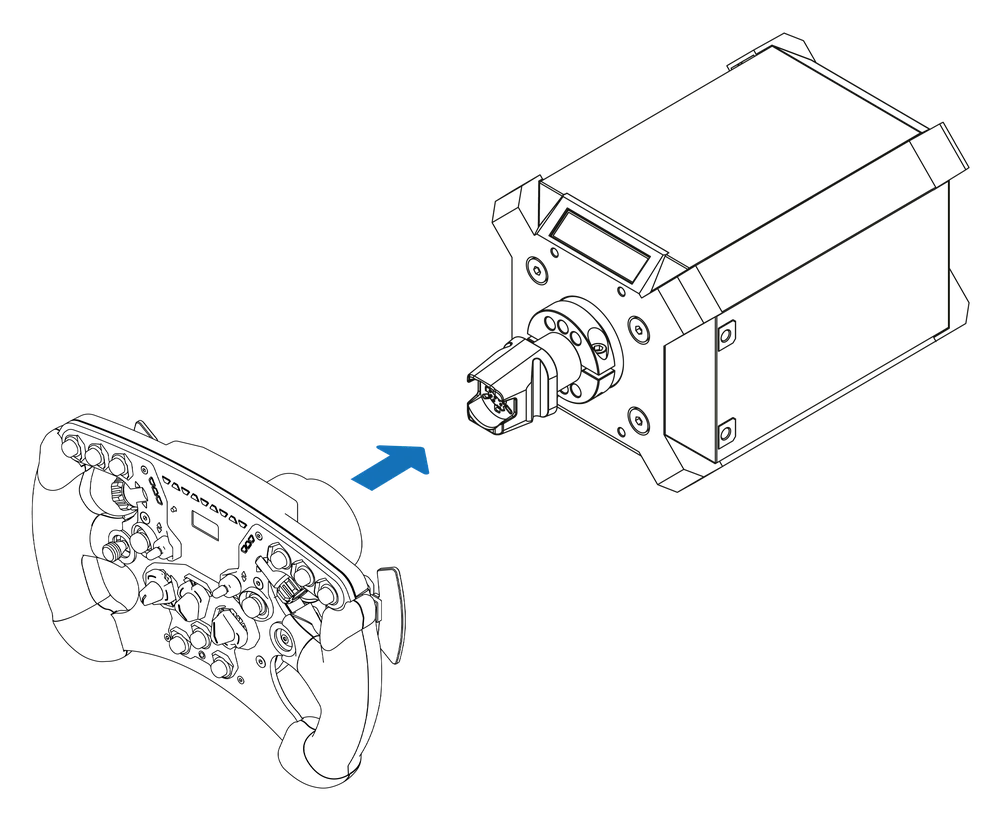
To attach a steering wheel, simply press the steering wheel QR2 adapter firmly onto the wheel base QR2 adapter.
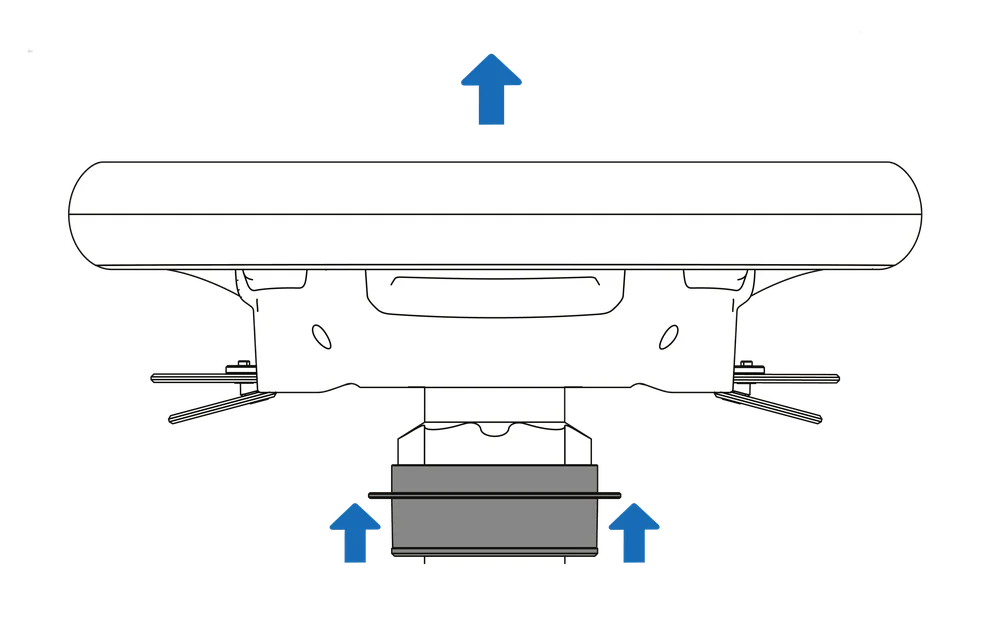
To detach the steering wheel, pull on the steering wheel QR2 adapter sleeve while simultaneously pulling the steering wheel away from the wheel base.
NOTE: Illustrations may differ from the actual product.
E - CONNECTIONS
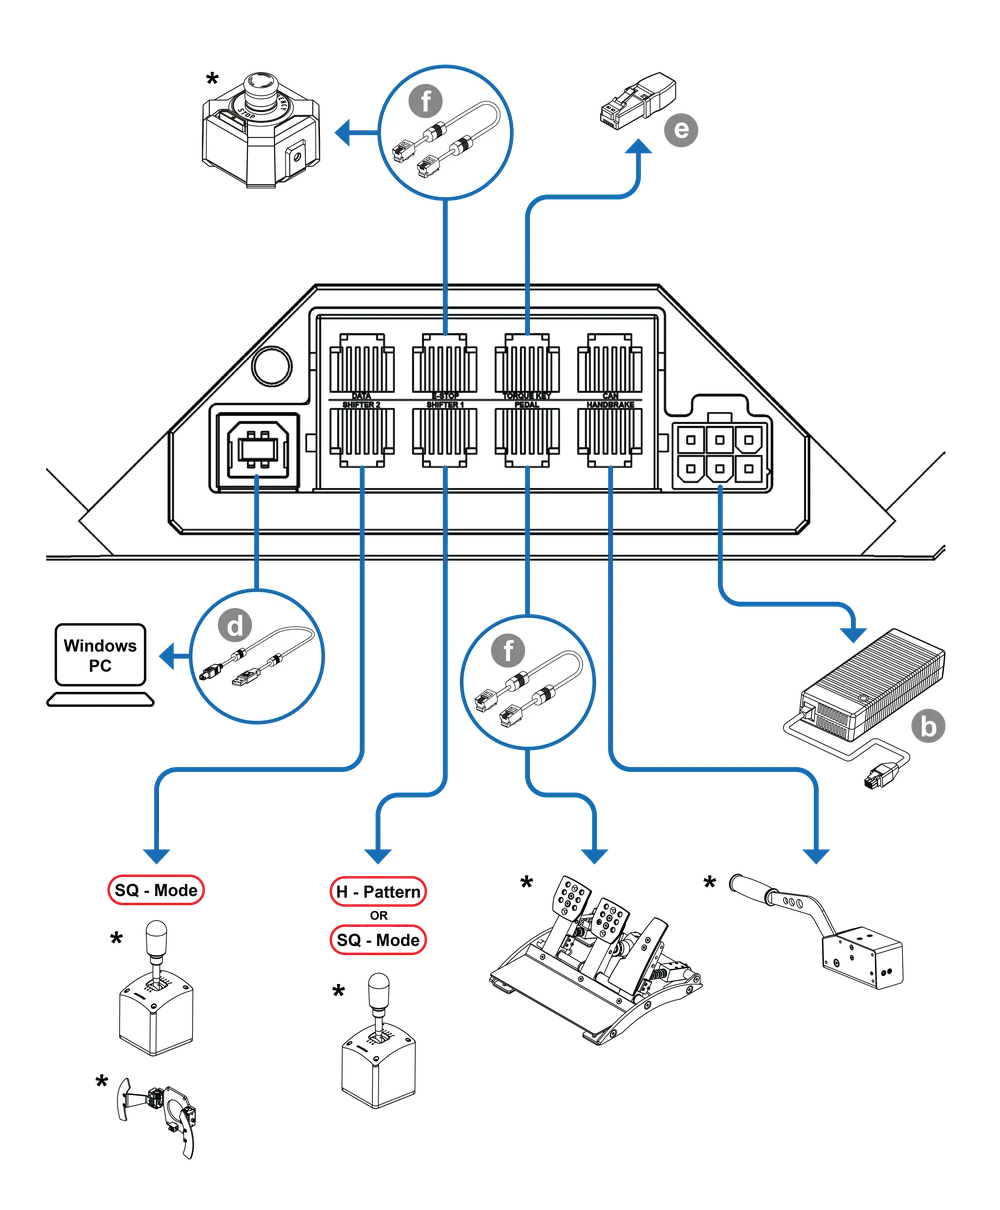
*Sold separately
The "CAN" port is intended for Future FANATEC® CAN peripherals.
F - ON / OFF
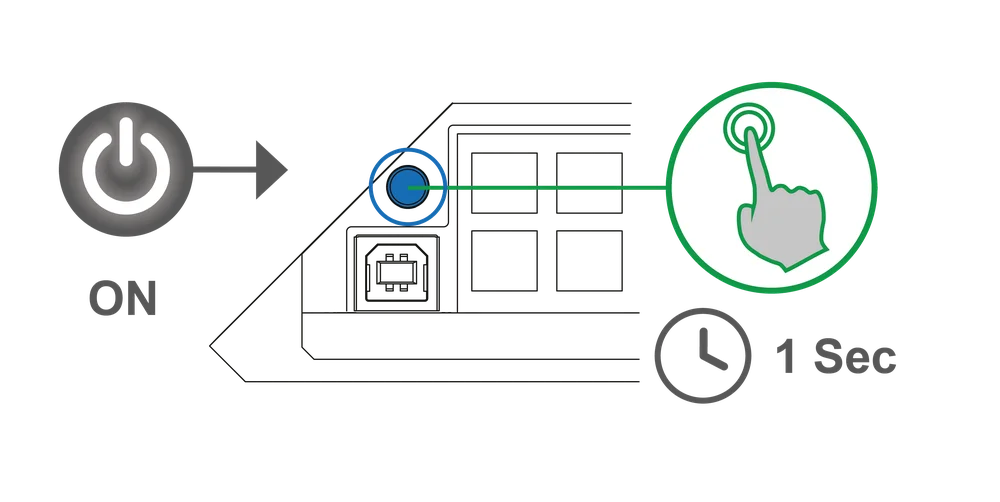
To turn on the wheel base, connect the system to electrical power and press the power button on the back of the wheel base. The wheel base will then immediately perform a start-up calibration.

To turn off the wheel base, press and hold the power button for 3 seconds.
G - TORQUE KEY
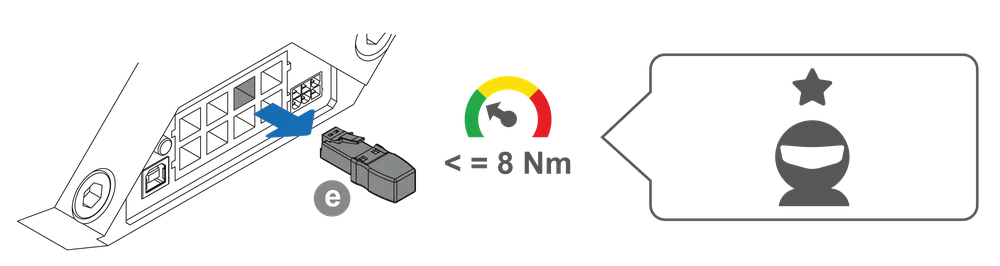
With the Torque Key (e) disconnected from the wheel base, maximum torque output is limited to 8 Nm.

With the Torque Key (e) connected, the wheel base outputs its maximum torque.
Note: Some steering wheels limit the maximum torque output of the Podium Wheel Base DD1 to 8 Nm of torque. Check the steering wheel product pages for more information.
H - MODES
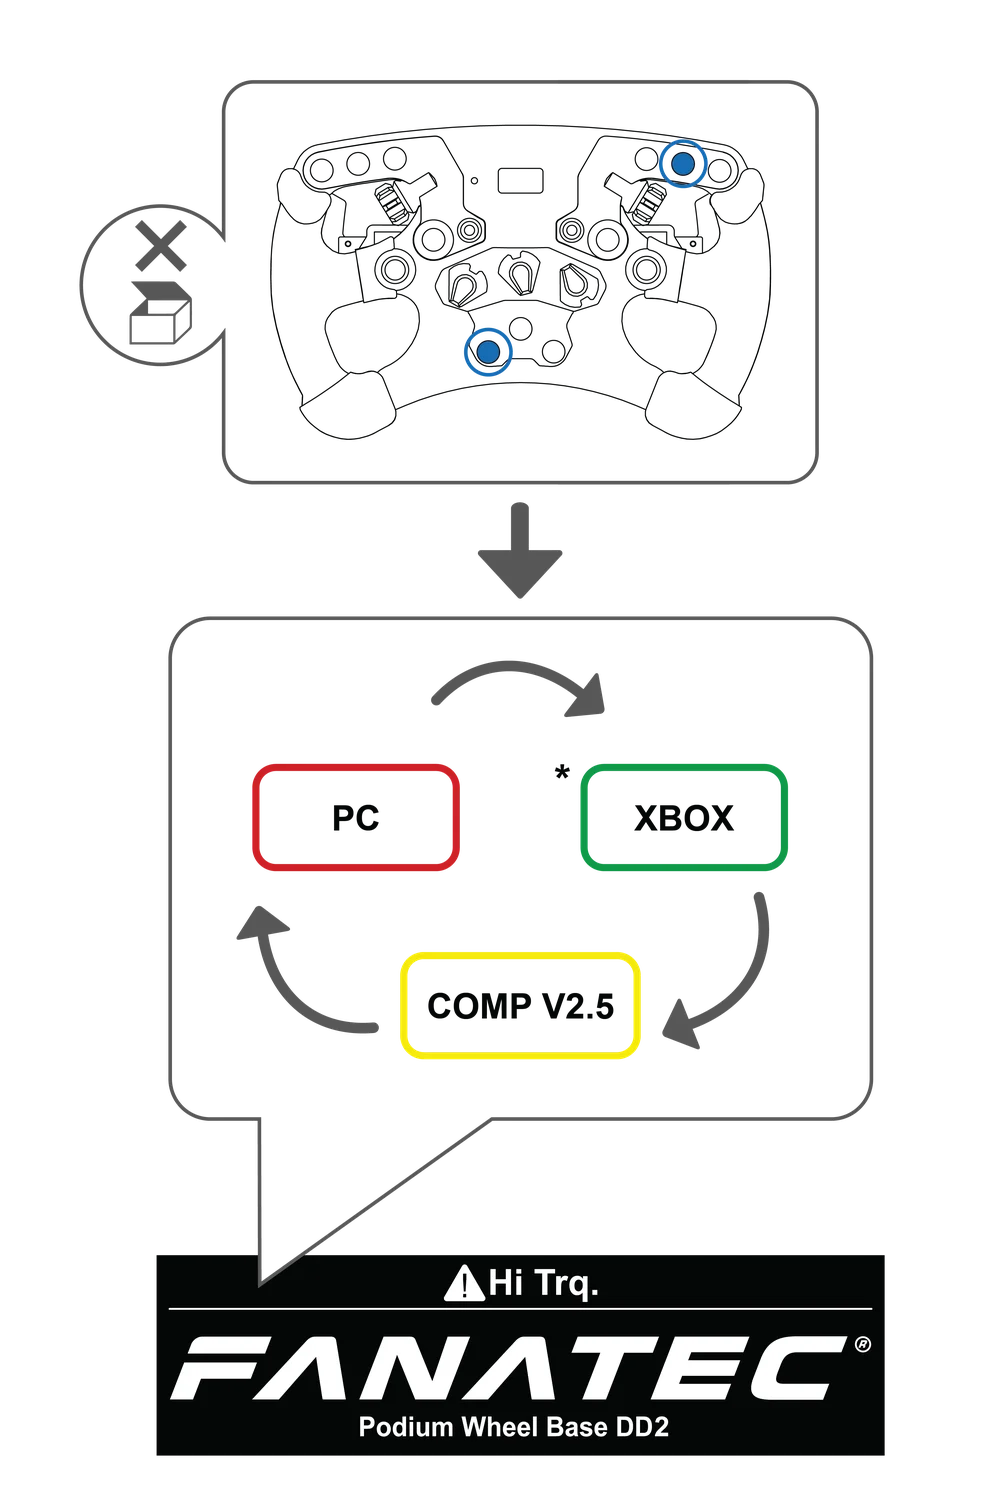
The Podium Wheel Base DD1 will start in “PC” by default. The OLED Display of the wheel base will show in the upper left corner the current operation mode. To change modes, a Fanatec steering wheel or hub is required. Simultaneously press the two highlighted buttons on your steering wheel (note: steering wheel sold separately).
NOTE: Each steering wheel has a different button press combination in order to change modes. Please see your wheel’s quick start guide in order to see which button press combination is required.
- PC: To operate with Windows PCs and any Fanatec steering wheel*
- Comp V2.5: To operate with older games on Windows PCs use this mode to emulate a ClubSport Wheel Base V2.5 with any Fanatec steering wheel*. There is no performance penalty when using this mode.
- Xbox: To operate with Xbox One and Xbox Series X|S using any Xbox-licensed Fanatec steering wheel*
NOTE: Once the mode is changed manually the Podium Wheel Base DD1 will remember the last active mode and will boot in the same mode next time. Exception: After firmware update is done.
* optional and not included in this product package
I - FIRMWARE UPDATE
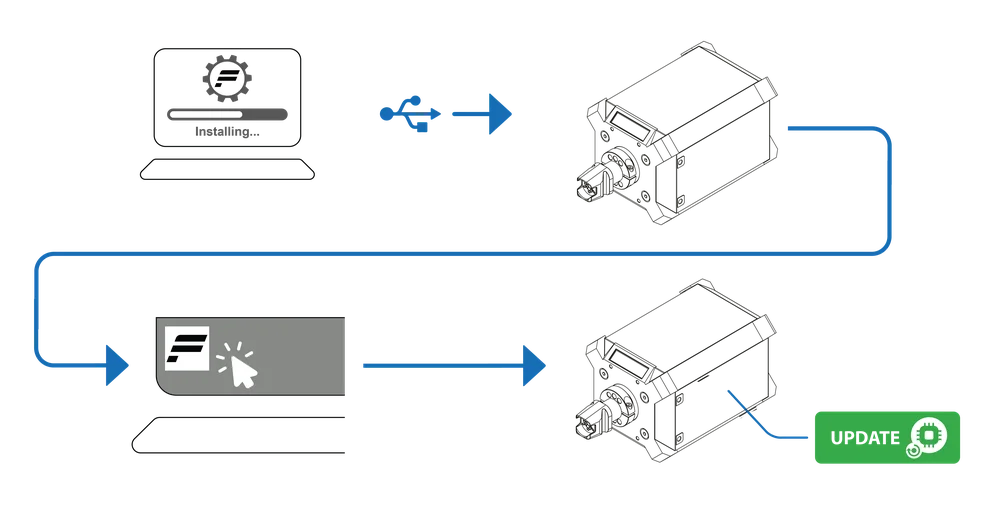
Install the PC driver, then connect your wheel base to your Windows PC via USB. Ensure that your wheel base is in PC mode (see chapter H “Modes” for instructions). Open the PC driver, select ‘Firmware Update’, then select ‘Open Firmware Manager’ which will guide you through the update process.
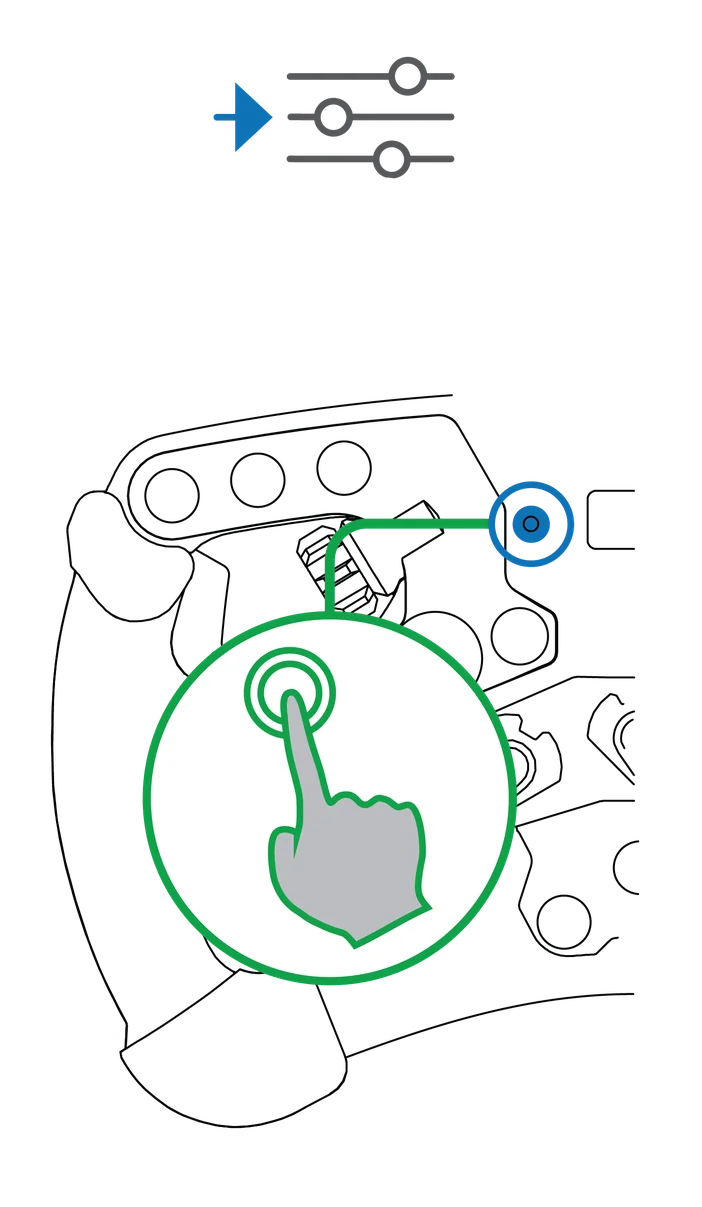
J - CENTER CALIBRATION
ATTENTION: When calibration is in progress, do not touch the attached steering wheel in order to avoid injuries or incorrect calibration. Every Fanatec steering wheel has a different button combination in order to perform a center calibration. Please refer to your steering wheel quick start guide in order to see which button combination is required.
NOTE: Images are only for the purpose of illustration. Steering wheel not included.

It may be necessary to calibrate the center position manually. This will be indicated by “CAL” flashing on the display of the steering wheel as shown on the right, then proceed with the following steps.
STEP 1 - Enter the Tuning Menu.

STEP 2 - Center the steering wheel.

STEP 3 - Press the button combination.
STEP 4 - Exit the Tuning Menu.
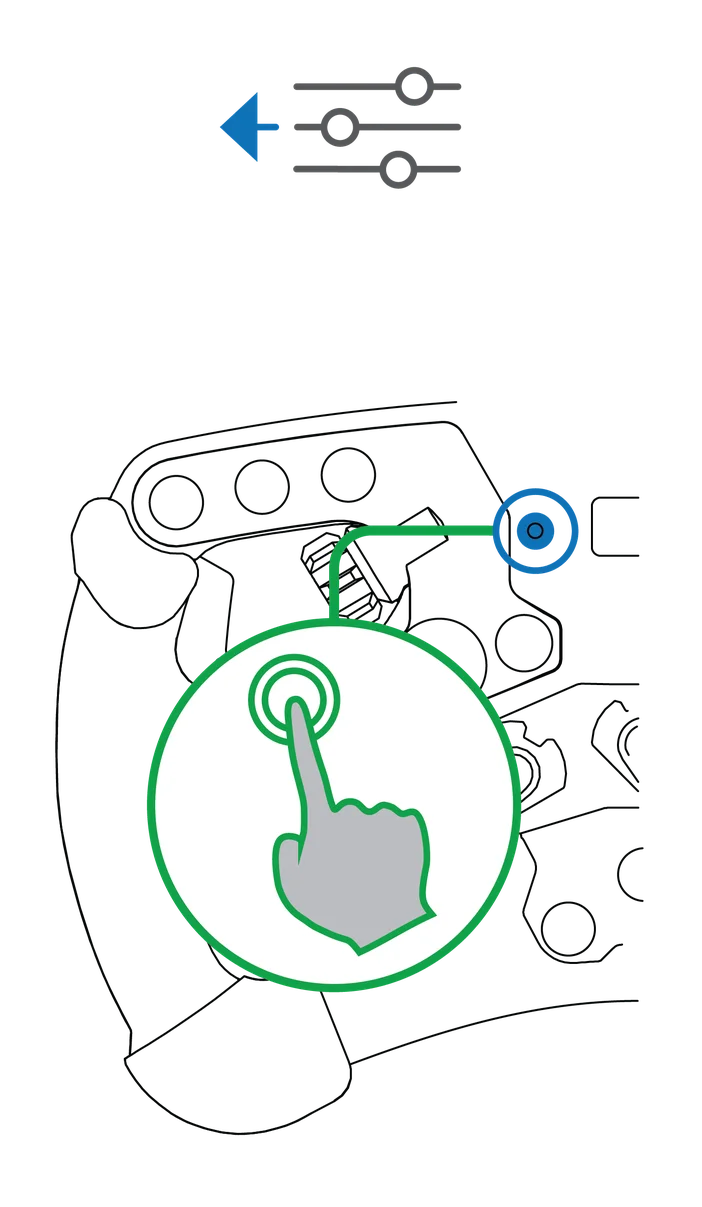
K - SHIFTER CALIBRATION
Every Fanatec steering wheel has a different button combination in order to perform a
shifter calibration. Please refer to your steering wheel quick start guide in order to see
which button combination is required.
NOTE: Images are only for the purpose of illustration. Steering wheel not included.

STEP 1 - In order to enter the H-pattern shifter calibration mode, press the button combination.

The OLED or 7-Segment display of the steering wheel will display the instructions in sequence.

STEP 2 - Put the H-pattern shifter lever into the position shown on the steering wheel display and acknowledge each gear position by pressing the indicated button.
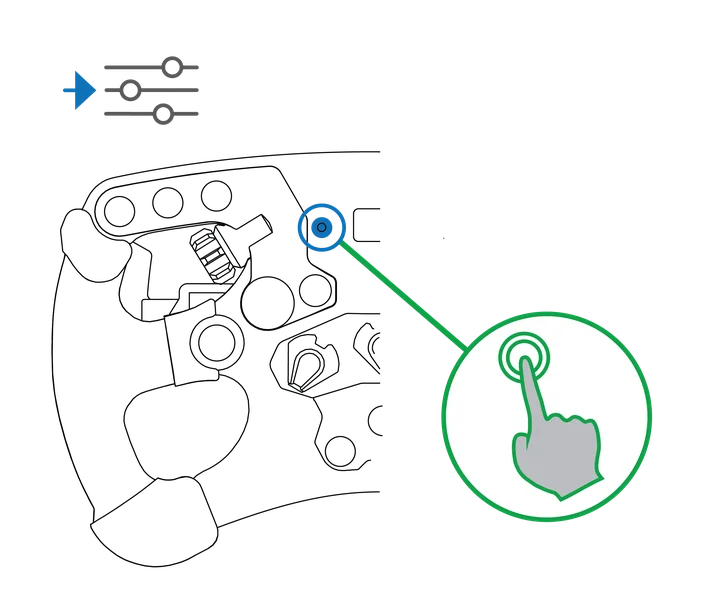
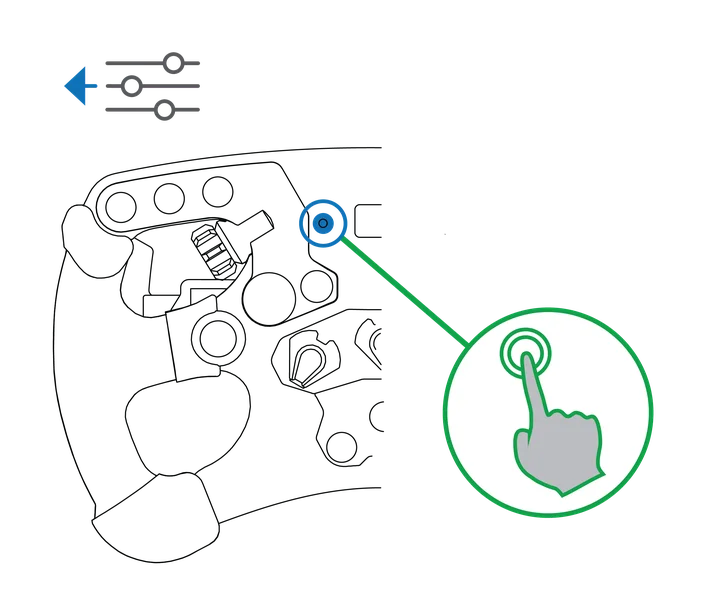
L - TUNING MENU
In order to enter the Tuning Menu, press the Tuning Menu button of the connected
Fanatec steering wheel. The Tuning Menu will be shown on the display of the connected
steering wheel. To navigate through the Tuning Menu, use the D-Pad or FunkySwitchTM of
the connected steering wheel.
NOTE: Images are only for the purpose of illustration. Steering wheel not included.
NAVIGATION
STEP 1 - Enter the Tuning Menu.

STEP 2 - Navigate the Tuning Menu parameters using the D-Pad or FunkySwitchTM
STEP 3 - Exit the Tuning Menu.
TUNING MENU PROFILES
NOTE: Read the quick start guide of the connected Fanatec steering wheel in order to perform various functions such as centre calibration via button combinations. Tuning parameters are subject to change and may be altered in future firmware versions.
Standard Tuning Menu
1 Auto + 1 Custom setup - Core parameters only
Advanced Tuning Menu
1 Auto + 5 Custom setup - All parameters
Auto Setup
Auto Setup allows games to control tuning parameter values for a force feedback experience as intended by the developer. Manual changes to tuning parameter values by the user are not possible.
Enter the Tuning Menu by pressing the Tuning Menu button and select ‘A SET’ to activate the Auto Setup. When a game actively uses Auto Setup, ‘A.SET.’ will be shown. If no game uses Auto Setup, the factory default tuning settings are used.
In order to view which tuning parameters are automatically adjusted, enter the Tuning Menu by pressing the Tuning Menu button. Select ‘A SET’, then navigate to the desired tuning parameter. Attempt to change the tuning parameter which will reveal the auto adjusted value.
Standard Tuning Menu
This Tuning Menu will activated by default when entering the Tuning Menu for the first time by pressing the Tuning Menu button. ‘A SET’ indicates the Auto Setup profile and ‘C SET’ indicates the Custom Setup profile.
This setup profile allows access to:
- SEN (Sensitivity)
- FF (Force Feedback)
- NDP (Natural Damper)
- BRF (Brake Force)
BRF is only available when a pedal set featuring a load cell brake is connected. These tuning parameters have slightly adjusted ranges to ensure the best possible standard tuning experience.
Cycle Standard and Advanced Tuning Menu
Pressing and hold the Tuning Menu button on your steering wheel for 4 seconds in order to switch between Standard and Advanced Tuning Menu as illustrated below. Press and hold for an additional 6 seconds in order to reset the Custom Setup profiles to the default values. Resetting the Tuning Menu will activate the Standard Tuning Menu.
Hold the Tuning Menu Button for 4 seconds to change the menu.
Hold the Tuning Menu Button for 6 seconds to perform a reset.
Advanced Tuning Menu
‘A SET’ indicates the Auto Setup profile and ‘1 SET’ to ‘5 SET’ indicates the Custom Setup profiles. These profiles allow full access to all tuning parameters without limitation.
TUNING MENU PARAMETERS
SEN (SENSITIVITY)
Standard SEN range: 180 … 1080 - AUTO SEN default: AUTO
Advanced SEN range: 90 … 2520 - AUTO SEN default: AUTO
Sensitivity defines the degrees of rotation. If SEN is set to 90 the steering wheel can only be turned 90° (45° left and 45° right from the calibrated centre position). If SEN is set to 2520 the steering wheel can be turned 2520° (1260° left and 1260° right from the calibrated centre position). If SEN is set to AUTO, the sensitivity is controlled by the PC driver or directly by the game (if it supports the feature).
FF (FORCE FEEDBACK)
Standard FF range: 005 … 100 - FF default: 100
Advanced FF range: OFF 001 … 100 - FF default: 100
Force Feedback defines the maximum strength of the motor when force feedback effects from software / games are sent to the wheel base. If FF is set to OFF, there will be no force feedback effect executed by the wheel base motor. If FF is set to 001, the motor will execute only 1% of the maximum motor power. If FF is set to 100, the motor will execute 100% of the maximum motor power. The final torque output is influenced by several factors, including the force feedback modifiers (see below), and the in-game settings. For stronger feedback, it is better to run a higher ‘FF’ value in the Tuning Menu rather than turning up the in-game strength value (to avoid clipping).
FFS (FORCE FEEDBACK SCALING)
FFS range: LIN (Linear) / PEA (Peak) - FFS default: PEA
FF Scaling reduces maximum FFB output by a small amount in order to guarantee a consistent output between peaks and holding forces as well as improved general linearity between game output and torque output. LIN activates this setting and PEA deactivates this setting.
| FFS Range | Max. Torque |
| LIN | 15 Nm |
| PEA | 20 Nm |
NDP (NATURAL DAMPER)
Standard NDP range: 25 … 100 - NDP default: 50
Advanced NDP range: OFF 01 … 100 - NDP default: 50
Natural Damper provides additional damping which can be adjusted from OFF to 100. 100 will have the strongest damping effect which reacts to the acceleration and angle of your steering. If turned OFF, your steering will have no additional damping, making it easier to turn the steering wheel. Natural Damper is useful for controlling the speed of the wheel during oversteer, and also helps to reduce wheel oscillation. Oscillation is typically caused by latency in the feedback loop, and is more apparent in racing games that are not optimised for high-torque motors. The default value of 50 provides a balance between steering responsiveness and oscillation mitigation.
NFR (NATURAL FRICTION)
NFR range: OFF 001 … 100 - NFR default: OFF
Natural Friction is used to simulate the mechanical feel of steering components. A higher setting results in more resistance when rotating the steering wheel. This can enhance the feeling of driving vehicles without power steering, or with very wide tyres. This setting may also help prevent oscillation.
NIN (NATURAL INERTIA)
NIN range: OFF 001 … 100 - NIN default: OFF
Natural Inertia simulates additional steering weight. This can be particularly useful when using lighter steering wheels such as steering wheels from our CSL Elite / CSL range. Additionally, the Natural Friction setting is smoothed on direction changes.
INT (FFB INTERPOLATION)
INT range: OFF 01 … 20 - INT default: 11
FFB Interpolation smooths and interpolates FFB by filtering game output without FFB detail loss. OFF = unfiltered, 01 = lowest filter, and 20 = highest filter.
FEI (FORCE EFFECT INTENSITY)
FEI range: 000 ... 100 - FEI default: 100
Force Effect Intensity adjusts the overall intensity and smoothness of force effects: 000 is the smoothest. 100 is the sharpest and most direct. Tuning this parameter can refine harsh or spiky force feedback signals in some games.
FORCE / SPRING / DAMPER EFFECT
FOR range: OFF 010 … 120 - FOR default: 100
SPR range: OFF 010 … 120 - SPR default: 100
DPR range: OFF 010 … 120 - DPR default: 100
These FFB modifiers allow you to change the FFB signals of a game (only applicable if games support these effects). Theoretically, there are three signal types which a game can send. Force (forces the steering wheel in a specific direction). Spring (pulls the steering wheel towards the dynamic centre). Damper (creates friction)
NOTE: Not every game uses all three types of effects and some games use only one type to create all three effects.
IMPORTANT: If Spring is adjusted to low values or OFF, the wheel base will not be able to move the attached steering wheel to the correct centre position after a centre calibration is performed. Only adjust these values higher than 100% if the FFB effects are not strong enough and weaker in comparison to other games. Raising one or more of these values may result in higher load on the motor and increase heat generation.
BLI (BRAKE LEVEL INDICATOR)
BLI range: 001 … 100 - OFF BLI default: OFF
Values from 001 to 100 sets the activation point for brake pedal vibration (only available when ClubSport Pedals V3 / V3i is connected). This feature works independently and therefore can be used with any game. It is useful for learning threshold braking technique. OFF allows pedal vibration to be controlled by a game directly (if supported).
SHO (SHOCK / VIBRATION STRENGTH)
SHO range: OFF / ON - SHO default: ON
The strength of the shock / vibration inside a Fanatec steering wheel and pedal set which features vibration motors can be set to either OFF or ON. These vibration motors can be used directly by the game if supported.
MPS (MULTI POSITION SWITCH FUNCTION)
MPS: AUTO; ENC; CONST; PULSE - MPS default: AUTO
ENC (Encoder): The MPS simulates two buttons, one when rotating the MPS left and one when rotating the MPS right.
PULSE: The MPS outputs a specific button signal for each position which is only sent as a single pulse when you rotate the switch.
CONST (Constant): The MPS outputs a constant button signal for each position.
AUTO (Game specific): The game can decide which mode is appropriate.
NOTE: Only available if you are using a Fanatec steering wheel featuring multi position switches such as the ClubSport Steering Wheel Formula V2.5. Additionally this feature must be supported by the game to function.
AP (ANALOGUE PADDLES)
AP: CbP; CH; bt; AnA - AP default: CbP
CbP(Clutch Bite Point): This feature can be used in any game with an analogue clutch axis. Both left and right analogue paddles work in parallel; the primary paddle is determined by which is pressed further.
CH (Clutch / Handbrake): Left paddle = Clutch. Right paddle = Handbrake.
BT (Brake / Throttle): Left paddle = Brake. Right paddle = Throttle.
AnA (Mappable Axes): Paddles can be mapped as two additional axes. This may be shared with the analogue joystick on some steering wheels.
NOTE: Only available if you are using a Fanatec steering wheel or add-on shifter paddles featuring analogue paddles which do not have a dedicated hardware switch for different analogue paddle modes.
| Clutch bite point configuration steps | |
| Simplified | Advanced |
|
• Press both clutch paddles simultaneously to a least 5% to activate, • Release one paddle whilst keeping the other fully pressed. The display • Set the released paddle to the percentage where your car’s clutch • As soon as the virtual start lights turn green, completely release one • Release the second paddle once a suitable speed is reached for the |
• Completely press and hold one clutch paddle. • Press the FunkySwitchTM D-pad stick down. “100” will be shown on the display. Rotate the FunkySwitchTM in order to change the • Release the paddles to set and store the desired value. You can have • At race start, press both paddles again to activate the bite point mode, • Release the second paddle once a suitable speed is reached for the |
BRF (BRAKE FORCE)
CSP V3 / V3i: Lo -> 001 ... 100 -> Hi - BRF default: 050
CSL E P LCK / CSL P LCK: Lo -> 010 ... 100 -> Hi - BRF default: 050
Brake Force changes the force needed to reach 100% brake input for load cell brake pedals and is available when a pedal set featuring a load cell brake is connected to a wheel base via RJ12 and to a PC via USB. ‘Lo’ requires the least amount of brake pressure, 100 requires the most amount of brake pressure.
M - OLED DISPLAY

The Podium Wheel Base DD1 features an OLED Display which by default shows the Fanatec logo, detected peripherals, USB connection and operation mode. The display can also show alternative screens with different data, for example installed firmware versions, torque curves or device temperatures.
To switch the screens first press and hold the Tuning Menu button of the attached steering wheel and then navigate through the screens by D-pad or FunkySwitchTM directions. Refer to the user manual for more details about the screens and also to the individual quick start guides of the steering wheels for the Tuning Menu button and FunkySwitchTM.
| FunkySwitchTM / D-Pad | Display | Menu |
 |
Default Screen | |
 |
Force Feedback Analysis |
|
 |
Motor Data Analysis |
|
 |
Temperature Analysis |
|
 |
System Info |
N - CLEANING
Clean only with a dry or slightly damp microfiber cloth.
ATTENTION: Using cleaning solutions may damage your wheel base.
O - TROUBLESHOOTING
The Podium Wheel Base DD1 must not be modified differently other than explicitly described in this manual. Corsair Memory, Inc. expressly prohibits analysis and utilisation of the electronics, hardware, software, and firmware contained in this device. In case difficulties occur regarding utilisation of the Podium Wheel Base DD1, please use the following troubleshooting guide. You will find further details and contact information on help.fanatec.com.
If the Podium Wheel Base DD1 is not working properly:
| Problem description | Solution |
| The steering wheel is not properly centred after a firmware update of the Podium Wheel Base DD1 has been performed. | After performing a firmware update of the Podium Wheel Base DD1, the wheel center position must be manually calibrated. See J “Center Calibration” of this manual for more details. |
| The H-pattern shifter is not working properly after a firmware update of the Podium Wheel Base DD1 has been performed. | After performing a firmware update of the Podium Wheel Base DD1, the H-pattern shifter must be manually calibrated. See K “Shifter Calibration” of this manual for more details. |
| The driver window does not show the attached steering wheel. | Ensure that you have updated your Podium Wheel Base DD1 to the latest firmware version which is contained in the latest PC driver and can be downloaded from https://www.fanatec.com/s/download-apps-driver |
| Check the pins inside the Quick Release of your steering wheel. These must not be bent or damaged. | |
| Try to use another steering wheel. If this is also not detected, the Podium Wheel Base DD1 may be damaged. | |
| The PC driver is unable to switch the wheel base into update mode. | When OFF, hold power button for 8 seconds in order to boot into bootloader mode. Attempt to update firmware via the Firmware Update Assistant. |
| The Tuning display does not show anything or is not working properly. | Try to use another steering wheel. If this is also not working properly the Podium Wheel Base DD1 may be damaged. |
| Check the pins inside the Quick Release of your steering wheel. These must not be bent or damaged. | |
| After booting on the Podium Wheel Base DD1, the start-up calibration is not working properly. |
Ensure that you have updated your Podium Wheel Base DD1 to the latest firmware version which can be downloaded from |
| After start-up calibration of the Podium Wheel Base DD1, the attached steering wheel does not return to the correct center position. | The wheel base might require a manual center calibration. See chapter J “Center Calibration” of this manual for more details. |
| RevLEDs, FlagLEDs and / or display does not work in specific games. | Older titles may not support recent wheel bases. A possible solution is to switch to the “PC Compatibility Mode”. Also please check out the Fanatec App which may add support for some titles and features. |
| How can I get in contact with Fanatec customer support? | There is a chat service on our website, or you can create a Support Ticket via the ‘My Products’ section of your Fanatec account. help.fanatec.com |
| The PC driver or the wheel base does not recognise a conneccted set of Fanatec pedals. | Make sure that you have updated your wheel base and ClubSport USB Adapter firmware to the latest firmware version contained within the latest PC driver which can be downloaded from https://www.fanatec.com/s/download-apps-driver |
| Ensure that the used RJ12 cable is only that which is included in the pedals package content. | |
| Ensure that the RJ12 cables are plugged in the correct ports of the pedals located on the gas pedal module and the correct ports of the wheel base and ClubSport USB Adapter. | |
| The conneccted set of Fanatec pedals, pedal signals are not correctly indicated or verified by the PC driver after start-up. | When starting-up the pedals, every pedal lever must initially be pushed to the maximum position and then fully released back to the minimum position. |
| After playing a while the Podium Wheel Base DD1 seems to become weaker or is fading. |
When the motor temperature is close to the upper |
| After playing a while the Podium Wheel Base DD1 motor has switched OFF. |
When the temperature is exceeding the upper limit the motor will be deactivated for a while until the temperature is low enough (to protect the hardware from damages). Let your Podium Wheel Base DD1 cool down before continuing to use it. Contact our customer support if this happens consecutively. |
| Fan is always working in full speed even though the Podium Wheel Base DD1 was just powered ON and did not heat up due to driving yet. |
In case of malfunctioning temperature sensor the fans will work at maximum speed to protect the hardware from overheating. Please contact our customer support. Note: Operating room temperature: 15°C-35°C |